Quantcast
Channel: Fly Fish Food
Viewing all 629 articles
Browse latest View live

New Fly Rod Unboxing: Loop Cross SX

$
0
0

A new rod in the house!


We were stoked to hear about Loop's new Cross SX series of fly rods a few weeks back and had
heard some really good feedback from a few folks who had tried them out. Of course, we had to get an order in and try them out for ourselves. Here's a little unboxing and first-look video we did as they arrived in the mail. Stick around for a more in-depth review later on....


The Foamerger: Midge Emerger Extraordinaire

$
0
0

My go-to midge pattern for fussy fish

Updated dressing for the Foamerger

This is literally one of the easiest patterns you'll EVER tie.

The pattern, however, was designed out of pure frustration. I was fishing a phenomenal midge hatch on

the Green River in Utah one day and after a couple of hours of fishing my traditional midge patterns (griffith's gnats, true midge dries etc), the score was: Picky Trout -- 1000; cold dumb midge fisherman -- 1. I landed only one fish in three hours. As I packed up and picked the pieces of my ego up from the rocks, a dude comes walking along the trail, sees the rising fish, takes one cast and nails a fish. Must've been luck. Next cast: fish on. I suck.

As I walk by, he actually strikes up a conversation and I came to find out he was fishing a fly his son had given him and he wasn't sure of the name. It was a variation of a palomino midge and it was designed to sit in the surface film.With new hope of redemption for my next midge encounter, I got busy trying to understand what it was about that style of pattern that made such a difference. I came to understand, as a lot of people already know, midges have a tendency to hang vertically in the surface film as they struggle to emerge from their pupal stage to an adult. With this in mind, I sat down at the vise to figure out a pattern that fit the bill. The palomino was ok, but when I tried to get it to float vertically, it didn't look much like the pictures of real insects I was looking at. After a bit of trial and error using different materials and patterns, I found one that floated vertically and resembled the bugs. I tied up a few more and set out for the Green the following week.


The fish gods were smiling on me that day as my new little midge invention did the trick. I fished the same hole and came up with much different results as I lost track of the number of fish I hooked that day. My friend fishing across the way, ended up with 1 fish as he refused to change from his good ol' Griffith's gnat. Anyhoo...the fly was dubbed the "Foamerger" and earned a permanent spot in my midge boxes from then on.

Foamerger in the surface film


As it also turns out, this pattern has far outpaced any of my tried-and-true Baetis patterns during the early stages of the Baetis hatch in the Spring. I can't remember why, exactly, I tied it on one day in early Spring as the Baetis turned on, but it turned a so-so day fishing into a great day of dry fly fishing for nice Brown Trout. So I made a point to keep it in the mix even when the Baetis hatch grew stronger and the midges less important. Time after time, this little stupid looking fly kicked the snot out of my Baetis patterns. I'm guessing it's the way it hangs in the surface film or maybe just the overall general impresssion of an emerging bug, but either way, it's been good to me.

UPDATE:
I realize this video needed an update and figured it was a good time to add a variation on this original pattern. I would use the old "dressed down" style on anything smaller than a #24 and the new style with its wing buds and brushed body on larger patterns. The one in the new video here is an #18


Hook: #18 and larger: Partridge Czech Emerger #18 (+)  For smaller sizes: Daiichi 1130 #18 - #32 (+)
Thread: Danville 70 Denier Black (+)
Shuck: EZ Magic Dub, Black (+)
Thorax: Gray or Black Ice Dub dubbing to match natural (optional) (+)
Head: Gray or Black Evazote 3/16" foam (+)


Size #26 Foamerger (original style)


Streamworks Scissors: Review

$
0
0

Another player on the market

Adjustable Tension 5" 

After a vigorous effort in cleaning up my desk last month it's almost back to the point of no return.  The thread is exploring all the nooks and crannies of my desk like little cobras looking for trouble, and the marabou is basically honey badger marabou because it just does whatever it wants. I'm OK with that, because a disaster zone on my desk spawns creativity.  Aside from the fact that I have a maze of thread snippings and tufts of marabou orchestrating a hostile takeover of my desk, I realized that I have a pretty impressive collection of scissors right now.  I use all of them for different purposes and for different time frames, and I'm not about to stop aquiring new models.  See, for the addicted fly tyer, new scissors being introduced to the market is like a fat kid (Cheech) going to the gas station and seeing a new flavor of Cheetos...  The fat kid buys Cheetos...  I digress, even though I love Cheetos (but my keyboard doesn't...  Which leads me to think that I should invent an orange keyboard...  yep.  anyone want to start a kickstarter campaign with me?)

Ok, so the above is a very good example of the adult onset ADD-ish scatterbrainedness that I deal with every day;)

I'll try to stay on track here, because there is some important reviewing to do with the new Streamworks scissors that we have been playing with lately.  I used to have some Streamworks fly boxes and tools a long time ago, but I hadn't really seen any of their scissors until they showed up a few weeks ago.  One thing that we have heard over and over again from tool startup companies is that their stuff is just as good as the "expensive" stuff that the other guys sell because it comes from the same factory in Pakistan.  Usually the "other guys" means Dr. Slick.  I say that because Dr. Slick is usually the brand that holds the standard for quality in the fly tying tool arena, especially for scissors (even though I have gotten a pair or two from Slick that were less than spectacular).  The reality is that the majority of tying scissors come from Pakistan, and for the most part, the factories over there do a decent job.  If the same product were made in the USA, we'd probably be paying upwards of $100 per pair.  The issue with the scissors from Pakistan is that their quality control is usually not up to US standards even though they promise up and down that they are "very very good my friend...  I'll make you a deal my friend." To make a Pakistani scissor into a premium product, some good ol''Murican quality control needs to take place.  Dr. Slick does it, Rising does it, and after talking with Streamworks, we verified that they do it too.  A claim that quality control takes place could mean anything from "we break down each pair and put it through rigorous tests," to "we make sure the color is right," so we were very interested to see where the Streamworks products fell in line.  They sent us each the 4.5" arrow point, the 4.5" spring action scissors, 4" all purpose curved scissor, the 4" all purpose tungsten scissors, and the 5" adjustable tension scissors.  Of all the scissors, I was immediately most interested in the 5" adjustable tension scissors (similar to razor scissors), and the 4" tungsten scissors.  We have had really good luck with the Dr. Slick Tungsten scissors, so I was curious to see how these would hold up; and the adjustable tension scissors were listed at a much lower price point than other comparable scissors.  The initial inspection definitely showed that there was additional tweaking and polishing done to these - kudos to Streamworks...

I have been tying with these for about a month now, and I do my best to change them all out for different applications so I can get a good idea of how they will perform.  Here are my top 3.

1st place: 4" All Purpose Tungsten Scissors
The Tungsten scissors are definitely my favorite because of the nice edge that they can keep.  The
Add Tungsten 4"
harder metal allows them to perform for a longer period of time than regular scissors, and I even accidentally dropped them tip first onto a concrete floor with very minimal damage. My concrete floor has been the kryptonite for many a pair of fancy scissors (which subsequently get thrown across the room like Nolan Ryan aiming at Robin Ventura's face.)  I was stoked to see that these scissors were still usable after their fall.  The only thing that I'd like to see better on these is a finer tip for precise cutting behind beadheads etc.  They are absolutely comparable to Dr. Slick Tungstens (I wish they were finer too.) MSRP $24.95 BUY HERE

2nd place: 5" Adjustable Tension Scissors 
These scissors were intriguing to me because they are basically a razor scissor at the price of a regular scissor (MSRP $14.95), AND they have the good serration situation that I really like.  One blade is serrated and one blade is smooth, and for whatever reason, that combination cuts through materials like Curtis cutting in line to buy a new pocket protector.  Obviously a 5" scissor is a bit much for most general tying situations, but they really found a home on my bench when it came to trimming game changer style flies.  The blade was long enough to maintain the angle I needed, and the blades cut through the body wrap material with no problem.  If they come out with a 4" version of this scissor, it will be a force to be reckoned with.  Downfalls? Nothing really, except for they need finer tips. BUY HERE

3rd place: 4.5" Spring Action Scissors
This was the biggest surprise to me because Curtis and I did a review on similar scissors a while
Adjustable Tension 4.5"
back, and we were less than impressed.  My expectations weren't very high at all, but I was pleasantly surprised to find that they actually had a really good edge on them!  I tied a bunch of midges with them, and I think that's where they will fit into my rotation due to the limited opening space.  Even though they are 4.5" scissors, the actual blade is really short, so they are designed for finer tying.  They felt a bit weird in my hand at first, but I eventually got used to them after tying a few bunny midges.  This scissor would benefit from a very very fine blade, but they performed well enough right out of the box. MSRP $11.95 BUY HERE

The other two pair of scissors were good, but I really didn't tie with them very much because I typically don't like arrow points or curved scissors.  One thing I will say about the curved scissors is that they are just slightly curved, which is something that I prefer if I'm using them.  My last pair of Dr. Slick curved blade scissors were curved so much that they were almost unusable...  All in all, these are very solid scissors that are from overseas, but get a lot of good ol' American elbow grease to make sure they are up to par quality wise with what we expect.  

~ Cheech

Street Sweeper - Articulated Streamer Pattern

$
0
0

More brushes than a street sweeper


Street Sweeper


It's no secret that fish love to stick flashy things in their mouths.  Some of my most effective patterns are almost entirely made of flash because of how the fish react to seeing such a huge wad of shiny plastic strings.  The Articulated Trout Slider, and the Sparkle Minnow Variation are prime examples of flies that go above and beyond with flash... The Street Sweeper is no different.  It's kind of funny
Blue Halo + Street Sweeper = Rainbow
how it all works out too, because I have heard countless people that use little to no flash because they learned somewhere that flash should be used in moderation.  Well... I'd say that's true sometimes.  Just like it's true that other times your fly should look like a Las Vegas billboard advertising an all you can eat lobster and filet mignon buffet!  The Street Sweeper is the Vegas buffet of flies.  

I use two basic brushes on this fly, and the first one is very simple: gold and red ice dub.  The second brush uses gold and red ice dub, tan craft fur, and barred UV predator wrap.  the trick is to go kind of sparse with the craft fur, and cut the predator wrap fibers off the "stem" and lay them on the brush kind of sparsely.  I use one entire length of predator wrap on a 15" brush.  I'd recommend making up a bunch of these brushes before you start tying these.  For more information on how to make a dubbing brush, and a list of tools to make great streamer brushes, click HERE.


Gold
Hook: Gamakatsu B10S #1 (+)
Thread: Danville 140 - White (+)
Tail: Nature's Spirit Prime Long Marabou - Tan (+)
Body (in brush) Ice Dub - Gold (+)
Body (in brush) Ice Dub - Red (+)

Articulation beads - Ruby Red (+)
Articulation wire - (+)
Flymen fish spine shank - 15mm (+)

Hook: Gamakatsu B10S 1/0 (+)
Eyes: Fish Skull Living Eyes - Fire 8mm (+)
Tail: Nature's Spirit Prime Long Marabou - Tan (+)
Body (in brush) Ice Dub - Gold (+)
Body (in brush) Ice Dub - Red (+)
Collar (in brush) Ice Dub - Gold (+)
Collar (in brush) Ice Dub - Red (+)
Collar (in brush) Craft Fur - Tan (+)
Collar (in brush) Predator Wrap - Barred UV (+)


Silver
Hook: Gamakatsu B10S #1 (+)
Thread: Danville 140 - White (+)
Tail: Nature's Spirit Prime Long Marabou - Muskrat Gray (+)
Body (in brush) Ice Dub - Silver (+)
Body (in brush) Ice Dub - Red Red (+)

Articulation beads - Ruby Red (+)
Articulation wire - (+)
Flymen fish spine shank - 15mm (+)

Hook: Gamakatsu B10S 1/0 (+)
Eyes: Fish Skull Living Eyes - Ice 8mm (+)
Tail: Nature's Spirit Prime Long Marabou - Muskrat Gray (+)
Body (in brush) Ice Dub - Silver (+)
Body (in brush) Ice Dub - Red (+)
Collar (in brush) Ice Dub - Silver (+)
Collar (in brush) Ice Dub - Red (+)
Collar (in brush) Craft Fur - Medium gray dun (+)
Collar (in brush) Predator Wrap - Barred UV (+)

Chartpak black (+)
Chartpak Dark brown (+)
Tear Mender (+)
Loon Applicator bottle (+)
Cautery tool (+)
Loon Fluorescing Resin (+)
Streamworks 5" Scissor (+)

Deep Dish Green Drake Nymph

$
0
0

A Beefy Bug


Photo from Troutnut.com
I remember the first time I ever saw a Green Drake nymph while seining a local small stream. I thought, based on the juicy plumpness of the bug, any self-respecting trout would treat it like a comparable Porterhouse steak. Turns out, that's not too far from the truth, so I like to come to the river armed with a few beefy drake patterns to imitate these obese nymphs.

Before jumping into the tying part, it's good to understand what we're dealing with here. Cheech calls this #nerdalert. I call it getting to know what to feed the fish.

The Green Drake or Western Green Drake is part of the Ephemerellidae family and is an oft-pursued "destination" hatch on many waters in the West, including the famed Henry's Fork in Idaho. Like their cousins, the more common Pale Morning Dun (PMD), Drakes are crawlers, which account for the super-buff Arnold Schwarzenegger-esque legs. You'll also find another smaller Drake species in the Drunella genus, commonly known as Flavs or Lesser Green Drakes. They too can be imitated along the same lines here and this pattern was designed to handle both. Simply adjusting the size up or down will cover the bases on both bugs.

Deep Dish Green Drake
With any pattern, there's always a balance of tying difficulty, imitation and usefulness. So I usually decide, mostly through trial and error, what constitutes a must-have feature on a fly based on these three aspects. With the Deep Dish, it's a bit more involved than say the piece-of-cake Dubbing Emerger which could be turned into a drake by simply varying colors, but isn't so crazy that you're having to tie in three sets of perfectly matching legs.

But all in all, this is actually a fun pattern to tie and it's really not too difficult. Give it a try. We've also included a couple of variations to handle darker or lighter nymphs. I normally carry a darker version because the nymphs are often very dark green, bordering black. So it's good to have both flavors here....

Olive (Light)


Hook: Daiichi 1530, #12 (+)
Thread: Danville 70 Denier, Peacock Green (+)
Under-Body: .020 Lead Free Wire (+)
Bead: Mayfly Nymph-Head, Clinger & Crawler, Small, Olive (+)
Tail/Body: Pheasant Tail, Dyed Olive  (+)
Ribbing: UTC Ultra Wire, Olive, Small (+)
Thorax: Hare'e Ice Dub, Olive Brown or Peacock (+)
Legs: Dyed Hungarian Partridge, Olive (+)
Wing Case: Fino Skin, Brown (+)
Back Stripe: UNI Double Sided Mylar, Orange/Peacock #16 (+)

NOTE: For a bigger bug, go with a #10 hook and the medium sized Nymph-Head, #8 would be the large sized Nymph-Head

Other Tools, materials:
Loon UV Fluorescing Clear Fly Finish (+)


Black (Dark)

Hook: Daiichi 1530, #12 (+)
Thread: Danville 70 Denier, Black (+)
Under-Body: .020 Lead Free Wire (+)
Bead: Mayfly Nymph-Head, Clinger & Crawler, Small, Black (+)
Tail/Body: Pheasant Tail, Dyed Black (+)
Ribbing: UTC Ultra Wire, Black, Small (+)
Thorax: Hare'e Ice Dub, Black (+)
Legs: Dyed Hungarian Partridge, Black (+)
Wing Case: Fino Skin, Black (+)
Back Stripe: UNI Double Sided Mylar, Orange/Peacock #16 (+)


Low Brow Articulated Streamer Pattern

$
0
0

Fish like food - Feed them meat


low·brow
ˈlōˌbrou/
adjective
adjective: low-brow
  1. 1.
    not highly intellectual or cultured.

The Low Brow kind of just happened one day at the vise while I was covered head to toe in flash and craft fur.  I was in the middle of making a bunch of dubbing brushes, and I had an idea for a black, red, and blue brush a.k.a. Midnight Fire.  I wanted kind of a more neutral pattern that wouldn't sink quite as quickly as the Street Sweeper, and I also had an epiphany that I needed to tie more with silicone streamer legs in my flies.  Like the Street Sweeper, this pattern uses two different types of dubbing brushes, but it also adds the element of silicone legs, rabbit, and ballz-eyes at the head to make it move in the water a bit differently.  

For the flash part of these brushes I'm using the metallic colors of ice dub (which are very straight fibers) and ice wing fiber cut to 2" lengths.  The best way to cut up a bunch of ice wing fiber is to lay it on one of those fancy cutting boards and try to preen it all so it's all facing relatively in the same direction.  Then take a circular fabric cutter (yes, the cutters that look like razor sharp pizza cutters) and cut it all to the desired length.  Check out these videos to learn how to make great dubbing brushes.  HERE

Anyway, this is a really fun fly to tie, and you can tie them rather quickly if you make up several brushes in advance.

~Cheech


Midnight Fire
Back Section
Hook: Gamakatsu B10S #1 (+)
Thread: Danville's 140 - Red (+)
Tail: Zonker Strip - Black (+)
Legs: Silicon streamer legs - Black/chrome red (+)
Brush 1: Ice Dub - Red (+)
Brush 2: Ice Dub - Steelie blue (+)
Brush 3: Ice Wing Fiber - Black (+)

Connection
Articulation Wire (+)
Articulation Bead - Magenta fire (+)

Front Section
Hook: Gamakatsu B10S #1/0 (+)
Weight: Lead free wire - .030 (+)
Eyes: Ballzeyes - Anodized red size large (+)
Tail: Zonker Strip - Black (+)
Legs: Silicon streamer legs - Black/chrome red (+)
Brush 1: Ice Dub - Red (+)
Brush 2: Ice Dub - Steelie blue (+)
Brush 3: Craft Fur - Black (+)

Olive Gold
Back Section
Hook: Gamakatsu B10S #1 (+)
Thread: Danville's 140 - Yellow (+)
Tail: Zonker Strip - Olive Variant (+)
Legs: Silicon streamer legs - Speckled froggy green (+)
Brush 1: Ice Dub - gold (+)
Brush 2: Ice Wing Fiber - Minnow Back (+)

Connection
Articulation Wire (+)
Articulation Bead - Gator belly (+)

Front Section
Hook: Gamakatsu B10S #1/0 (+)
Weight: Lead free wire - .030 (+)
Eyes: Ballzeyes - Anodized green size large (+)
Tail: Zonker Strip - Olive Variant (+)
Legs: Silicon streamer legs - Speckled froggy green (+)
Brush 1: Ice Dub - gold (+)
Brush 2: Ice Wing Fiber - Minnow Back (+)
Brush 3: Craft Fur - Dark Olive (+)

Gold Red
Back Section
Hook: Gamakatsu B10S #1 (+)
Thread: Danville's 140 - Red (+)
Tail: Zonker Strip - Tan (+)
Legs: Silicon streamer legs - Sparkle sand (+)
Brush 1: Ice Dub - Gold (+)
Brush 2: Ice Dub - Red (+)

Connection
Articulation Wire (+)
Articulation Bead - Gold (+)

Front Section
Hook: Gamakatsu B10S #1/0 (+)
Weight: Lead free wire - .030 (+)
Eyes: Ballzeyes - Silver/Red size large (+)
Tail: Zonker Strip - Tan (+)
Legs: Silicon streamer legs - Sparkle sand (+)
Brush 1: Ice Dub - Gold (+)
Brush 2: Ice Dub - Red (+)
Brush 3: Craft Fur - Tan (+)

Other items used:
Loon Fluorescing UV resin (+)
Flush Cutters (+)
Streamworks Tungsten Scissors (+)
Stonfo Comb and Brush tool (+)
Zap-a-Gap super glue - thin (+)


Rod and Tippet Selection - Don't Give Fish Bad Blood

$
0
0

It's not about you.  It's about the fish

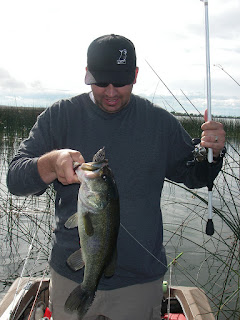
Small river, big gear.  Cheech fights a nice brown with a 5 wt and 2x tippet

One 4th of July I picked up two of my five brothers (No.  No sisters.  Yes. Crazy mom.) on the way to our favorite bass lake so we could avoid the craziness of parades, barbecues, and extremely overweight people wearing shorts that are a size too small...  (sorry for the visual, but it helps me get in the zone.)  We launched at first light, and we rode the glassy water until we got to the happy hunting ground of submerged reeds and weed lines.  That's where the bass lived. That's where we would throw large hollow bodied frog lures and hope they would get engulfed by the jaws of predatory largemouth.  I opened up the rod locker to find that I hadn't brought a single fly rod - but I
Frog Bass
wasn't shocked - I left them home on purpose.  A day on the lake throwing heathen gear with my bros was going to be a great time even if the fish didn't cooperate a lot.  One Brother saw that I had 12 baitcasters and two spinning rig set ups ready to fish, many of which were rigged with 2 to 65 pound braided line, and he was wondering why I needed such heavy gear to chase fish that were probably going to max out at 3 pounds.  I explained to him that each technique was optimized by a certain rod and reel setup, and that I could technically get by with one rod, but my effectiveness would go down substantially.  Even though a rod was rated "Heavy" and for 1/2 oz to 1 oz lures on 15 to 20 pound test, It was absolutely the best tool for the job for these 3 pound fish because the jig I was throwing was very heavy, and I was going to be flipping it into some heavy cover.  Luckily I didn't have to use that rod very much because the fish were absolutely crushing topwater frogs tied to 50 pound braided line all day.  The key to this situation is that I had the proper rods lined up for the proper technique that I was going to be using.  The fly rods stayed home partially because fly fishing with three people on a bass boat is a nightmare, but most importantly, they weren't the right tools for the job that day.  (And before you tell me that you can do anything with a fly rod that you can do with a baitcaster, number one - this isn't the article to have that debate, and number two - look up punching mats for bass.)

What's my point with all of this conventional gear talk?  My point is that you should choose the right tool for the job.  If you know that you are going to change the oil in your car, you wouldn't be grabbing a handsaw would you?  You wouldn't go in to the auto parts store and brag to your buddies that you proceeded to change your oil with a handsaw right? "Yup, it took me about 17 hours, but by damn, I got it done.  It takes years of experience to learn how to change your oil with a hand saw, but you'll learn." In the conventional bass fishing world I really don't hear much bragging about landing fish with light lines and light rods, but I'm sure it exists.  In the fly fishing world, however, stories of over-fighting fish with light gear are told as if they are badge of honor and a qualification of skill.  Now here is my main point before people get bent out of shape. If you use gear that requires you to fight fish longer than needed, you are greatly increasing the chances of killing fish. I have had some very interesting conversations with people about this, and I have to qualify one instance where fishing a light rod with light line is still a good way to land fish quickly - tight line "Czech or Polish" nymphing.  The longer rods used in this technique (typically 10' to 11') have a bit more backbone than a rod of normal length, and they are made for bringing in fish quickly so they can be scored in a competition setting.  Tippet has come a long way in recent years too, and some of the 5x and 6x tippets are amazingly strong and abrasion resistant.  In addition to using these rods and tippet, they are usually fishing in pretty close proximity, so it's easier to control the fish.  I guess I just don't understand the guy who goes out purposefully undergunned so he can fish, as one of my old fishing partners put it, "So I can feel the fish." He was notorious for over fighting fish due to his undergunned gear.
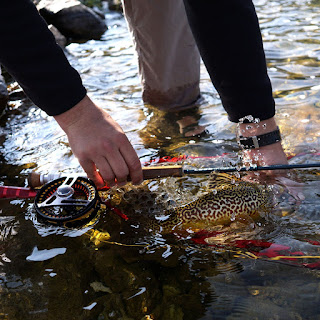
17" tiger trout.  6 wt rod and 3x tippet


Several recent conversations that I have had have led me to think about the process I go through when I pick equipment for a certain trip.  Below are some gear selection opinions from Cheech's tying dungeon: (Keep in mind that these are my opinions...  and even though I feel pretty strongly about this stuff, you are entitled to your opinions as well.)

Rods:
I realize that this might be easier to do if you have several rods to choose from, so if you are limited to one or two rods, it might be a good idea to get something that could cover all of your bases moderately well.  Generally speaking, and from a trout perspective, a 9' 5 wt or a 9' 6 wt will do you just fine.  If you have a whole barrel full of rods, (#firstworldproblems) choosing a rod can get a bit more tricky. What are the factors that determine what rod to use?  Is it the fish that you are chasing? Is it the type of fly you are using? Is it the environment in which you will be fishing?  I say it's all three.

Flies
For me, I look at the flies that I will be throwing first.  If I'm going to be throwing double articulated meat, I might take along an 8 wt even if I'm only targeting trout up to 22".  The 8 wt will allow me to more comfortably cast the large streamer all day where a 5 or 6 weight might wear out my shoulder.  Also, if I'm going to go fish a small stream with a huge hopper, I might opt for a shorter 4 wt rod instead of a 3 or 2 wt because it will be easier for me to turn over a larger fly (especially if the wind picks up.)

This chunk was even a challenge on a 7 wt
Fish
The next thing I consider is the type of fish that I'm chasing.  If I know that I'm chasing large stillwater cutthroat up to potentially 10 pounds, I'm not going to bring a 4 wt even though my go to fly for them is a small low fat minnow.  I usually string up my 7 wt with about 15 pound fluorocarbon tippet, not because I need it to cast the fly, but I need it to fight the potentially large fish.   If I'm going to go fish for bluegill, I know that there is no fish in the lake that is too much of a match for the trusty 3 wt, so I'll take it.  This being said, there have been many bluegill trips when the wind picked up and I ended up tying my bluegill flies on to the 7 wt I was using for bass.

Environment
Finally, I'll consider the environment that I'll be fishing.  If I'm going to be casting into the wind from a drift boat all day, I'll probably go with a heavier rod like a 5 or 6 wt even if the day involves casting small dry flies to rising fish.  A 4 wt is my preferred dry fly rod weight, but sometimes the wind can turn a 4 wt day into a 6 wt day.  Another thing to consider is obstacles in the water.  Curtis is notorious for breaking out his 9 wt while chasing bass because he might have to dig one out of the slop and salad.  A 6 wt doesn't do so well on salad duty.

Tippet:
I use the term "tippet" loosely because it can mean anything from 50 pound power pro braid (Curtis is guilty of this one) to good ol' Stren.  The point is that, like choosing a rod, you should consider flies, fish, and environment to make a decision on tippet.
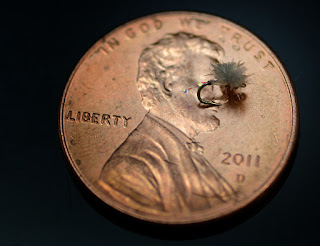
Flies
The fly that you are going to fish has a big impact on the tippet that you should be using.  One time I had tied a bunch of hoppers for a guy who was going to use them on his local small stream full of eager brookies.  He messaged me to tell me that my hoppers were twisting up his line a lot and that he wasn't satisfied.  When I found out that he was using 6X tippet on a size 4 hopper, I explained to him how a 3x or 4x tippet would be a better choice.  Not because of the gnarly 10" brookies that he was catching, but because of the big foam fly that chews up small tippet like Curtis on a plate of corn bread.  This is only one example, but many times we just think about the size of fish we are targeting to make a tippet choice.  For the most part, micro tippet + big flies = twisted tippet and many swear words.

Fish
As I stated before, this is probably the most popular factor for choosing tippet, but one that I use very little.  I like to fish the heaviest line I can get away with, and I have been guilty of fishing 0x fluorocarbon for 16" demon eyed fighting rainbow trout on my favorite stillwater.  Why? Because I keeping  all of the fish you catch.  Landing a fish on extremely light tippet and an extremely light rod is certainly doable, but it is also a good way to kill them if it requires you to fight them for a long time.  I'll say it again If you use gear that requires you to fight fish longer than needed, you are greatly increasing the chances of killing fish.   Here is a simple breakdown of  fish, lactic acid, and bad blood.  When fish struggle they use muscles and tissue -> muscles and tissue use oxygen to operate -> once the oxygen is gone, lactic acid builds up -> lactic acid is toxic to fish -> once the lactic acid builds up, it is released into the blood -> fish need good blood to live -> lactic acid in the blood makes it bad -> as Taylor Swift reminds us, "now we've got bad blood" -> some bad blood can turn into good blood again -> some bad blood can kill a fish hours, or even days, after being caught -> over fighting of fish results in bad blood -> don't give fish bad blood.  This can also be said for fighting fish in general...  Get them in quickly regardless of your rod and tippet!  Don't be the guy who takes 8 minutes to land a 14" fish on his 6 wt indicator rig just so people know that he hooked up...  Yeah, I've seen that guy a time or two.
This fish was landed and released quickly with 3x tippet
can.  In regards to light tippet, just because I'm fishing in a creek where a 3 pound fish is a trophy, it doesn't mean that I should only fish 3 pound test.   There is also the mentality that some people like the challenge of landing a fish a very light rod and on tippet rated much lighter than the size of the fish they are pursuing.  This actually isn't a problem... If you are

Environment
Are you fishing a crystal clear spring creek where the fish scatter if a caddis fly so much as farts?  This might be a good reason to use lighter tippet... OR it might be a good opportunity to work on your fish stalking game and casting presentation.  The difference in diameter from 8x to 6x is very minimal, but the strength difference is substantial, so maybe challenge yourself to be able to catch the same fish with slightly bigger tippet.  I'm not against targeting big fish with light tippet - as long as you are disciplined enough to break a it off if you are fighting it too much.  I have seen large fish eat tiny midges presented on tiny line that can be landed quickly.  They are typically on heavily pressured water and kind of know the drill so they don't fight much and hold still while you release them.  Other environmental factors for tippet selection are underwater snags, tree branches that like to catch flies, etc.  It's not fun to snap off flies on a snag just because you are set on using light line.


This whole post was spurred by some interesting conversations that I have had this week, and I just want to point out that I own 2 wts and 3wts that I LOVE to fish.  I have spools of 6x and 7x, and I'm not saying that I never use them.  I just wanted to point out that you should use gear that allows you to land fish quickly and responsibly.  If you target fish with gear that purposefully extends the fight of a fish, you are basically poisoning that fish (see bad blood.)  I also realize that if we cared that much about fish, we wouldn't deceive fish with fake food, and then torture them by shoving needle sharp shards of metal through their mouths.  I get it, we all injure fish, and it's the nature of our sport!  Lets just be more ethical in our fish injuring practices by using the appropriate gear.

~Cheech

Bunny Midge

$
0
0

Small, proportionate, AND visible.


UPDATE!

We wanted to highlight a few newer materials that we have been using in our midge tying.  Snow shoe hare's foot kind of got hard to find for a little but, so we started to play with some other options.  Poly yarn works well, but we just got some EP trigger point international fibers that is a very fine option for wings.  I have no idea what "trigger point international" means, but I'm translating it as "really good winging material." We also wanted to show how to use Veevus body quill as a trailing shuck because it has just enough luster to make an effective shuck.  Keep in mind that I always use floatant on this bad boy, and Loon Lochsa is definitely my favorite.

Check out the new video:


Updated Recipe:

*We used a Tiemco hook in the video because it's what we had at the bench.  The Gamakatsu C12-BM is a great hook too because it's barbless and it has a bigger eye.


Hook: Gamakatsu C12-BM - #28 (+)
Thread: Uni 8/0 - Black (+)
Shuck: Veevus body quill - Tan (+)
Wing: EP trigger point international fibers - Quick Silver (+)

If you want snowshoe hare's feet, we have those too (+)


A dozen #30 bunny midges on a dime
Several years back all of my free days in the winter consisted of arriving at the river about 8:00 am, rigging up the 3 weight and walking slowly down to the stretch of the river where the fish liked to eat dry flies.  I HATED nymphing, and I would rather go and sit at the side of the river waiting to see a nose, fin, or tail come up for a snack.  I quickly realized that my offerings needed some tweaking if I was going to be able to take advantage of these risers.  I had been tying a lot with snowshoe hare's foot (because I had no money, and good hackle costs money...) and I began to tie with some small hooks.  I started with a #24 and got the fly to be proportionate without a lot of added bulk where the wing was tied in.  I wanted a shiny trailing shuck and a very faint rib.  I started with a wire rib, but adding any more metal on an already minuscule hook was going to compromise the buoyancy of the bug.  I settled on tying thread of a slightly different color.  Off to the river to fish, and the bugs performed very well, except for the fact that the fish seemed to be taking size 64 emergers that day.  I would drift a #24 right down Santa Claus lane with no takers.  I had to go smaller.  The fly shop was on the way home, and they thought I was nuts for asking for #30 and #32 hooks, but hey, THEY were the ones who had them on the shelves.  The next weekend, the smaller flies performed amazingly, and I have been fishing small flies ever since.  I tie this fly from #18 to #32 in black, brown, olive, gray, etc.  The key is the wing and the shuck; you can do whatever tickles your fancy in the middle.


Recipe:
Hook: TMC 2488 #18-28 or TMC 518 #28-32
Thread: Veevus 16/0 or Uni 8/0 color to match natural bugs
Tail: Midge flash - root beer or opal
Rib:  Uni 8/0 thread - dun or iron gray
Wing: Snowshoe hare's foot - dun

This one is tied on a #32 TMC 518 hook.


AND... the HD video tutorial.

Quill Body Midge Pupa

$
0
0

Downsized buzzer style


A pile of Quill Body Pupae

There are likely only a few fly fishers who have not, at some point or another, had to fish a midge/chironomid/buzzer pattern. Many freshwater trout spend a good portion of their lives picking up these little (and sometimes pretty big) bugs for lunch. In stillwater (i.e. lake and reservoir) fishing circles, the ubiquitous buzzer or chironomid patterns are a staple of the fly box and come in a variety of colors, shapes and sizes. However, as I've looked over my boxes from the past few years, I realize my flies and corresponding insect samples from stillwater outings land a bit on the larger size, running anywhere from #14's up to #8's on average. This doesn't usually translate over to rivers and streams as well, plus the bigger flies tend to be loaded with more realistic features.

So, as I looked at my river midge boxes with zebra midges, thread midges, WD40's and a number of others, I realized I really needed to shrink some of my bigger more effective buzzer patterns to get some more realistic imitations of our smaller diptera specimens. 

The quill body midge pupa was one of the first ones to get really downsized. There's nothing inherently original about this pattern. I'm pretty sure this style pattern is taught in all elementary schools in the U.K., so it's a common one. I've just put it to use on hooks down to #22 in order to better imitate river midges.

Purdy Cutthroat who was eating small midges
I usually fish this pattern as a dropper from either a midge dry fly or emerger like the Bunny Midge or the Foamerger. The cutthroat shown here was taken on the quill body pupa in a #20 that was dropped from a bigger attractor pattern.


Also it's important to note that you might be faced with a situation where you're fishing to some obese trout eating these small bugs. If you want to beef up the hook, go with the Daiichi 1120 below instead of the lighter wire 1130.


Hook: Daiichi 1130 #18 - #22 (+)  For bigger fish, go with Daiichi 1120 #18 (+)
Thread: Danville 70 Denier Black (+)
Body: Stripped Peacock Quill, Natural (+)
Wing Buds: Goose Biots, Orange (+)
Coating: Loon Fluorescing UV Clear Fly Finish (+)


Sprout Midge - Dry Fly

$
0
0

Sometimes Simple is Best

Black Sprout Midge


I remember very clearly when I first started to fish midge dry flies.  It was kind of one of those areas that I considered waaaaay over my head, because it wasn't just dry fly fishing - it was trying to catch picky fish on what seemed like a tiny fluff of carpet on a tiny hook.  I had been fly fishing about a year, and I had a trusty Pflueger Trophy Tamer 6 wt and a matching reel that was equally awesome.  My friend Aaron and I were fishing the Green River in Utah, and the fish were really targeting small midges on top all day long.  This was my chance to jump in head first to the midge dry fly circus.  I had tied some small parachute flies that were copies of the flies that I had seen in bins in the local shops in Salt Lake, so I lashed them on with the smallest tippet that I had (4x) and hoped for the best.  They weren't the best ties in the world, but the fish absolutely ate them up, and that day went down as one of the most memorable days of fishing that I have had.  We probably caught ten or so fish each, but I may as well have caught 150.  After a gorge burger and a long drive back home, I found out that they were called the Sprout Midge - and that I had forgotten the trailing shuck on the back.  They worked so well that they have become a staple in my box - without the shuck, and they are easy enough to tie that you can crank out a bunch in no time.

~ Cheech


Recipes:

**Since the thread is a key part of this fly, feel free to use your favorite thread on this fly.  MFC 8/0, Danville 70, and Veevus 16/0 - 14/0 are all capable substitutes.

Black

Hook: Daiichi 1130- #20 (+)
Thread: Uni 8/0- Black (+)
Thorax: Ice Dub- Black (+)
Post: Para Post Material - White (+)
Hackle:  Black or grizzly. See below

Olive

Hook: Daiichi 1130- #20 (+)
Thread: Uni 8/0- Olive (+)
Thorax: Ice Dub- Olive Brown (+)
Post: Para Post Material - White  (+)
Hackle:  Dun or grizzly. See below

Gray

Hook: Daiichi 1130- #20 (+)
Thread: Uni 8/0- Gray (+)
Thorax: Ice Dub- Callibaetis (+)
Post: Para Post Material - White (+)
Hackle:  Dun or Grizzly. See below

A note on the hackle...  Many different types of hackle can be used on this fly, and we chose to use a Whiting Cape in black.  This being said, the Hebert Miner Capes, High and Dry Capes, and Whiting Midge Saddles also work great for this fly.  Black, Grizzly, and Dun are my favorite colors for midges.  Also, you will find many useable hackles in the small sizes on both Bronze and Pro Grade hackles.  Curtis and I both have several of both grades and we are constantly blown away by the quality of these "lower" grade hackles.  Check out our selection of dry fly hackle HERE.


Chuck's Midge

$
0
0

A pupa for all seasons


I was introduced to this fly several years ago on a winter fishing excursion with Charlie Card on the Green River in Utah.  It was one of those days that were almost too cold to fish, but after an hour's drive I was determined to make the best out of it.  Charlie and I hit the water and kind of split up a bit to hit two different runs in the river, and my strategy was to start small and get smaller if I didn't get anything to eat.  I was about to tie on a #28 midge pupa when I decided to go upstream to see how Charlie was doing.  No surprise, but he was reeling in a nice fish that was just one of several that he had caught that morning.  When I asked about the special sauce, he said that he was fishing "green." I made some adjustments later that day and ended up putting a few fish in the net on flies that I might have considered too big for January fishing.  One of the flies that Charlie showed me that day was a blinged out pupa with a double rib and tungsten bead.  I'm not even sure what he called it, but I have referred to it as "Chuck's Midge" since then, and I have fished it in many rivers and lakes with great success.  I typically fish it in a size 16, but a size 14 or 18 make fine bugs as well.

~Cheech

Recipe

Olive

Hook: Daiichi 1120 #16 (+)
Thread: Uni 8/0 olive (+)
Bead: 2mm tungsten black nickel (+) (we used silver, but black nickel is more common)
Body: Veevus pearl tinsel - medium (+)
Rib1: UTC wire - small chartreuse (+)
Rib2: Coats and Clark sewing thread - brown (readily available at Wal Mart)
Thorax: Ice dub - olive brown (+)


Deep Dish Callibaetis 2.0

$
0
0

Dialed in and drake-compatible

A Drake-ish version of the Deep Dish
As I've written before here, here and here about the Deep Dish Callibaetis, it's one of my go-to still water patterns. Although not the most simple of ties out there, it's a fun pattern to whip up and looks cool to boot. And while originally intended to be just a wicked callibaetis nymph or emerger, this past year I ran into a couple of brown drake hatches that got me thinking about turning it into a brown drake nymph as well.

But here's where you need to put on your bug nerd hats and understand the leap between a Callibaetis and a Drake (Epherema Simulans). A Callibaetis nymph is classified as a swimmer, while a brown drake is a burrower. They're sized differently but overall coloration can be similar. Compare the two photos below. Both insects have lighter brown/tan contrasting colors on the body and wing case as well as fairly pronounced gills along the abdomen. And although both photos here show a lighter thorax area, both bugs can have varying degrees of darker brown, gray or tan as well.

Either way, the Deep Dish has now become a mash-up style pattern where I vary colors and sizes to imitate different mayflies. It works out in the end, just ask a fish or two if you don't believe me.

Emphemera Simulans (Brown Drake)

Callibaetis -- Courtesy of Troutnut.com

In a river, where you'll find drakes more often than callibaetis usually, I'll nymph the drake version of the Deep Dish on either a euro rig or a dry dropper.

Material List


Hook: Daiichi 710, #14 (+)
Thread: Danville 70 Denier, Olive (+)
Under-Body: .015 Lead Free Wire (+)
Bead: Mayfly Nymph-Head, Swimmer & Burrower, Small, Brown (+)
Tail: Lemon Barred Wood Duck (+)
Abdomen: Pearl Tinsel, Medium (+)
Abdomen 2: Ostrich Herl, Scud Tan (+)
Abdomen Back: UNI Double Sided Mylar, Orange/Peacock #14 (+)
Ribbing: UTC Ultra Wire, Gold, Small (+)
Thorax: Hare'e Ice Dub, Tan (+)
Legs: Grizzly Micro Legs, Rootbeer (+)
Wing Case: Nymph Skin, Bronze/Tan - Clear (+)
Wing Case Stripe: UNI Double Sided Mylar, Orange/Peacock #16 (+)

NOTE: For a bigger bug like a Drake, go with a #10 or #12 hook and the medium sized Nymph-Head

Other Tools, materials:
Loon UV Fluorescing Clear Fly Finish (+)
Stonfo Combo Comb/Brush (+)

Flügenblinger Bugger

$
0
0

Who doesn't need a little bling on their buggers?

Flügenblinger Bugger

I must admit, it's really been a few years since I've consistently fished any sort of standard bugger or leech pattern. I find myself opting for chironomids, baitfish or other more match-the-hatch style patterns when fishing lakes and reservoirs. However, a few weeks ago, I was going through some stillwater boxes and came across a style of leech/bugger combo pattern Cheech and I used to fish a lot. It incorporates Arizona Simi Seal into the body (as opposed to say a Chenille) but keeps the stand-by hackle aspect of a regular bugger and then you blend it all together to create an awesome full-bodied pattern that's the best of both worlds.

We are, after all, mostly trying to imitate leeches or other bigger insects such as damsels or dragon fly nymphs here, so having more lifelike movement, some translucency and a good natural-looking body taper is a good thing. Plus we throw in some extra bling on this one by means of some Kiley's Bugger Bling and some attractive Loon UV Clear Fly Finish (especially the Fluorescing kind) and it all comes together for a fun pattern to tie that also happens to catch fish.


And don't limit yourself to lakes either. This could be sized and colored differently to be fished for anything from bigger hex mayflies, drakes, stoneflies or October caddis. It's a good style of pattern for a lot of things, so check out the video below and tie some up!

Burnt Orange


Hook: Daiichi 1710, #10 (+)
Thread: UNI 6/0, Rusty Brown (+)
Under-Body (optional): .025 Lead Free Wire (+)
Tail: Whiting Super Bou, Dyed Brown (+)
Tail: Krystal Flash, Rootbeer  (+)
Body: Arizona Simi Seal, Canadian Brown (+)
Hackle: Whiting Bugger Pack, Grizzly Dyed Coachman Brown (+)
Ribbing: UTC Ultra Wire, Copper, Brassie (+)
Shell: Kiley's Bugger Bling (+)
Collar: Whiting Coq De Leon Hen Saddle, Speckled Burnt Orange (+)

Other Tools, materials:
Loon UV Clear Fly Finish, Thick (+)
Loon UV Fluorescing Clear Fly Finish (+)
Stonfo Combo Comb/Brush (+)


Black/Red


Hook: Daiichi 1710, #10 (+)
Thread: UNI 6/0, Black (+)
Under-Body (optional): .025 Lead Free Wire (+)
Tail: Whiting Super Bou, Black (+)
Tail: Krystal Flash, UV Pearl (+)
Body: Arizona Simi Seal, Black/Red (+)
Hackle: Whiting Bugger Pack, Black (+)
Ribbing: UTC Ultra Wire, Wine, Brassie (+)
Shell: Kiley's Bugger Bling (+)
Collar: Whiting Coq De Leon Hen Saddle, Speckled Red (+)


Green/Olive


Hook: Daiichi 1710, #10 (+)
Thread: MFC 6/0, Chartreuse (+)
Under-Body (optional): .025 Lead Free Wire (+)
Tail: Whiting Super Bou, Fl. Green Chartreuse (+)
Tail: Krystal Flash, UV Pearl (+)
Body: Arizona Simi Seal, Golden Peacock (+)
Hackle: Whiting Bugger Pack, Fl. Green Chartreuse (+)
Ribbing: UTC Ultra Wire, Chartreuse, Small (+)
Shell: Kiley's Bugger Bling (+)
Collar: Whiting Coq De Leon Hen Saddle, Speckled Fl. Green Chartreuse (+)


Biot Midge Pupa

$
0
0

Add some spice to your pupa life

Biot Pupa


On a trip to one of our favorite cutthroat waters this summer we decided to see what would happen if we decided to match the hatch instead of throw the typical foam marshmallow-like flies that they are known to eat from time to time.  I tied the biot pupa on underneath a big foamer, and it got pretty ridiculous pretty quickly.  I was fishing the olive and copper biot pupa, and at one point in the day I landed 6 fish in 6 casts...  In your face Curtis.

This is a bug that we have been fishing for a few years now with great results, and It's a good way to kind of break up the standard Zebra Midge routine with a cool bug that catches plenty of fish.  This particular pattern in brown and blue does great on some of our more picky midge waters, and the color combinations are endless due to the wide array of colors that are available.  Check out our favorite color combos below the video.

~ Cheech


Recipes:

Brown/Blue

Hook: Daiichi 1120 #18 (+)
Bead: Tungsten 2mm - Copper (+)
Thread: Uni 8/0 - Camel (+)
Body: Goose Biot - Brown (+)
Rib: UTC wire sm - Blue (+)
Thorax: Ice Dub: UV Brown (+)

Olive/Copper

Hook: Daiichi 1120 #18 (+)
Bead: Tungsten 2mm - Copper (+)
Thread: Uni 8/0 - Olive (+)
Body: Goose Biot - Olive (+)
Rib: UTC wire sm - Copper (+)
Thorax: Ice Dub: Brown Olive (+)

Black/ Silver

Hook: Daiichi 1120 #18 (+)
Bead: Tungsten 2mm - Silver (+)
Thread: Uni 8/0 - Black (+)
Body: Goose Biot - Black (+)
Rib: UTC wire sm - Silver (+)
Thorax: Ice Dub: UV Black (+)

Gray/Black

Hook: Daiichi 1120 #18 (+)
Bead: Tungsten 2mm - Black nickel (+)
Thread: Uni 8/0 - Black (+)
Body: Goose Biot - Muskrat gray (+)
Rib: UTC wire sm - Black (+)
Thorax: Ice Dub: Callibaetis (+)

AP Emerger Variation

$
0
0

A Hybrid of a Hybrid fly

AP Emerger variation


When I was still fairly new to the sport, the annual outdoors expo was the highlight of my year because I could go wander around looking at flies, gear, etc...  I was going through a phase where I fished lakes 90% of the time, so I was always looking for the latest greatest stillwater pattern. I tied flies a lot, and at the time, they boxes were loaded with leeches, buggers, and other abominations that I called flies.  It was at this show where I saw Denny Rickards giving a presentation on his patterns and techniques for stillwater angling, and like he starts off so many times, he started by telling of a fly that was illegal in most states because it caught so many fish.  We all knew it was BS, and so did Denny.  I guess that was his way of getting people's attention by telling them that he had an effective fly.  Don't quote me on it, but I think the "illegal" fly changed between the seal bugger and the AP emerger depending on which show it was.  I never really bought in to the pitch wholeheartedly, but I'll guaran-damn-tee you that I tied some of those flies for my box! I was young and impressionable! 

AP Variant with a different tail and a hint of pink
Just like any fly pattern that I tie, I immediately began tweaking these flies to suit my needs.  The AP (stands for All Purpose) emerger is basically a larger sized soft hackle that had a wood duck, mallard, or partridge tail, a dubbed body with a wire rib through it, a peacock thorax, and a partridge soft hackle.  Larger sized soft hackles really should be in any stillwater angler's box and they can be fished as anything from a mayfly nymph to a leech.  The variation that I use now has a bit buggier dubbing than the original, and adds just a hint of flash in the body, thorax, and head.  I also really like fishing these in natural hare's ear color, but with hints of other colors.
~Cheech


Recipes

**I listed Hareline grade 1 partridge in these recipes, but the grade 2 pelts will work too. If you want a slight upgrade on the partridge, get a Nature's Spirit Partridge Skin HERE.

Natural/Purple

Hook: Daiichi 1710 #8 (+)
Weight: Lead Free Wire - .020 (+)
Thread: Danville 140 - Purple (+)
Tail and Collar: Partridge - Natural (+)
Body: Nature's Spirit Snowshoe Rabbit Foot Dubbing - Hare's Ear (+)
Rib: Holographic Tinsel Medium - Purple (+)
Thorax: Ice Dub - Brown (+)


Natural/Pink

Hook: Daiichi 1710 #8 (+)
Weight: Lead Free Wire - .020 (+)
Thread: MFC 8/0 - Fl. Pink (+)
Tail and Collar: Partridge - Natural (+)
Body: Nature's Spirit Snowshoe Rabbit Foot Dubbing - Hare's Ear (+)
Rib: Holographic Tinsel Medium- Pink (+)
Thorax: Ice Dub - Brown (+)


Natural/Chartreuse

Hook: Daiichi 1710 #8 (+)
Weight: Lead Free Wire - .020 (+)
Thread: MFC 8/0 - Chartreuse (+)
Tail and Collar: Partridge - Natural (+)
Body: Nature's Spirit Snowshoe Rabbit Foot Dubbing - Hare's Ear (+)
Rib: Holographic Tinsel Medium- Chartreuse (+)
Thorax: Ice Dub - Brown (+)


Natural/Pearl

Hook: Daiichi 1710 #8 (+)
Weight: Lead Free Wire - .020 (+)
Thread: Danville 140 - Gray (+)
Tail and Collar: Partridge - Natural (+)
Body: Nature's Spirit Snowshoe Rabbit Foot Dubbing - Hare's Ear (+)
Rib: Veevus Pearl Tinsel Medium (+)
Thorax: Ice Dub - Brown (+)


Aero Baetis v 2.0

$
0
0

A Solid Mayfly Nymph


Since I first featured and did a tutorial on the original Aero Baetis here almost three years ago (crazy how time flies) and true to form on most any pattern I work with, I've come to tweak a few aspects of the fly that I feel make it an even better performer.

The first major change was the hook. I've become less a fan of the 200R style hooks with the small gap and long bend like that. I don't think the shape and small gap give me much more than a stronger, larger gaped hook. Granted, they give you an awesome natural-looking shape to a finished fly and as I've heard some people mention, the smaller tapered gap might serve to obfuscate the overall hook shape. But given that any fish taking a fly will have to ignore the ginormous hook appendage coming out of the insect's butt, I find myself tying more in wider gaped hooks and not worrying about that little aspect of it. Plus, getting beads on those hooks can be a nightmare.

I also updated the body and ribbing material to something less bulky and more flashy. The thorax is now a half-and-half natural/synthetic material in the Hare'e Ice Dub -- one of my favorite nymph dubbings.

And not only does this style nymph play well as a Blue Winged Olive nymph, I use it almost as often for PMD nymphs and Callibaetis nymphs. You just need to swap out the appropriate colors and mess with sizing a bit.

Material List


Hook: Daiichi 1550, #14-#18 (+)
Thread: Danville 70 Denier, Olive (+)
Thread 2: Danville 70 Denier, Fl. Orange (+)
Bead: 2mm Tungsten (2.4 on #14), Black Nickel (+)
Tail: Coq De Leon Tailing Fibers, Med Dun  (+)
Body: Veevus Holo Tinsel, Med, Brown (+)
Ribbing: Dyed Pearl Flashabou, Olive (+)
Thorax: Hare'e Ice Dub, Olive Brown (+)
Wing Case: Nymph Skin, Bronze/Tan - Clear (+)
                   or Fino Skin, Brown (+)


Other Tools, materials:
Loon UV Fluorescing Clear Fly Finish (+)
Stonfo Combo Comb/Brush (+)


Guide Highlight - Colby Crossland

$
0
0

Channel your inner moustache


Every February Curtis and I make a trek to Utah's green river to celebrate our birthdays (he's a LOT older than me.)  These trips usually consist of waking up at 4:30, driving for about 4 hours to the river, fishing midges until we either get bored of catching fish or get frozen to the core, and then head back home.  Some years it's midge fishing bliss in moderate winter temperatures, while other years it's filled with snow wind and Curtis crying himself to sleep on the way home.  This year it was an especially great trip, not because the midge fishing was insane, or the temperatures were speedo
Colby with a meat eater
worthy.  It was great because we finally got to float the river with our buddy Colby Crossland.  It's kind of one of those things where you always talk about fishing, but life happens and stuff...  Well, we finally made it happen.

We have known Colby (who is now a d-list celebrity due to his moustache and swimsuit photo spreads in RV Weekly magazine) for a number of years just through the Utah fly fishing community, and for the past several years he has been making clients happy by helping them hook fish on the green river.  He guides for Spinner Fall Guide Service, who employs many of the top guides on the river and has a reputation for fishing dry flies a lot.

We kind of wanted to fish for a mixed bag of active fish (risers and meat eaters) so we decided to float the A scetion of the green river, which is located directly beneath the Flaming Gorge Dam.  Due to the nature of the constant cool water year round, it is a great trout habitat that allows you to see fish everywhere, almost like you are in an aquarium.  Right from the start of this trip we saw how intimate he was with all of the "micro drifts,""new rocks," and areas that held fish vs areas that didn't.  I could tell that Colby is a true ambassador of the river, and his hundreds of days floating the river showed.  Just like his overall easy going demeanor, he likes to guide in a way that is maybe unique in his own way.  Instead of just getting clients into fish, he'll teach them some of the intricacies of drifting a tiny dry fly right down feeder alley, or throwing a beefy streamer at a meat eater.  Curtis and I have fished the Green River quite a lot, but it's amazing what you can learn if you have an open mind, and someone who is willing to share fishy knowledge with you.


Cheech and Colby playing musical chairs
Colby knew that I had just gotten a drift boat, and he was even gracious enough to help me with some of the trickier parts of rowing the river.  A good guide should leave a client a better angler, not just a person who has caught 5 more fish in his life.  For the majority of this trip Curtis was searching for the subtle noses in the back eddies while I focused on plopping meat down in hopes of enticing the carnivores.  While we were flailing and doing our best to sink his fancy Stealthcraft, Colby made sure to always have his eyes open to the risers, while putting me in the best position to huck the meat.   The risers were deciding not to play very much, but we found some hungry fish that wanted to eat the meat - so we fed it to them.  Perhaps the most memorable "eat" of the trip was when we were anchored next to shore for a quick lunch and we spotted a mid sized rainbow "trying" to hide in the weeds.  I actually didn't see it until Colby and Curtis pointed it out.  I put a mini belly scratcher in front of it in the sand, and we watched it slowly swim over and toilet bowl flush it into it's mouth.  That was pretty rewarding, because he sucked it in like he was basically trying to digest it before he even ate it!
Little Fatty with a soft gut.  It ate the belly scratcher.


Here is Colby's profile page to Spinner Fall Guide Service.  If you are looking for a great guide on the Green River, give them a call!

Sparklesvelte Blood Worm

$
0
0

Slim, small and deadly

Sparklesvelte Blood worm
It's hard to beat the effectiveness of a simple blood worm pattern, whether on a lake or in a river or small stream. And while the Gut Bomb, discussed here and here, is my go-to still water blood worm pattern, the Sparklesvelte is what I'd call a specialist pattern. It works well when fish are picky or when imitating much smaller midge larva in streams or rivers.

I keep a good number of these little guys in both my stream/river nymphing boxes as well as my still water boxes. You never know when they might come in handy. The rainbow shown below was taken on a Sparklesvelte when bigger nymphs weren't producing as well and a throat sample showed a good number of smaller blood worms in the mix. It ended up catching a lot of fish that day.

Nice little Rainbow that fell to the Sparklesvelte

And the nice thing about it, is that it's a super-simple fly to tie and you can literally tie around 100 an hour.


Material List


Hook: Daiichi 1150 #18 (+)  (for smaller sizes, go with the Daiichi 1130 #20 - #24 (+)
Thread: Uni 8/0 - Red (+)
Body: Veevus Holographi Tinsel, Med - Cranberry (+)
Rib: Thread
Body Coat: Loon Fluorescing UV Clear Fly Finish (+)


Ice Hare's Ear

$
0
0

A simple spin on a classic


The Hare's Ear is one of those flies that most people have fished and tied.  Part of the charm of a Hare's Ear is that they are super effective even though they are pretty messy and buggy.  I have been tying Hare's Ears in different variations for many years, and this version has been pretty good to me due to how effective Ice Dub is.  Ice Dub has just the right amount of flash, UV sparkle, and black magic to make fish for miles crave it...  This pattern can be tied in many different sizes and colors just like the original Hare's Ear pattern.  There really isn't too much more to write about this pattern because it's so simple...  Check out the video below.

~ Cheech


Recipes:

Black

Hook: Daiichi 1260 #14 (+)
Bead: 2.8mm tungsten - Black Nickel (+)
Weight: Lead free wire - .015 (+)
Thread: Danville 70 - Black (+)
Tail: Pheasant tail fibers - Black (+)
Rib: Dyed pearl flashabou - Black (+)
Counter rib: Mono Thread (+)
Thorax and Abdomen: Ice Dub - UV Black (+)
Wing Case: Fino Skin - Black (+)
Resin - Loon Fluorescing (+)

Olive Brown

Hook: Daiichi 1260 #14 (+)
Bead: 2.8mm tungsten - Black Nickel (+)
Weight: Lead free wire - .015 (+)
Thread: Danville 70 - Black (+)
Tail: Pheasant tail fibers - Natural (+)
Rib: Dyed pearl flashabou - Black (+)
Counter rib: Mono Thread (+)
Thorax and Abdomen: Ice Dub - Olive Brown (+)
Wing Case: Fino Skin - Black (+)
Resin - Loon Fluorescing (+)

M3 Mayfly Nymph

$
0
0

A realistic Box Filler


In my tying it seems as if I get really caught up in the synthetic materials, flashy fibers, markers, etc...  One day while I was fishing a local river on a pretty bright summer day I was determined to focus on my nymphing techniques on this stretch of river.  I knew that the fish were plentiful, and they would readily eat a good fly that was properly presented, but I was having a hard time hooking up that day.  As I waded upstream there was a steep bank that dropped right into a deep hole that was for sure a home to many fish.  As I approached this hole, I realized that my best shot at getting a proper drift would be to stand on the bank nearest the deep part of the hole and make a cast from a higher vantage point.  As I stood looking into this dark hole, I realized that my nymphs were giving off a LOT of reflecting light due to the sun being directly overhead.  I fished them for a bit with no luck, so I brought them in and saw that there was just a minimal amount of flash on the wing cases of both of my flies.  That minimal amount was enough for the sun to hit them and make them look like flash strobes.  I clipped them off and replaced them with very drab, flashless patterns that looked more like a natural.  I did catch fish after making the change, and I often think back to that experience while I'm at the vise.  I'm not saying that all flies need to be removed of flash, but it's a great idea to have some more plain patterns in the box.

A friend of mine, Michael Faulkinbury, recently showed me his most popular nymph pattern and I immediately started adding them to my boxes.  At first it was kind of hard to decipher what he was using for the tail and body, and I was pretty surprised when he told me.  It's called the M3 (Moose Mane Morsel) and the tail, body, and wing case are all tied out of Nature's Spirit Speckled Moose Body Hair...  He said he used to tie it out of moose mane until the nice body hair came out, so maybe we need to call it the Mike's Moose Morsel or something like that.  Anyway, Michael is a great fly tyer who does some amazing work with natural materials.  Check out his instagram feed @2dryfly.

~ Cheech


*Please note...  Make sure the super glue has time to set up before placing the resin over the fly.

Recipes:

Olive

Hook: Daiichi 1560 - #16-20 (+)
Thread: Uni 8/0 - Olive Dun (+)
Tail/Body/Wingcase: Speckled Moose Body Hair - Olive (+)
Thorax: Snowshoe Hare's Foot Dubbing - Olive Gray (+)

Gray/Tan

Hook: Daiichi 1560 - #16-20 (+)
Thread: Uni 8/0 - Iron Gray (+)
Tail/Body/Wingcase: Speckled Moose Body Hair - Medium Dun (+)
Thorax: Snowshoe Hare's Foot Dubbing - Hare's Ear (+)

Brown

Hook: Daiichi 1560 - #16-20 (+)
Thread: Uni 8/0 - Camel (+)
Tail/Body/Wingcase: Speckled Moose Body Hair - Brown (+)
Thorax: Snowshoe Hare's Foot Dubbing - Hare's Ear (+)


Other Items Used:
Loon Fluorescing UV Resin (+)
Stonfo Comb/Brush Tool (+)

Viewing all 629 articles
Browse latest View live