Quantcast
Channel: Fly Fish Food
Viewing all 629 articles
Browse latest View live

Gear Review: Smithcreek Net Holster

$
0
0

Quick Draw McGraw!


smithcreek net holster
Me fighting a fish whilst sporting the Smith Creek Net Holster
I'm not a big fan of a lot of doo-dads hanging off my person when I fish, be it on a pack, a lanyard a belt or anything else. In fact, if I'm going to fish a certain area for a longer time, I'll take my pack and bags off and set them on the ground so as to fish unencumbered. So when I saw this net holster from Smith Creek, I just had to try it out. I don't like my net swinging around hanging from behind me on a pack getting caught on all sorts of things and they're inherently difficult to retrieve.

Professional Smith Creek model showing off the holster
The idea behind the Smith Creek Net Holster is that you simply attach it to your current wading belt, a Smith Creek Wading belt or even the belt you use to hold up your trousers and you stick the net in it by the handle. 

The first thing I noticed was that the net is held surprisingly stable. I was worried that my movements might jar it loose or cause it to pop out, but it held in place nicely. I compare this to the idea of just jamming a net into the small of my back, held only by my wading belt or even a strap from a hip-pack. This holster, I found, is much more reliable and definitely restricted the net's movement far more than any rigged solution I have used in the past. The holster itself is a very tough and stiff strap material that holds its shape very nicely but can be adjusted to hold the net tighter if desired. The clip is lightweight and durable, so no issues there. 

Probably the biggest thing is that it's super-easy to both retrieve and to put back when you need to use it. My Fishpond net, which is a pretty beefy net, fit perfectly as did a few other nets I tried out.

I can't wait to use it this summer wet wading and traipsing about the high mountain streams and lakes in search of big fish. You can get more information here. Check them out, this is a nice addition to your gear hoard. Also, check out their other products, including a cool rod clip and a handy tippet/leader trash holder.


Bling Leech

$
0
0

Another must-have leech for your stillwater box


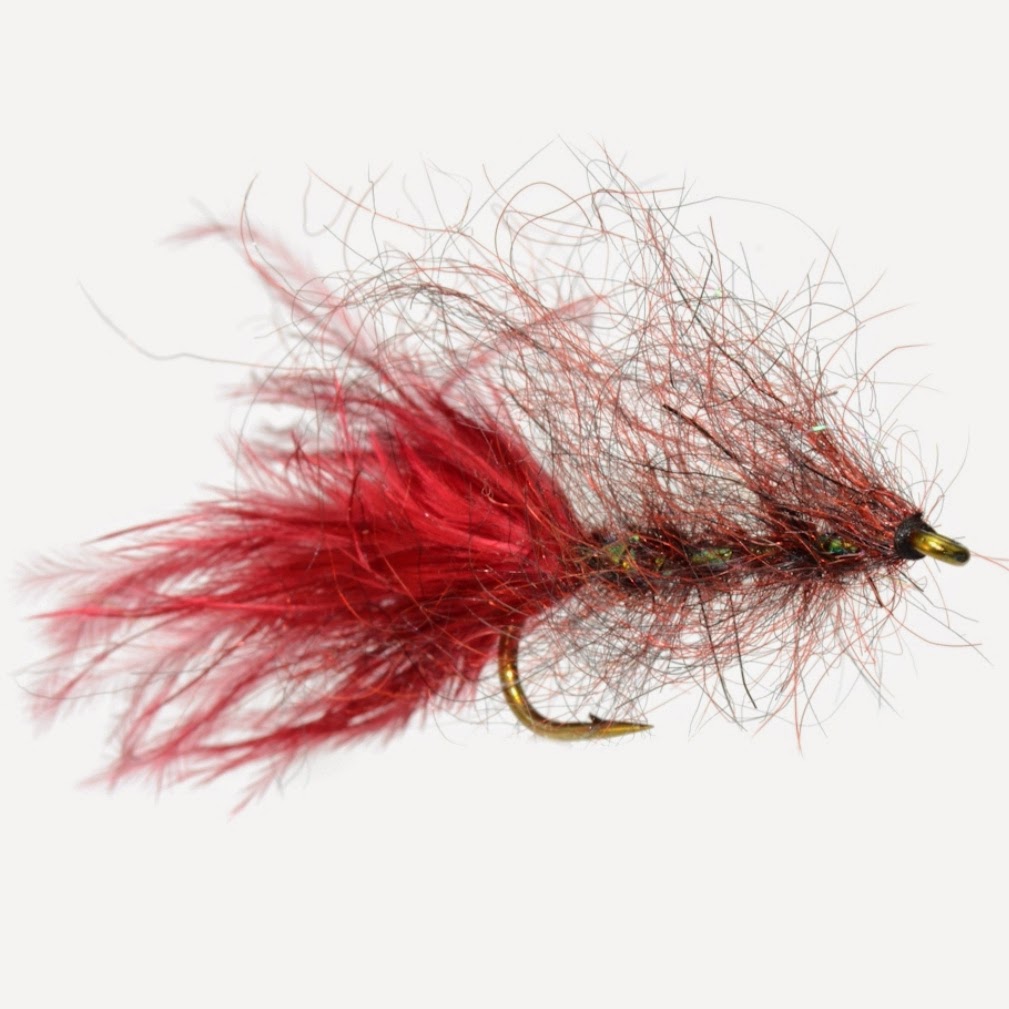
Bling Leech

Can fly tying materials have a cult following?  I was introduced to Mike Andreason's mohair about 10 years ago, and realized that it is definitely one of those materials that has it's own paparazzi chasing it! His most popular color is CBS (Canadian Brown Seal), but the dark horse of his color lineup is the blood leech
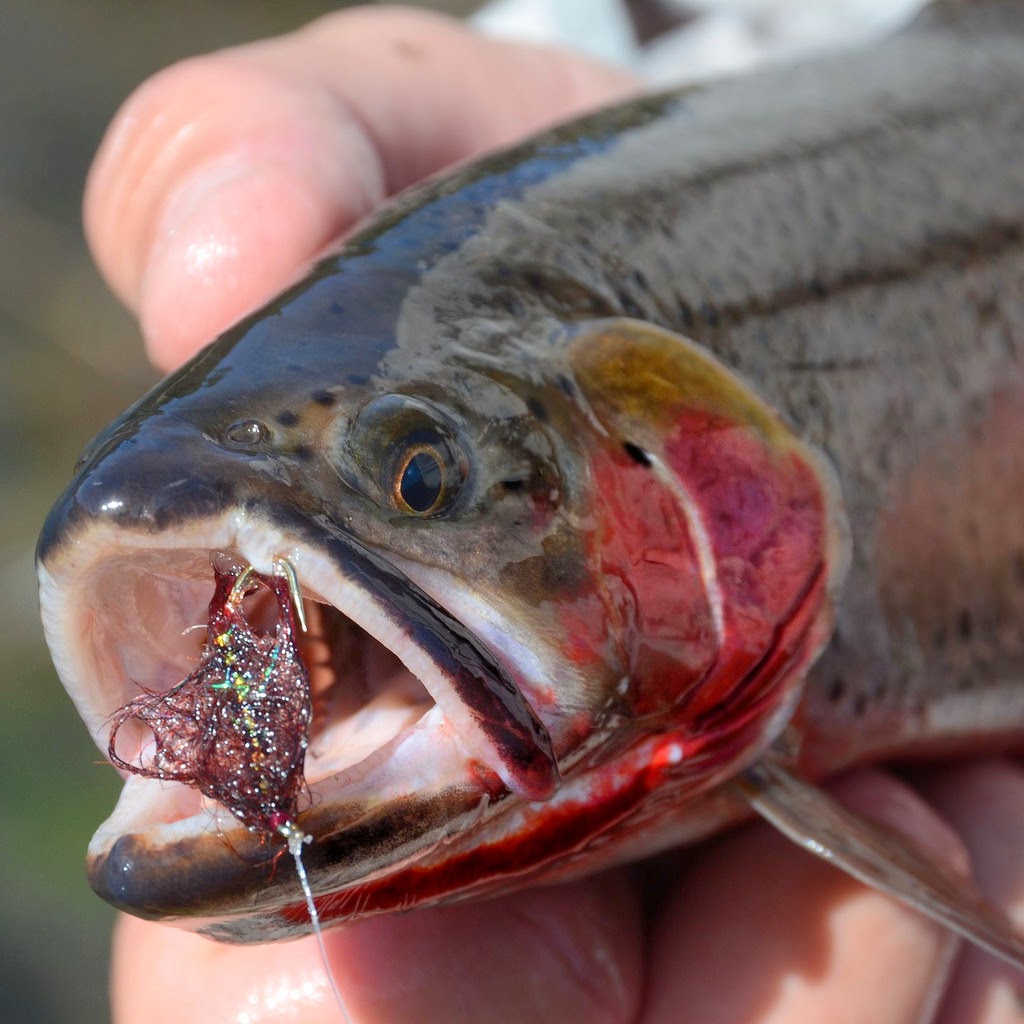
Colorado River Cutthroat slurped the Bling Leech
mohair.  I'll tell you right now that I absolutely HATE working with mohair, but sometimes you do what you have to do in order to catch fish.  I really had to think twice about using mohair when our buddy Herb Patterson showed us a leech similar to the one pictured above.  The key to the pattern was that it had mohair wrapped around mylar to give just enough subtle flash to make it irresistible to the fish, and it plain caught fish!  It seemed like it worked on whatever lake we fished, and it attracted whatever species we were chasing...  So what's different about this fly?  Simi seal dubbing.

Simi seal dubbing comes in so many awesome colors as you saw with the simi seal leech video, and the blood leech color was just what I was looking for.  Now I didn't have to tie these with unruly and inconsistent mohair!  Not only that, but now I could tie this "bling leech" in basically any color I saw fit, and if you have seen all the colors of simi seal, you would see that you could fill several boxes of these bad boys.  I have fished this fly successfully in a wide array of colors, but the blood leech and dark olive seem to be my best two colors.  See the video below.  Pay special attention to the type of marabou I'm using, and how sparse the dubbing loop is.  Happy tying and catching.


Recipe: BLOOD LEECH
Hook: Allen S402 #6 BUY HERE
Thread: MFC Premium Thread 3/0 - black BUY HERE
Tail: Wooly Bugger Marabou - Claret BUY HERE
Under body: Pearl Tinsel - large BUY HERE
Body: Arizona Simi Seal dubbing - blood leech BUY HERE

Recipe: DARK OLIVE
Hook: Allen S402 #6 BUY HERE
Thread: MFC Premium Thread 3/0 - black BUY HERE
Tail: Wooly Bugger Marabou - Olive BUY HERE
Under body: Pearl Tinsel - large BUY HERE
Body: Arizona Simi Seal dubbing - Dark Olive BUY HERE


~ Cheech  


5 Tips for Fishing With Kids

$
0
0

Just because you love it doesn't mean they will

Curtis' girls terrorizing the local brookies


A buddy's son "Curt" puts me on fish at 7 years old
When my wife and I were starting to think about starting a family I would think about how cool it would be to have two or three perfectly behaved kids who got straight As in school, were the best athletes on the field, and who LOVED to fish.  I have three beautiful children (Audrey 11, Seth 10, and the family boss Mia 5) and up until a few years ago I hadn't quite figured out how to go fishing without constant bickering for the iPad (even though it was not even on these trips!), punching each other, complaining, and their general inability to throw tight loops and mend their fly line.  That's not too much to ask is it?  Well, here is a reality check...  Some of your kids will not like fishing.

Several years ago I decided to take my kids out to the community pond on my little 13' aluminum boat.  It was going to be the perfect afternoon fishing trip because the bass and bluegill were eating.  Well, about 10 minutes in, Seth says "I'm bored Dad.  Can I go home." Then Audrey chimes in "Can I play with your phone." Needless to say, that trip lasted about an hour and it was a LONG time before I took them out again.

Since that trip in the boat, I really had to get creative to find ways to make fishing fun for my kids.  Here are some tips that have worked for me.

Seth's big kitty
1- Make it fun -  Bring lots of treats and find stuff that they can do if the fishing isn't really good.  On one memorable trip in the tin boat, Seth was the pirate captain and I was the first matey.  My chore was to catch all the fish, and his job was to direct the ship.  We (I) caught numerous bass and bullfrogs that day, and it became the theme for the rest of the summer.  He would fish sometimes, but most of the time he was on the lookout for other pirates that we could battle.  Fishing with kids usually involves 3 or 4 rock throwing sessions.

2- Try to make sure the fishing will be good - Now...  I know that this is kind of a given, but your 8 year old probably wont appreciate going to the river and changing flies 15 times until you find that one Baetis pattern that will work.  Scout out a fishery that is low on the technical side, and high on the fish quantity side.  I'd encourage you to think outside the box when it comes to species too.  Bluegill and Crappie are good kid fish.  Kids don't care if you are catching pristine Colorado River Cutthroats or big slimy catfish.  As long as it pulls, they will dig it.

3- Fly fishing only? - This is the part where elitism gets thrown out the window.  There is a time and a place for bobbers and worms, and this place typically has to do with getting kids into fish.  On a recent trip with the family on the upgraded bass boat we had a plan, and it turned out much better than expected.  I had
Audrey and her huge catfish
planned the trip out so I could target largemouth, and my wife and kids could target Crappie.  The agreement was that I would cast on one side of the boat, and they would cast off the other side.  Two or three Crappie in the boat and Audrey starts yelling that she has a fish!  Her rod was doubled over so far that it was about to break...  Up came about an 8 pound catfish and it was game on from then on.  I put my bass gear away, and we caught catfish until our arms were tired.  I had a blast baiting hooks and netting big ol' catfish for kids who were more excited about fishing than I had ever seen.  On the other side of the coin, last year we camped on a small stream with many hungry and stupid brookies.  We only brought fly rods on that trip, and both Audrey and Seth caught their first fly rod trout on wooly buggers that Audrey had tied.  They had a blast even though we only caught two trout because we had rock skipping contests, looked under rocks for aquatic insects, etc.  My point - choose the technique that will provide the most enjoyment for the kids.

4- Practice with them - There isn't much that will frustrate a kid than constantly messing with line tangles and not being able to present the fly (worm or lure) to the fish.  Something that will help is to practice casting, tying knots, landing fish, etc.  Audrey is my fly fisher, and she can cast a fly rod moderately well - well

Mia's Crappie in one hand, a granola bar in the other hand
enough that I don't have to constantly tell her what to do on the water.  Seth, on the other hand, is all about the hardware, and hasn't really taken much interest in learning the ways of the fly rod.  He has a baitcaster setup that he can throw all day long without issues, and I think it's awesome!  I'll teach him to throw a fly some day, but for now he's having a blast pitching his jig into a bucket in the front yard.  Because they practice at home, they can usually fish with minimal issues.

5- Consider taking one kid at a time - I have three kids, and if the is ever a constant with them - it's that they will fight if they are cooped up with each other for too long.  I'll take all of the kids if my wife comes along because she is another enforcer, but if I'm headed out alone I like to take one kid at time.  They take turns coming with me on short trips, and it truly is a special time to spend talking to them without any other distractions around.  The other kids are typically OK with it (except for Mia the boss) because they know that their turn is coming soon.


Again, these are just my opinions and I have had to get fairly creative to get my kids on the water, but it's what works for me.  What's most important about this whole article is that you plant a positive "fishing" seed in your kids, so that it will grow into something that they truly love.  We all had to go through our progressions in fishing, so we shouldn't expect our kids to automatically appreciate fishing like we do, well, at least until they are about 10 ;)

What are some of the things you all do to make kid fishing more enjoyable?

~ Cheech


The Olive Willy - From Washington with Love

$
0
0

A Stillwater go-to pattern

Olive Willy

In the spring of 2003 I found myself on another work trip to Seattle, and like many previous trips, I looked up a fly shop that I could visit to waste a few minutes and a few bucks.  I ended up at Swede's Fly Shop in Woodinville, Wa, and as I had done in many shops across the country I asked them what the local specialty pattern was.  A very understanding shop employee must have seen the tying addiction in my eyes and took me to the fly bins to show me a fly that they called the "Olive Willy." They offered me great service in selecting the correct materials and giving me a few tips in tying the fly.  The tail was fluff from the base of a pheasant rump feather.  They body was custom dyed chenille, and the collar was tied soft-hackle style with the remaining part of the rump feather.  There was an optional over-wing tied of red rabbit fur that I turned into a staple in my box. To top it all of was a ruby red bead with a silver lining - literally.  The secret... chartreuse dyed rump feathers that made the drab gray turn into a magic olive with lots of speckles.

I remember distinctly getting home on Friday and heading straight to the vise to whip up some Willys, and i only stopped when I wore out all of the hooks that I had purchased in Washington.  A small lake that held
Bonneville Cutt on the Olive Willy
Kamloops strain rainbow trout and largemouth bass was in the plans for the next day, and I knew I'd be fishing the trusty cone head brown bugger trailed by the Olive Willy.  To spare you a lot of details, the Willy absolutely crushed trout, bass, and bluegill.  It was a good thing that I tied a lot of them because I was handing them out to friends right and left.

Swede's Fly Shop in Woodinville has since closed it's doors, but it's still going strong in Spokane.  I had a chance last week to visit the shop in Spokane, and was able to replenish my stock of special beads and custom dyed chenille, but best of all, it was good to chat with Allen (Swede) about all of their cool materials.  If you have a chance, head in to their shop to see a wealth of awesome tying materials!

I caught a LOT of fish on the Olive Willy that year and every year since 2003, and as much as I tinker with other bugs, I always make sure I have some Olive Willys in my box.  I even landed a catch and release state record smallmouth on it! (that lasted about 5 months until it was beaten by a guy throwing tube jigs.)  As you will see on the video tutorial, I made a slight change on the hackle and the chenille, but it still works great.  This pattern is especially effective in early summer when the damsel nymphs are going crazy.

~ Cheech

Original recipe:
Hook: Allen S402 or S402BL
Bead: Red craft bead with a square hole (painted silver inside)
Thread: UTC 70 - red
Tail: Fluff from the base of a chartreuse dyed pheasant rump feather
Body: Medium chenille - dyed peacock
Hackle: Pheasant rump dyed chartreuse (one with a lot of speckling)
Over wing (optional): red rabbit fur


Modified recipe (as shown in the video):
Hook: Allen S402 or S402BL BUY HERE
Bead: Red craft bead with a square hole (painted silver inside)
Thread: UTC 70 - red
Tail: Fluff from the base of a Coq de Leon hen saddle feather - speckled yellow chartreuse BUY HERE
Body: Speckled chenille - lime/olive BUY HERE
Hackle: Coq de Leon hen saddle feather - speckled yellow chartreuse BUY HERE
Over wing (optional): red rabbit fur

Video

Cicada Invasion

$
0
0

It's Getting Buggy Up In Here

cicada fly
A face only a mother could love
If you've ever been lucky enough to hit a strong cicada hatch around a body of water where fish are keying on these crunchy meat bombs, you can probably appreciate the style of fishing that ensues. We're talking hard-slapping, big-bug-throwing and ferocious fly inhalation takes. So it's good to get a handle on a few patterns that will seal the deal for you.

Each year we hit a few lakes (yes lakes) and streams, including Utah's famous Green River, for our Cicada fix. I'd venture to say there are Cicadas around a lot of streams and lakes you probably already fish, so be on the lookout. I have a couple of my favorite Cicada patterns, including the Sickada and the Unsinkabeetle (in black) and some other crazier patterns that we've also found to be very effective (more about that later).

cicada fly patterns
Swarm!


So one of our favorite areas to fish Cicada patterns features three or four streams with a few smallish ponds, giving us a wide variety of fishing. The numbers of Cicadas in these areas is staggering and the fish definitely take note. The bugs consistently fall from the trees and bushes and join the floating buffet presented to the fish below.


If you look at the Sickada entry from last year, you'll notice more of an orange tint to the Cicadas. The shots here were taken only a couple of miles away on another stream in this same watershed and most bugs were a lot less orange looking with more of a yellow tinge. Not sure if that's due to maturity of the bugs or time of day or whatever, but I found the yellow color to be a better fly choice for the fish that would hit my offerings in the area we've been fishing lately. Either way, pay attention to the colors on the bugs if you want to dial down any imitations.

Hungry Brown that took a yellow Sickada
Regardless of the pattern you use, you'll realize these bugs are thick and relatively heavy. They don't land like a mayfly on the surface of the water. We opt for heavier, slappier (read: foam) patterns that garner more attention. In fact, the fish to the left hit my offering after I'd thrown four or five casts into the same seam and it wasn't until Cheech screams at me from me downstream to slap the water harder that I regained focus on my casting, threw a huge splashy cast and fish on.

So go find some Cicada water, get some good patterns and start slapping the water.


Gut Bomb Damsel Fly Nymph

$
0
0

Gut Bomb Bloodworm meets damselfly nymph

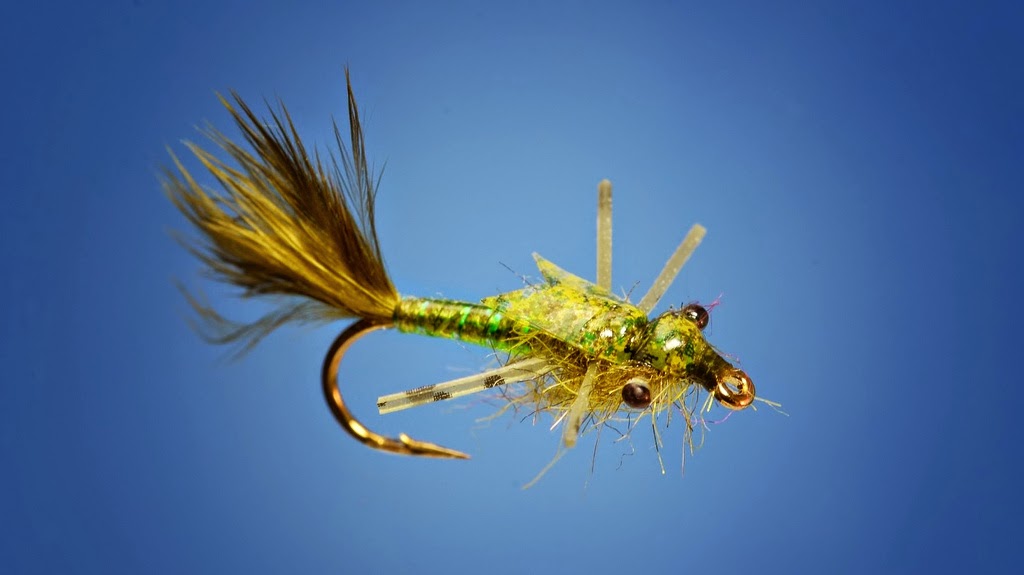
Gut Bomb Damsel

A few years back when Curtis created the Gut Bomb Bloodworm I was really impressed at how he was able to manipulate the body to seem almost see-through, and I started thinking of ways that the "gut bomb" technique could be added to other types of patterns.  I had tried it on many different iterations of bugginess from the vise until one of the flies really clicked; it is now called the Gut Bomb Damselfly Nymph.  I really like to fish damselfly nymphs in the early summer, and this one was quickly added to the arsenal full time after several successful trips with it.  I think the keys to a realistic damselfly nymph are eyes and a slender profile, which are achieved with the gut-bomb body technique and burnt monofilament eyes.  

This Bonneville Cutthroat couldn't resist 

There are several damsel patterns that I will fish quite a bit, but if I know the fish are feeding on damsels but are being picky about patterns, the GB Damsel gets tied on and they can't resist.  This pattern is also successful in tan and a brighter green.  You can also add flash to the wingcase, and use soft hackle fibers for the legs on this pattern.

~Cheech  


Recipe:
Hook: Allen S402 #12-#8 BUY HERE
Thread: UTC 70 - olive BUY HERE
Tail: Wooly Bugger Marabou - olive BUY HERE
Body: Scud back 1/8"- clear BUY HERE
Ribbing: Krystal Flash - UV pearl BUY HERE
Thorax: Arizona synthetic dubbing - bronze peacock BUY HERE
Legs: Buggy Nymph Legs - dark olive BUY HERE
Wing Case: Fino Skin - mottled olive BUY HERE
Eyes: Melted 25 lb. mono

To seal the body and the wing case, you can use either Clear Cure Goo - Hydro, or Loon UV finish - Thin.


Enjoying the Smaller Things

$
0
0

Sometimes we have to take a step back and enjoy what we can.


A few months ago on a very snowy and blustery Saturday morning in November, I sat in front of my vise in
my warm and cozy manly man-cave watching the powdery Utah snow piling up outside my window. I felt a little like Clark W. Griswold as he stood before the frost-laced window staring out at the fantasy scene unfolding in his yet-to-be-built swimming pool as my mind drifted to summer meadow streams full of colorful bikini-clad cutthroats. In my Griswold stupor, I could smell the grasses, trees and water as they combined to form one of those scents you don't easily forget. I could hear the wind in the trees and the splashy rises of fish greedily taking terrestrials from the surface. And as Ruby Sue roused me from my day dream, I was harshly reminded of the months ahead locked in Winter's grasp.

But as I sat there and tied flies that day, I had an epiphany of sorts. I was playing around with some very clean colorfully dyed pheasant tails and a superb Hungarian Partridge pelt while working my way through a few fly patterns. As I was tying, I stopped to think about how something as small as a delicate pheasant tail fiber wrapped on a hook and counter-wrapped with some silver wire was a source of a certain amount of enjoyment and fulfillment. I stopped and began to focus on those small things in my world right in that moment that brought me satisfaction: Being in a warm room tying flies; having my soft-hackles prepped with webby fibers stripped and feathers all lined up; being able to take a few pieces of fur, feather and metal and ultimately make something from nothing in the form of one fly. Done, complete, tidied up from chaos to order.

I began to think more about the things we fly fishers more often focus on and strive to attain. It's frequently more about the big fish, the big trip or the big gnarly flies. But how often are we forgetting or overlooking those small things that, when added up, combine to form what could be a very large part of our enjoyment of this sport in which we participate -- especially when those other things are out of reach for the time being. How often do we focus on getting that huge trophy to impress the peeps, but not stopping to appreciate the colorful bright spots on a small brown or brook trout taken from a small stream or lake?

And even more to that, for the fly tyer, it can be all about the latest and greatest materials, hooks, flies and doodads. Everything leading up to the big trip or the filling of the boxes. How about the smaller things? Things like a nicely stacked clump of deer hair with the tips aligned, ready to be pulled out of the hair stacker or a perfectly spaced and wrapped peacock quill body or the motion of gently preening back soft hackle fibers as you tie off an immaculate thread head in front of it. That list goes on.
Big Color, Small Brookie

In today's hustle and bustle, it will behoove us to stop and smell the roses along the way. Appreciate those small things wherever and whenever you can. Don't let the pursuit of the grand overshadow the enjoyment of the everyday or the small.

Peace out.

~ Curtis


Drakes -- Fripple Style

$
0
0

A very effective big bug style mayfly pattern


Based on the great success of the latest version of the Baetis flavored Fripple (see tutorial here), it stands to reason that the same effectiveness should translate to really any kind of mayfly -- big and small. A few weeks ago, we fished a stream that had some large gray drakes hatching and for which I was largely unprepared. Luckily, there was a lot of non-Drake bug action popping, so it didn't matter, but it got me to thinking about taking the Fripple to the next level.

There are only a couple of small tweaks to the original pattern in the form of deer hair substituted for the snowshoe hare toe fur and the addition of hackle to further aid in flotation as well as give a bigger footprint on the water. The butt still slices into the water and hangs there taunting the fish to eat it. I think that is very key to its effectiveness.

green drake fly patternAnyway, clinical trials began shortly thereafter and the results were actually pretty amazing. We sought out a river that was known for good Green Drake action and some decent sized Browns. The first part of the day was slow and although I didn't see any Drakes at the time, I decided to throw on my new Fripple. The first cast into a likely holding spot resulted in a slashing grab, but a miss. No fish actively rising and we got one to come up -- good sign. The next cast was fish on. No hesitation, just a big mouthful of drake. To prove it wasn't a fluke, I threw right back into the same little run and caught an even bigger fish a few minutes later.


green drake fly patternAt about the same time, the adult Drakes started to show up and the fish started staging to intercept so we could see more potential suitors sitting in the feeding lanes waiting for the buffet to pass by. After a few more fish, we decided to run a few tests comparing the Fripple against some other patterns. In one instance, a few casts of a good drake pattern was ignored 4 or 5 times perfectly placed over the feeding lane. "Your turn", Cheech informed me. My awesome casting skills on display, I placed the fly a good three feet to the right of the fish (blame the Euro-nymph leader I was too lazy to change). Nonetheless, on that errant cast, the fish glided out of his holding position and promptly engulfed the fly.

A few fish following that one, I had a similar situation where I twice, on two consecutive casts, pulled the fly out of the rising fish's mouth (I lost track of the fly as the sun was in my eyes...). But the 3rd cast, also quite errant but yet I was able to see the fly this time, resulted in a solid hook-up.


green drake fly pattern brown trout


green drake fly pattern brown trout
"The fly done work."
Beyond the fact the fish really took to the pattern, it proved to be fairly durable. This is fly right at the point where the foam and deer hair had started to fall apart from being inhaled by numerous hungry fish.

So give it a try. Here's a quick tutorial to help out...

Hot Spot: Fl. Orange Glo-Brite or Fl Fire Orange Thread  -- Buy Here --
Body: Thread
Body Coating: Clear Cure Goo Hydro or Loon Clear Fly Finish  -- Buy Here --


The Universal Chironomid Pattern

$
0
0

The Hamburger of Chironomids


stillwater chironomid fly pattern
Universal Chironomid with goose biot wing pads
So if scuds are the skittles of the sea, then chironomids are likely the equivalent of fast food for the hungry trout. With a laser focus, when chironomids are out and about, the fish will gorge themselves on this plentiful meal ticket. Very rarely will we see stomach or throat samples from stillwater fish that DON'T contain some amount of chironomids in them.

As luck would have it, we like to fish with chironomids in our stillwater fishing and do it quite often. In fact, I have a large chunk of my stillwater nymph box dedicated to chironomids of all shapes, sizes and colors.

OCD Fly Collection

Sometimes, I have to dial in a specific size and color just depending on what the fish are focusing on that day and time. But I have found, more and more, that regardless of various sizes of bugs present, there is a pretty universal size and color that will work most any time on any stillwater -- with very few exceptions. That's why I call this the Universal Chironomid.

A collection of the ubiquitous chironomids

First off, there's nothing inherently magic about this style of pattern -- lots of people tie quill body chironomids. The revelation for me came over the past few years as I noticed that I caught more fish on the smaller less flashy chironomid pupa imitations such as this. So I just standardized on this specific pattern and it's done quite well.

Portly Hamburger-eating rainbow that fell for a smallish chironomid
On a recent trip to a stillwater that holds some very large rainbow trout, I began with some flashier larger style chironomids and was only able to muster a couple of fish here and there. While I noticed two or three sizes and colors of naturals, I focused on the smaller and more traditional looking bugs that were just black/gray or black/tan. The Universal chironomid (UC), once again, worked its magic with 4 fish on its first 4 casts. The 23 inch rainbow on the right was caught on a size #16 UC.

The only differences in this pattern are really just the bead size in conjunction with the hook size (from #12 down to #16 or even #18) and I started using more holo tinsel than the goose biots. I also tie a version without a bead.

One thing to also point out is that you must use some sort of epoxy or UV cure resin on this bad boy. The fly below was responsible for probably 10 fish, but it took a beating in the process. Without the UV resin, it wouldn't have lasted more than 1 fish.
UC "Before"

"UC" After

Material List:

Hook: Allen N203BL #12 - #18 or Daiichi 1150  -- Buy Here --
Thread: UTC Ultrathread 70 Denier, Black  -- Buy Here --
Bead: Tungsten 2.4mm to 3.2mm, Black Nickel.  -- Buy Here --
Body: Stripped Peacock Eye Quills  -- Buy Here --
Wing Pads: Holo Tinsel, Orange, Med.  -- Buy Here --
Coating: Clear Cure Good Hydro or Loon UV Clear Fly Finish, Thin  -- Buy Here --

Yet another big fish eating smallish chironomids

Review: Tacky Fly Box

$
0
0

A new concept in fly storage


When I first saw the Kickstarter launch of the Tacky Fly Box, I'll admit I was a bit intrigued but yet fairly skeptical. I've seen a lot of gimicky fly box ideas float around over the years and hardly any hold up to the standard foam or slotted foam styles we've all used. However, the more I thought about it, the more I liked the idea of using silicon instead of the standard foam that fly boxes have been using for years.

So without having used the Tacky box, I had a few main gripes about my current box setups that I hoped the Tacky box would overcome. 

  • The slots on my slotted foam boxes tend to grow wider as I move flies in and out -- to the point where they won't even hold a fly.
  • I have several foam boxes where, after sitting in the hot sun for a time, the foam and adhesive used to glue them to the box would delaminate and the foam would warp or just peel off.
  • I've had a few instances where my plastic foam slotted boxes were crushed when I sat on or leaned on my pack or bag.
  • Some fly boxes, after long-term use, lose their ability to shut securely. Combine that with foam that doesn't hold flies and you create a recipe for a dropped box that will easily spill its contents. I did that once and spent quite a bit of time picking up small flies from the dirt and rocks. It was awesome.

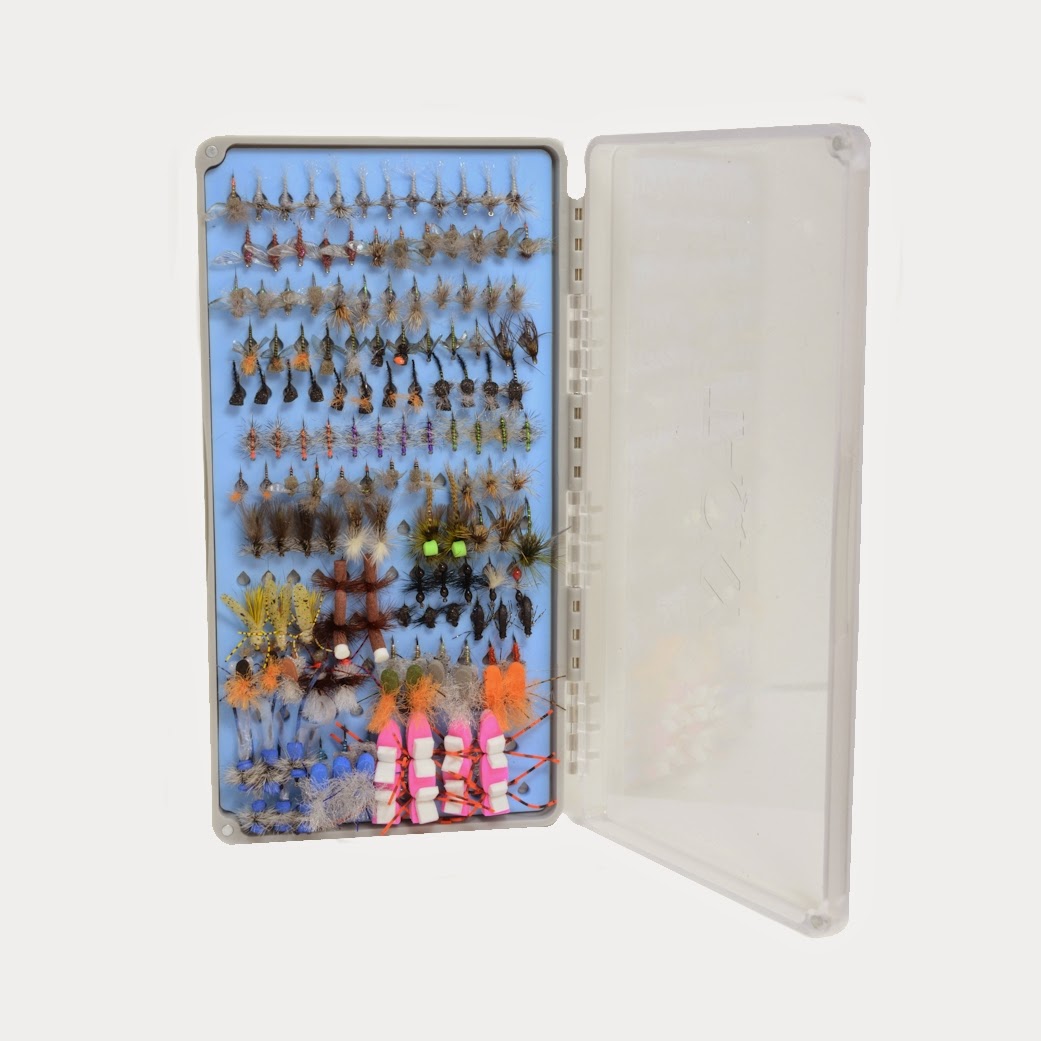
Tacky Fly Box
Tacky Fly Box
So when we finally got some Tacky Boxes in the mail, I was eager to try them out. The first thing that jumped out at me was that these boxes are sturdy. They are made with a high quality polycarbonate that appears to be very shatter resistant. They'd have to be very strong as you can witness by the Sasquatch abuse shown in the video review below. And the magnetic closure mechanisms work great, holding it securely shut.

In terms of size, they have a very thin profile and fit nicely into a lot of pockets on my various fishing packs and bags. So size-wise, they're great. 


My Tacky Fly Box of dry fly all-stars for the high country
As far as fly storage goes, these boxes will hold typically fewer flies (168 to be exact) than some of the bigger slotted foam boxes, but you actually end up being able to more securely and comfortably store your flies due to the silicon material and the fact that the slots are offset from row to row. This is a great advantage over the typical foam slotted versions and I'd say evens the playing field in terms of the number of slots. For me, it was actually a very good exercise to pare down some of my foam boxes and create an "all star" dry fly box for the high country (shown here). 

And even with the bigger flies I have in the box, there is enough clearance that the lid closes with no issues. Now I'm not likely to store my 3/0 bass poppers or Double-Wide Cheech Leeches in here, but most everything else would fit fine.

So double thumbs up from us on this one. After a lot of testing, poking and prodding with the boxes, both Cheech and I are in the process of moving most of our flies into new homes.  Check out the video review below and buy the boxes here.


Technical Clothing - a great option for sun protection

$
0
0

An alternative to sunscreen

Patagonia Sun Hoodie and a bruiser Brown Trout

A few years ago I decided to start being a bit more mature (as my wife would put it) with my sun protection efforts after seeing some of the aftermath of skin cancer that some dear friends have had to endure.  This meant slathering myself up a few times a day with sunscreen and trying to follow the recommendations on each tube of paste that I was using.  I say "paste" because that's how it felt on my skin... in other words, I HATE sunscreen.  I don't hate the fact that it helps keep my skin protected from the sun, I just hate the feeling that my skin is coated with a thin layer of elmer's glue.  I still wanted to protect myself from the sun, but I wanted to find a way to do it without dealing with sunscreen.  I kind of went through a progression of products until I found stuff that I like, but I'm 100% satisfied with where I ended up.  The good thing is that many manufacturers are coming out with a large selection of clothing specifically to block the sun.  Here are my findings from top to bottom.

EYEWEAR:
High quality polarized lenses are very important to help see fish better, but they are equally important in protecting your eyes from the sun.  When selecting glasses, it's important to find something that fits your head/face and that provides maximum coverage.  I have been using two styles of glasses (Smith Touchstone, and Maui Jim Spartan Reef)  over the last 7 or 8 years, and I have been very pleased with the results

HEADWEAR:
I first started out by wearing a larger "sun" hat that would cover my face and ears from the sun.  I bought a Simms Solar Sombrero, and It worked OK, but it was a bit tight on my huge head (I wear a size 8 new era cap without it looking like a gang banger).  I wore it for a while until I just got fed up with it squeezing my brain for hours on end.  There are several types of sun head wear available from several companies, and they are a good start to going sunscreen free.

Everyone is familiar with buffs, and whether people use them to keep out of the sun, or to get the bank robber look while fishing, they are all the rage right now.  My issue with buffs is that they compress my huge head and make me breathe my hot breath all day long.  They are good for winter fishing, but I can't deal with them in the heat.  I have really only tried them on long enough to realize that they drive me nuts (so like 15 seconds).  If buffs are your cup of tea, go for it.  I really think I'd love them if they weren't so friggin' tight on my fat head.

TOPS:
Patagonia Tropic Comfort Hoodie THUMBHOLES!!!
Long sleeves are a MUST!!!  Yes, even in the sun long sleeves can be a very comfortable option to keep the sun off.  If I'm on the boat, I'll keep a spray bottle close by so I can spray my shirt down to keep cool. If I'm wading, I just dip my arms in the cool water.  Either way, it's built in air conditioning especially if there is a small breeze.
 As much as I love my Patagonia gear, I LOVE the stuff from Columbia because they make stuff for big guys (6'5" 285 pounds... yeah)  I started with the Columbia Terminal Tackle long sleeve tee and the XXL was plenty big for my long arms.  I love that shirt and I have put a lot of miles on it, but it doesn't cover my head and hands.  Then I moved up to the Patagonia Tropic Comfort Hoodie II, and I have found sun protection bliss.  The hoodie goes up over a normal hat and buttons under my chin to keep it right where you want it.  It is like a perfect built-in buff that isn't tight against my skin... YAHTZEE!  The sleeves also have thumbholes so they cover almost down to my first knuckles on my hand.  This shirt is a shirt, buff, and sun gloves all built into one.  The fabric is light and breathable, and is very comfortable even in very hot conditions  The Tropic Comfort Hoodie and a regular ball cap are what I use now and it's very effective.

BOTTOMS:
My Columbia pants are great on the boat
I'm a huge proponent of shorts and I pretty much live in my over sized basketball shorts, but if I'm trying to stay out of the sun I'll wear pants.  The issue that I have always had with pants is that the manufacturers never quite have the right fit for me... hence the reason I wear shorts so much.  I tried to find the right fit with Columbia Silver Ridge Cargo Pant and skeptically ordered some, and after I tried them on and fished with them I immediately ordered another pair!  They are my go-to fishing pants for wet wading and fishing from the boat.  They actually are pretty good under the waders, but I prefer micro fleece etc. for that job...  They are very comfortable and durable at the same time due to the fact that the fabric is somewhat stretchy.  They have come into contact with lots of barbed wire, sharp rocks, fish hooks, etc. and they are as good as new.  Most serious fishing manufacturers will make zip off versions of their technical pants, but I really don't ever see me using those, so I just got the "perma-pant" option.  Pants also come in very handy when wet wading and breaking through thick brush.
Patagonia and Simms, but I couldn't find anything with a 36" inseam.  I stumbled upon the

FOOTWEAR:
When I first started wet wading I was fishing in a pair of original Chaco sandals, and while they are
Even the cicadas love my technical gear.
absolutely bulletproof and durable, they aren't the best at keeping the gravel and pebbles from getting lodged under my feet.  I also had more than one run-in with some wild boulders that jumped out and split my toes up pretty bad.  Wading-specific shoes might be a bit better than sandals, but they still are magnets for pebbles and gravel.  Aside from keeping your feet protected while you fish, your footwear should provide you protection from the sun too.  If I'm on the boat, I just wear my every day comfortable running shoes to keep the tops of my feet out of the sun, but if I'm wet wading, I prefer to use neoprene socks and my wading boots.  My boots give me the best traction, and my feet stay clear of sharp rocks and pebbles under my feet.

In all, it's not too hard these days to find technical clothing that will protect you from the sun.  If you get the right stuff, you will be able to leave that nasty sun block at home!

~ Cheech

Un-Matching the Hatch

$
0
0

Sometimes you gotta go against the grain

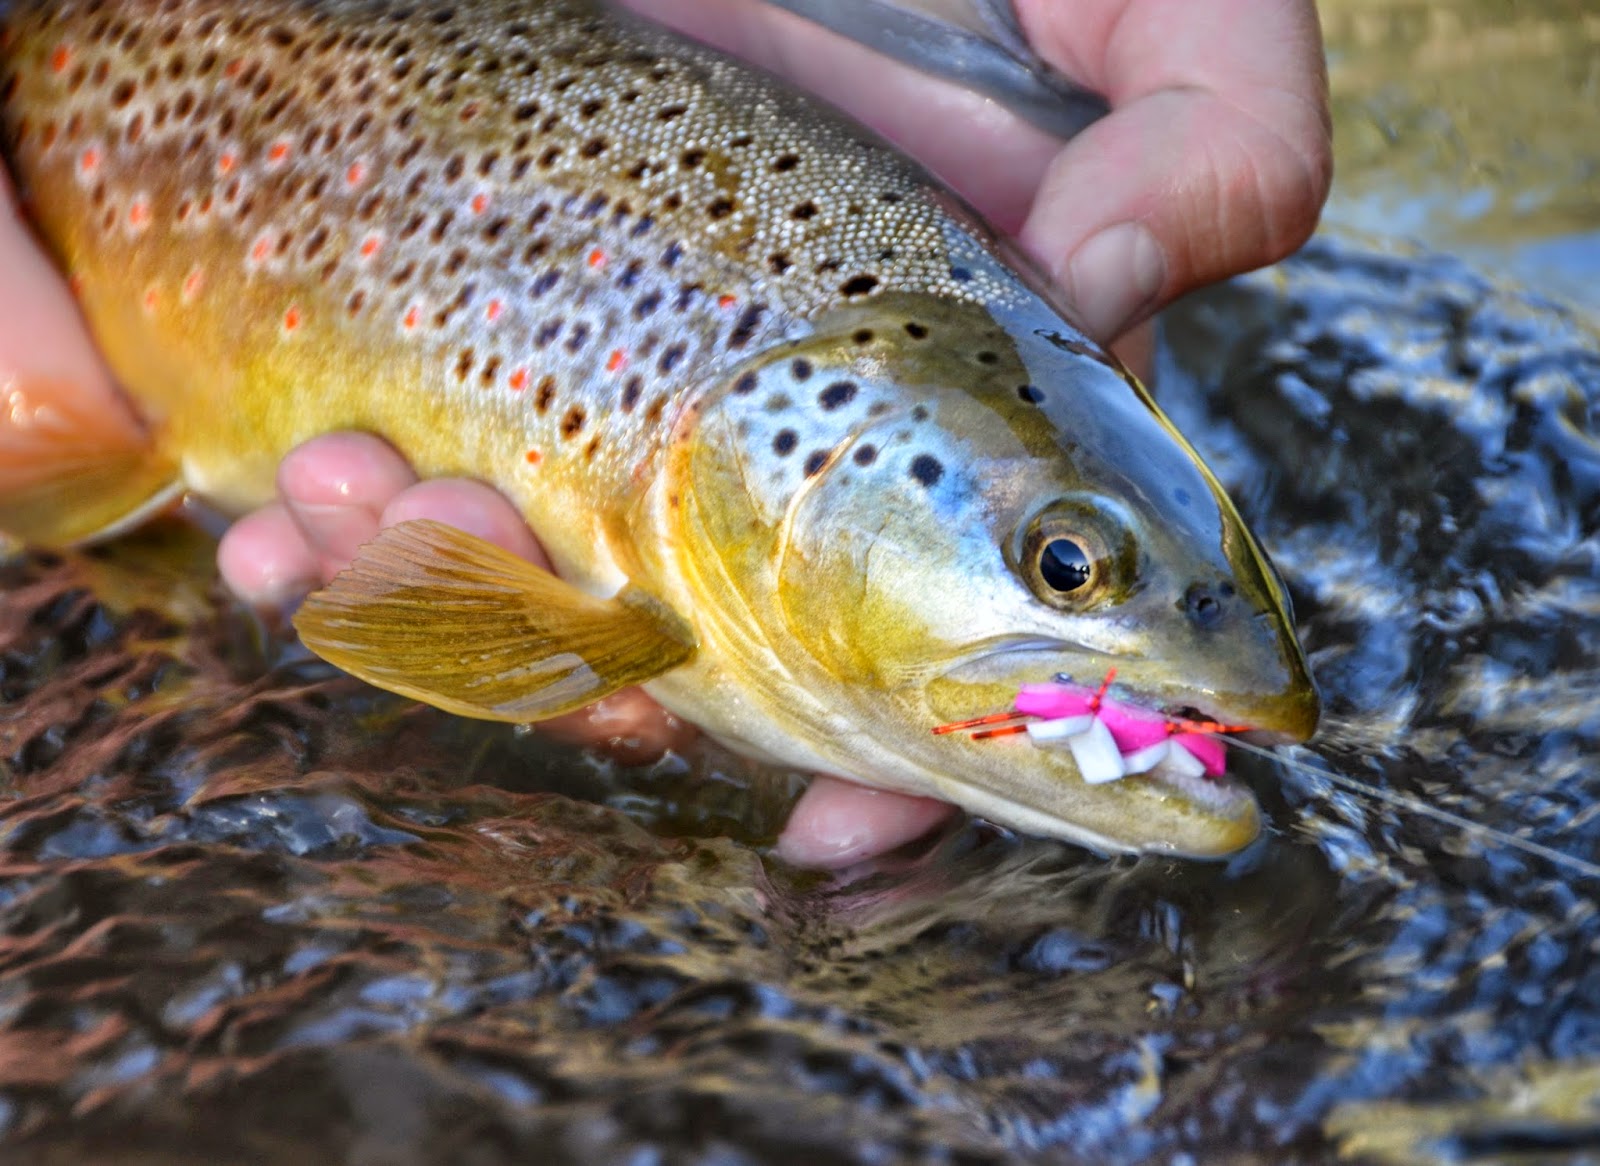
brown trout taken on blingnobyl ant
A Brown trout took kindly to the Pink Bling
On a recent trip to the river expecting some big fish on some big bugs, we weren't disappointed as we arrived on the water to begin the flogging. Bugs were everywhere:  caddis, stoneflies, a few mayflies and some nice juicy cicadas. Knowing the bigger fish will often target the bigger meals, I tied on a big chunky cicada pattern and began hucking it into the promising spots. An hour later and only a couple of fish to hand and I tried a stonefly pattern hoping that would be the ticket. Not a bite. 

Cheech was having similar results as we switched off throwing different patterns at a very fishy looking seam. Time to change it up. Similar to George Costanza's opposite day, as Jerry puts it, "If every instinct you have is wrong, then the opposite would have to be right." So, as these fish obviously didn't care much about our hatch-matching attempts, I figured it was time to do something unconventional and bust out a new favorite: the Blingnobyl Ant. And as we've written previously here and here, the Blingnobyl ant has been a stellar addition to the dry fly arsenal.

brown trout attractor pattern
Another Pink Bling 
The Pink Blingnobyl wasn't going to win any hatch-matching contests yet, it began to immediately produce results. The rest of the day consisted of throwing this gaudy pink attractor pattern into the holding lies and it was topwater carnage.

A pile of fresh Blingnobyl Ants
Granted we've had some great results with this pattern in recent months, but it just goes to show that sometimes you have to shake conventional hatch-matching convention and do something so crazy it might just work. And work it did.


If you missed it the first time around, here's the recipe and the video tutorial:

Thread: UTC GSP 100 Red
Under-body: Pearl Cactus Chenille or Estaz -- BUY IT! --
Body: Glitter Craft Foam (Pink) -- BUY IT! --
Legs: Rainy's Barred Rubber Legs -- BUY IT! --
Indicator: 2mm white craft foam


Dry Fly Fishing with a Nymphing Rod

$
0
0

Whodathunk?

As I wrote about last year, I ended up getting a fancy Allen Icon 10 foot 4 wt rod for Euro style nymphing.
Since then I've put a lot of mileage on this rod and it's pulled in a lot of fish. One of my initial hesitations about going with a 10 foot "specialty" rod was the thought that I'd have to go to a different rod when fishing dries. Now granted, you won't fish the same leader setup on a dry fly rig than you would with a euro rig, but I was still worried about how it would cast and affect my presentation of delicate dries to big attractors.


Allen Icon Series Rod
So I ended up working the 10 footer into my dry fly fishing repertoire for the past few months and have really been impressed with the results. Rather than thinking I'd throw the 10 footer when I didn't want to nymph but still go to the 9 footers for normal dry fly fishing, I've now ended up opting to reach for the 10 footer for most of my small stream and river situations.

Here are some points of interest in case you want to consider a nymphing rod that can be used for double duty:


  • Similar to the concept of using the longer rod to control your line and presentation for nymphs, the same applies to dry flies. Duh. Bigger dries on a smaller water produced more fish on my 10 footer than I think I would have seen with the shorter "small stream" rods I have due to drag control and presentation factors. I was really impressed with the way I could flip a bit of leader out with the fly and maintain a totally drag free drift by virtue of that added rod length. I was reaching over crazy side currents and working flies into back eddies and pockets I don't think I would have been able to with a shorter rod.
  • Related to the idea above, I've found that mending line with a 10 footer is also a much easier and accurate process than with a shorter rod. More line control again. Better drifts. More fish.
  • I was initially worried about going from my 7 1/2 foot or 9 foot rods to a 10 footer and tangling with the trees and overhanging branches or bushes. What I found was that yes, I had to be a bit more mindful of my casts and rod placement, but this was offset by the fact that I wasn't doing as much false casting due to the longer reach of the rod. Plus, when needing a bow-and-arrow style cast, the 10 footer did an excellent job at flinging the fly into confined spaces.
  • As I mentioned initially, if you're going to Euro nymph and then expect to just tie on a dry fly with the same leader setup, you're not going to have as smooth a casting or presentation motion -- especially with smaller lighter dries. I've done well with bigger attractor patterns and it works ok. But to get the best performance, you'll want to swap out leaders. Going with a loop-to-loop connection or something similar that's easy to swap out will pay dividends.
  • Think of it this way: You can't as easily pull out a 9 foot rod and do the tight-line or Euro style nymphing as you can use a 10 foot rod for dry fly fishing. Ideally, you have a specially-trained rod monkey that holds your specialty rods and follows you around on the water all day swapping out your rods like a caddy does on the PGA tour. But until then, I'm leaning more towards a 10 footer as more of an all-around rod in a lot of situations.
  • Now, one minor complaint: Probably the only downside for me on a 10 footer has been the extra workout my arm and wrist will get. At first I chalked it up to being out of shape, but I've since found that I definitely have more sore muscles and aches after throwing the 10 footer all day. Euro-style nymphing alone, with your arm cocked like it is will definitely do that, but I think the longer length just requires a bit more force (think of the force it takes to open a really wide door vs a shorter door). And not a big deal, but something worth mentioning.

Anyhoo...that's just my two cents on the matter. Everyone will be different, but for me, the next couple of rods on the radar for purchase are both 10 footers. I think they're definitely worth a 2nd look.

Hackle Primer - Why Buy Expensive Hackle?

$
0
0

Good hackle = good flies


Royal Wulffs tied with Whiting hackle


Whiting Euro Saddle
I can still remember the first hackle that I bought.  It was a dun colored neck hackle that I had to save my pennies for, and it was definitely put to good use.  As much as that hackle served a purpose, it also caused a lot of frustration when I was trying to tie certain types of flies.  I can remember almost giving up on tying parachutes because the stems would twist, and I remember having to tie in two to three feathers to get the hackle bushy enough to work for some attractor patterns.  Yes, it was useful... but I think I would have been far better off buying a better neck or saddle.  It took me a while to realize that I was better off saving my money to get better hackle, so I decided I'd put my experience and opinions on hackle on the site.

Buying a top of the line piece of rooster won't guarantee that you will tie just like the "pros," but it sure does put you on the right track.  I remember about 8 or 9 years ago when Curtis and I were talking about parachutes.  He told me that he had pretty much sworn off parachutes  because of how much of a pain in the butt they were to tie.  I found out later that he hadn't upgraded his hackle for a while and that was the cause of his frustrations.  Once he upgraded to top notch hackle, it made all the difference in tying "clean" flies more easily.  This especially holds true if you are tying hackled dry flies in size 18 or smaller.

One piece of good saddle hackle can tie 4 to 5 of these.
Like all fly tying materials, cost is a determining factor when considering hackle.  One of the things that I hear all the time is that hackle is "WAY too expensive" and this especially goes for Whiting dry fly hackle.  Sure you can get an inferior piece of hackle for a little bit less money, but if you look at it from my point of view, Whiting hackle is cheaper than all other brands!!! The reason I say this is the quantity of usable feathers on a saddle/cape.  A lot of patches of feathers really look the same until you start pulling off webby fibers at the base of the feather so you can tie with the "sweet spot." On a whiting feather, the web is very minimal, and it's very possible to get more than one fly out of a feather (depending on what I'm tying).  My point is that you will be able to tie MANY more flies out of a whiting cape/saddle than you would with an inferior cape/saddle.

This was tied with bronze cape feathers.
As far as the grading system with Whiting, I mostly tie with bronze or pro grade hackles.  Some of my favorites are the Hebert Miner pro grades because they come in some really buggy colors, and they are probably the best bang for the buck when it comes to good dry fly hackle.  I would buy silver, gold, and platinum if the bronze and pro grade weren't so good...  

Check out the video for more information on capes, saddles, and a comparison between modern hackle and the hackle from 15 years ago. And don't forget we carry some awesome Whiting products, including dry fly capes, saddles, soft hackles and etc etc. We even have the elusive Euro Saddles in the store.
~ Cheech


Hackle Primer video...

Low Fat Minnow - Perch Version 2

$
0
0

Not so Low Fat anymore


By now you are probably pretty familiar with the Low Fat Minnow and the many shapes and forms it can take.  Also, you have probably seen our Bruiser Blend dubbing that we have been selling on the site for several months now.  Well, I developed Bruiser Blend dubbing specifically so I could get more length on the Low Fat Minnow.  I like the way this minnow swims so much that I'm blending a new length of bruiser blend to take the place of the Lazer Dub on the smaller version of the fly too.  This new version of the minnow has been a great addition to our arsenal, and we constantly get pictures sent to us showing off what the original Low Fat Minnow has caught, so give some of these bad boys a spin and let us know how they do for you. 

This new color scheme is a KILLER for smallmouth in perch filled waters, and the top and bottom colors can be swapped out to make your perch as bright or as subtle as you want.


The Fly Airbrushing Revolution

$
0
0

The Copic Airbrush system


First off, this is literally one of the more fun tools and techniques in my tying arsenal. I first learned about these cool fly tying tools a few years ago and have been using them ever since. Nowadays, you'll see a lot of tyers out there that have finally picked up on this little gem, so it's not just a passing fad. Not only can you have a blast painting poppers, but the Copic Airbrush system can be used to paint crease flies...

Smallmouth bass on crease fly popper

Crawdad bodies...

crawdad fly pattern crawfish craw

And whatever else you might have in mind.


bluegill popper fly pattern yearofthebluegill


The beauty to this little system is that you have the creative power of an airbrush but with the convenience of the patented "hot-swappable" marker system. You can literally swap from color to color in a few seconds with no clean-up in between. Not only that, but the airbrush system is portable by virtue of it's "canned air" system or you can go "plugged" with a standard craft or airbrush air compressor. Plus, it's relatively inexpensive compared to other styles of airbrushing out there.

The possibilities are really endless. From the pattern coloring patches, to the airbrushes and markers, you can really churn out a lot of different fly patterns. A fun way to get started is with ourplain white bass poppers from Rainy's. It's a great way to flex your artistic muscles.

Check out the starter kits and selection of markers on our store here.

To get started, here's a list of things to keep in mind:

  • The markers themselves are not fully water proof, so it's not recommended that you just color something and leave it uncoated. For my poppers, they're usually coated with something like a Clear Cure Goo or a Loon UV Clear Finish. 
  • Related to the first item, it's important to know that the UV cure products don't necessarily get along nicely with foam and especially don't like foam that's been painted with Copic markers. To get around that, I usually apply a base coat (or two) of a white acrylic paint to act as a primer. Not only does this prevent the glue from bubbling and the paint from running, but it also enhances any colors you apply to the foam because it creates a much less porous yet paint-friendly surface.
  • As opposed to what you see in the videos below, make sure to use latex or plastic gloves as the chance of getting over-spray is high when painting in tight quarters like this. 
  • If you want to get some cool patterns on the flies you tie, be sure to check out the coloring patches or the template mask shown in the video below.


Flying Black Ant Tutorial & HMG Review

$
0
0

Heat up your tying sessions


I had seen a couple videos and photos floating around showing this method from Joe Nicklo, so I decided it was time to try out his HMG (Hot Melt Glue) method for tying flies. If you're interested in the supplies for this method, Joe sells them on his website here.

As you can see here and on Joe's website, there are some really cool patterns that you can whip up using hot melt glue as part of the fly.

HMG Mayfly by Joe Nicklo

HMG Scud by Joe Nicklo

Anyway, my concern to begin with was how well the glue stick material would take to being scorched with a super-hot soldering iron. Surprisingly, it didn't take long to get the hang of light touches and sculpting the material on the hook. With the exception of a few errant stabs and swipes, I found it relatively easy to work with and shape the flies I tied. Overall, though as you can see from Joe's website, you can really tie a lot of different style flies with this method. Definitely worth looking into.

So, for this pattern, I used the new Allen D202 dry fly hook. I think this hook is quickly becoming my favorite for flies bigger than #16. I've been tying on it for the last couple or three months and it's a great hook. The black hot melt glue did the trick on the body, although my OCD comes out and would probably do a final coating in Loon or CCG to get a shiny finish. And finally, in fishing this pattern it actually floated pretty well, so that's a good sign given that I'm floating a couple of clumps of glue on a hook. Anyway, give 'er a whirl!


Recipe:

Hook: Allen D202 #14  -- Buy Here --
Thread: MFC Premium Thread, Black 6/0  -- Buy Here --
Body: Hot Melt Glue. See the HMG Kit here
Hackle: Whiting Saddle or Cape, Black  -- Buy Here --
Wing: White CDC (try the bulk CDC option here)  -- Buy Here --

The Butthead Attractor Fly

$
0
0

It simply floats high and gets eaten


Do any of you have a fly box full of junior varsity players that you can tie up quickly and give to your buddies who always snap off their flies in the trees?  I do.  It doesn't mean that these flies won't catch fish, but I'm not about to give up one of my more complex flies just to have it hang off of a limb or rust out under a rock...  Rant over.  Kind of.

I was going to head out fishing with a few guys that had just started fly fishing and I wanted to make sure I had plenty of flies in my box that I could pass out.  I was strapped for time, so I started whipping up some stimulator variations with hot spots,and what came out of the vise was a pretty slick little bug that was pretty easy to tie.  It could either pass as a larger caddis, or a smaller stonefly - one of those tweener patterns that make the fish go nuts.  When we got to the river one of my buddies tied one on and hooked up right away with this fly so we all ended up fishing it for the rest of what turned out to be a pretty memorable day.  It was very durable, it floated high, and there was something about it that really got the attention of the fish.  I have fished this fly a lot over the years, and I recently sent some to New Zealand to fish for some finicky trout.  They are trout approved in the northern and southern hemispheres, but best of all, they simple to tie so I can pass them out to buddies. (Except for Curtis...  Tie your own damn flies.)

~  Cheech

Recipe:


Bikes for Brookies

$
0
0

Mountain biking on the fly


Passing a small pond in a meadow
As I've written about before, I like to spend a good portion of my summers in the high country chasing Brookies, Grayling, Cutt's and those sorts of reclusive ugly trout. For a few years now, there has been a series of small remote mountain lakes, down some pretty gnarly roads, we've been exploring here and there. Some of the roads are 4X4 friendly, some are ATV-esque and others are more hiking oriented. So this time around, rather than worrying about an ATV or an even longer hike, we threw the bikes in the truck and decided to use pedal power to get to some fish.

I'm, by no means, any sort of biking guru. I ride my mountain bike for exercise and as a means of transportation to my office each day. But I get enough questions from people who ask about ideas on good hikes or even bike rides into fishing locations that I figured it's something to discuss here. There's no harm at all combining a little old fashioned butt-kicking exercise at high altitude with some fishing. Or as I say, "a hike isn't a hike unless there are fish at the end". And it goes without saying to make sure wherever you go that you're not breaking any travel restrictions and to stay on established trails and roads where possible.

So the ride into these lakes is winding and up down approach through some beautiful country at over 11,000 feet. There are a lot of snakey rutty paths over a lot of rocks, loose gravel and such as this isn't your groomed mountain biking trail system just outside the city limits. I would say, however, that we probably made better time on the bikes than we would have in the truck, which has to pick and choose the least-boulder/rut filled path to take.

Brook trout taken on a damsel adult imitation
As far as gear goes, I have a Fish Pond backpack I've used for 7 or 8 years. It has a handy rod holder and plenty of space for my other gear, food and even a hydration pack system built in. That said, a 3 or 4 piece rod is really a necessity so you can easily attach it to or throw it into the pack you have. And although I know people often prefer smaller rods for smaller fish, it's best to have a more versatile 4 or 5 weight rod that can battle any wind and toss hoppers with ease. Unless you want to pack in a couple of rods, that's typically going to be the more universal option.
As far as bikes go, I'd probably recommend a full suspension bike or maybe a 29'er for this type of travel, but I got by with my old hard-tail and ended up with only a bit of soreness from all the jarring business. Make sure to carry a small repair kit and be prepared for something to break down. I have some squirrelly brakes and my tires have been known to somehow collide with sharp rocks every now and again, so you never know.

In the end, the reward was a pristine lake with extremely colorful Brook trout and some nice sized Grayling -- not to mention the fact that we had the lake to ourselves the entire day. Catching a load of beautiful fish on dry flies all day makes the strenuous part of the trip worth it.

As usual, the worst part of the day is making the trek back to the trailhead and having to pack up and go home. Maybe next time, I'll pack in a tent and stay longer.
Grayling from a high mountain lake

Bug Collars and new dubbing

$
0
0

New Tying Fodder

Jig style nymph with Bug Collars
We'll, no doubt, push out a more complete review of both products here, but I wanted to at least throw down a preview into what's brewing.

First off, if you've been cruising the interwebs lately, you've likely seen at least a glimpse of Bozeman Fly Goods' Bug Collars. These are a nice addition to or even replacement for beads. They offer a a variety of colors and sizes in a convenient stackable series of "collars". In the pattern here, I tried them out on a jig hook with a slotted bead. Even though I ended up reversing the orientation of what you'd normally do with a recessed hole bead, they still worked out great.

Next is the dubbing. We're excited to be working with John Rohmer even more with his Arizona line of dubbings. This time around, it's the longer fiber version of Arizona Synthetic Dubbing. If you haven't used the regular style, you need to get you some and double it up with this longer version called Arizona Mega Synthetic Dubbing.  It's some of the best nymph dubbing around and comes in some wickedly buggy colors. We've been tying a lot of our nymphs with this stuff lately and it's the real deal.


Maybe we'll put up a video on this at some point, but here's a quick recipe in case you're interested.

Hook: Allen J100BL #10
Thread: MFC Premium 6/0, Dark Brown
Bead: 3.3 mm Tungsten Bead, Gun Metal
Collars: Bozeman Fly Goods Bug Collars (email us for purchasing information)
Body: Arizona Mega Synthetic Dubbing, Yellow Tan
Over-Body: J:son Realskin Nymph Body, Tan
Ribbing: UTC Ultrawire, Small, Wine
Tail: Coq De Leon Hen Saddle, Speckled Brown

Viewing all 629 articles
Browse latest View live