Quantcast
Channel: Fly Fish Food
Viewing all 629 articles
Browse latest View live

Articulated Flies - The Importance of a Back Hook

$
0
0

Streamer fish have short man's syndrome


This Brown swiped the back half of the Mongrel Meat


Barely pinned on the back of a 7" prototype fly
I really didn't get on the articulated bandwagon until about 4 years ago when I started messing around with the Cheech Leech.  Admittedly, I tied the Cheech Leech in tandem because of a certain swimming motion that I was looking for, but I didn't think too much about how effective the back hook would be.  I think we have all heard people say "But... predatory fish will eat from the head first right?" Logical, and I agree with this, BUT, this is definitely not a reason to omit a hook in the back of the fly.

Front hook!  He was hungry
Here is my logic, and it's nothing new, but something to think about specially if you are considering a fly that is long enough to warrant a back hook.  I always tell people that streamer eating fish are feisty...  More specifically, they are the short guy at the bar who has had a few and has something to prove (like the fact that he can drink BEER damnit- even if he's only 5'2" and uses a New York yellow pages book to see over the steering wheel of his F-350 dually).  Suppose you walk by that guy and bump into him accidentally - in his short guy syndrome brain, it's go time and fists are thrown...  He doesn't necessarily want to kill you, but he wants you to learn a lesson to never come over in short-guy land EVER again.  Ok. Ok. Point proven there Poindexter.  I regress - streamer fish are feisty, but they don't have fists to duke it out like shorty.  They have mouths, and tend to bite stuff to tell it to "get the hell out of here." (Wouldn't it be entertaining to see a bar fight where 5'2" dudes just bit each other?)  Anyway, this is why the back hook is so important.  When a fish is merely "enforcing" as opposed to eating, they will bite any part of the intruder that is available, and when a smaller fish flees from a bigger fish, there is a good chance that he's going to get bit in the tail.

So I wrote all that to write this.  Tie on good, sharp, and exposed back hooks to your articulated flies to catch more fish.


~ Cheech

If it's pink.. all bets are off.  They try to swallow the whole thing!


Back Hook Rainbow Swiper

The Importance of Good Soft Hackle

$
0
0

Hungarian Partridge: Grade #1

Hungarian Partridge Skin, Grade #1 (Natural)


I'm not quite sure what it is, but I love to wrap soft hackle. Just something graceful about how those fibers lay when tied in and preened back with a nice clean head and tie-off. But don't settle for just any feathers when you're tying soft hackles or tying flies that call for Partridge. Pay close attention to the quality of feather to get the most bang for your buck. I'll try to lay down the reasoning here and explain why I sometimes have an inexplicable urge to cuddle with my Hun skins for warmth and comfort.

For the past few years, I've lived on a steady diet of a few Hungarian Partridge #1 olive and brown dyed skins from Hareline. They are, in a word -- exquisite. Because I'd been given a "natural" colored skin a few years ago by a good friend, I initially stuck to the olive and brown colors purchased from Hareline and used the natural color "wild" skin only when needed. The shot-in-the-wild bird was good, but nowhere near the quality of these skins from Hareline. Further, if you compare the quality of the bagged loose feather crap they sell in stores, it's an even bigger difference. In the end, I eventually broke down and relegated the wild bird to the left-over bin and bought the natural skin from Hareline.

Hungarian Partridge Skin, Grade #1 (Olive & Brown)
So why spend $30 on a full grade #1 skin? First off, I truly believe you get a much wider variety of feather than you do from a wild bird or lesser quality skins. The variety comes in both color variation as well as size variation. With these grade #1 skins you can tie very small to large flies and you can also pick the stiffer longer fibers along the wings and tail for other purposes (tails, legs, wings etc). Plus, the finer feathers on the neck are really fine. You can tie very small and clean soft hackles in larger numbers than what you'd get from a bag or an uglier bird. Plus, in a pinch, you can use them for a nice pillow if you're banished to your tying man-cave for misbehavior.

Here's an example of a feather from a Grade #1 skin. The colors and mottled aspect of the feather are more to my liking, the fibers are the perfect length and they're not as stiff so as to give better movement in the water.


 Using this feather, I tied up a nice classic "Partridge and Orange" soft hackle. You'll note the length is spot-on and the feathers lay nicely back without sticking out at right angles. It makes for a much more enjoyable tying session with good feathers. Spring for the nicer skins...you won't be disappointed.

Partridge and Orange Soft Hackle

Hook: Allen N205 BL #12 << Buy from our store --
Thread: Pearsall's Gossamer Silk, Orange
Body: Thread
Hackle. Grade #1, Hungarian Partridge Hackle, Natural


How to Make Shrimp or Crab mono eyes

$
0
0

Easy and awesome

how to make shrimp crab monofilament eyes
I'm sure most anyone has seen or has created their own monofilament eyes. It's not rocket science, but there are still a few things I've found that make it easier yet keep a bit of realism in the mix.

So for this method, you'll need:

  • 30 to 50 lb monofilament. The brand or type doesn't matter. Use whatever you have and whatever color you might want.
  • Clear Cure Goo. I use Hydro, but you can use whatever style you'd like. Because of the "sculp-a-bility" of Hydro, it's very difficult to get this shape and effect with anything else.
  • Lighter
  • Sharpie. You can color up the eye in any color or combination you might need. Crab eyes come in a wide variety of colors and sizes (another reason the Hydro and Sharpies come in handy here)

As shown in the video below, you simply melt the mono with a lighter (starting with the flame above the mono held vertically), allowing the glowing ball of liquid nylon to melt back on itself thus forming an eye shape. Once I extinguish the flame, I immediately flip the eye upside-down so that the still-malleable eye can pull back to form a nice tear-drop shape (shown here).

how to make shrimp crab monofilament eyes
Mono eye painted up and coated with CCG
You can then apply a bit of color with a sharpie before you coat and sculpt the shape a bit more (if needed) with the Clear Cure Goo. Pretty easy, but here's a video to show you how...


Halloween Bugger Leech

$
0
0

Get your spook on!


This is an oldie but a goodie. One of our favorite fall leech or bugger fly patterns. Nothing fancy, but it's a great pattern. I apologize for the old style picture and video on the fly, but you get the idea. It's more of a style that can combine the leechiness of a leech and the bugginess of a bugger. Make sure you have a good dubbing brush.


Cheech sporting the Halloween style buff on a fall Rainbow
Recipe:
Hook:  TMC 5263 #6 - #12
Thread:  UTC GSP 100 Denier Orange
Tail:  Rust/Orange Arctic Fox w/ orange Krystal Flash
Body:  Alternating black and orange dubbing in a dubbing loop. Mega-Simi Seal would be great for this.
Hackle:  Orange Grizzly


The Chimera Hunts

$
0
0

Fall Field Testing Update

Chimera in Black with Orange hot-spot
As we do from time to time, I'm revisiting a previous post with updated on-the-water results and photos. See the original story on the Chimera here.

So going back to the original idea on this pattern, I wanted to be able to tie a similar pattern in a lot of different sizes and colors to imitate a lot of different bugs. The idea is similar to a general attractor pattern, but with more specific trigger mechanisms drawn from the various bugs. Yeah, pie in the sky, I know. One "magical" pattern to catch fish under all conditions.  Not. It's more of an efficiency thing for tying purposes, but  as it turns out, this little pattern really keeps impressing the hell out of us.

Fall fishing backdrop, courtesy of awesome changing colors and lots of fish.

Pretty brook trout that inhaled a Chimera
My ugly mug and a pretty brookie
Anyway, I spent a good portion of the month of October up in the hills chasing Brook Trout. On the first lake on the first day of "fall fishing" up there, I focused on the Deep Dish Callibaetis, which did fairly well. So while I did fish other patterns, by far the majority of my success was with the Chimera. As Cheech will attest, I'm not the most active fly-changer when I'm on the water. But at times, the fishing was so fast and furious, I'd cut off my trusty Chimera and slap on a different pattern just to make sure it wasn't a fluke. Most of the time, however, the other patterns didn't last long as I'd need to switch back over to the Chimera to keep the same pace. Even fished side-by-side with other patterns in similar coloration, it far out-fished anything we threw. Plus, I always take it as a good sign on a pattern when Cheech finally gives in and agrees to use one of my flies when I'm out-fishing him 3 or 4 to 1. Boom Roasted!!


So yeah, it's been a fun fly to mess around with. Here's the recipe and tutorial:

Chimera:
Hook: Mustad C49S #8
Thread: UTC Ultrathread, 70 Denier Black
Eyes: 50 lb Mono, Melted
Bead: 2.3 mm Tungsten (Hot Orange)
Tail: India Hen, Black
Body/Thorax: Az. Diamon Dubbing, Black
Overbody: Thin Skin, Black
Ribbing: UTC Ultrawire, Silver, SM
Thorax Stripe: Veevus Holo Tinsel, Pink, MD
Top Coat: Clear Cure Goo Hydro


"That Guy" with the "Secret Fly"

$
0
0

I'll show you my fly, but then I'll have to kill you


Uncle Ken's Secret Ninja Wooly Bug


I think in every industry or sport there is "That Guy." In golf, it's the dude who always kicks his ball into the fairway and conveniently forgets what shot he's on and always ends up beating you by one.  In fishing, it's the guy who is adamant about counting fish and knowing who is in the lead, even though he disappears out of sight for an hour or so and comes back and says "All on top.  All over 20." Then there is the guy who has that "secret" fly pattern that he won't share with anyone because it's so damn effective that it would ruin every fishery due to catching so many fish.  Many times, these "secret" flies are no secret at all like Uncle Ken's Peacock King, or Wooly Bug.  These "heroes" or "one uppers" exist in all facets of life, and I'm glad they do because they provide me much entertainment.  Here are some prime examples.

Uncle Ken's patented secret "Peacock King." Griffith's What?

I was sitting at a fly tying expo last year when "that guy" walked up to me.  He was decked out in a casting shirt, zip-off wading pants, a lanyard around his neck, and a wading staff.  He was ready... to fish look at some flies.  He walked right over to me and asked "HEY, uhhh, do you know what it takes to patent a fly?" I kind of went into what it would take to patent a fly, and the reasons why not many people try it.  He cut me off mid sentence, and told me that he had a secret fly that he had been tying and fishing that had produced "54 fish in the last 3 days," and that it needed a patent.  It was that point when I realized that he was "that guy." I told him that he was lucky that he had such a great pattern, and talked to him for about 20 minutes.  He sat in front of me and watched me tie some of my original creations, and after each whip finish he would let me know that he ties something EXACTLY like it, and that he has boxes full.  You go girl.  That interaction made my day.

A few years back, I was working in a fishing shop while I was between jobs and I was constantly amazed at one of the shop owners.  Here was one of the best fly anglers-tyers that I have met and he would provide friendly service to everyone, even if they were there to teach him a "lesson." He taught me a lot of patience, and how to deal with the constant one-uppers.  One day, one of our regular customers (an avid ice angler, and black-belt one-upper) who I was confident had never tied a fly before, sat at the back of the shop and chatted with me while I spun up some wooly buggers for the bins.  As I was wrapping some hackle on one of the buggers, he started to tell me how he had tied hundreds of dozens of flies for shops back in the day.  My response was "You know what?  I've been tying flies for a long time, but I always struggle when it comes to tying the wacky hackle technique.  What do you suggest?" He assured me that I would get the hang of it once I had tied for a few more years, and that one day, I would be the master of the wacky hackle.  That interaction made my day.

The secret fly of River-X.  The Grumpy Frumpy
Working at the fly shop was a great experience, and one certain "interaction" has made me think back and laugh many times.  This guy was on a mission, and he was sure that he was going to stump yet another fly shop in his quest to find his "secret fly." I greeted him and asked if I could help, he got really close and whispered "uhh, well, it seems like no fly shop will be able to help me find what I want, but I guess I'll give you a try." He said (still whispering) that he had been fishing what we will call River-X with a secret fly that he was only able to find in a shop in Vernal, UT.  Little did he know, Vernal is my home town, River-X is my favorite river, and there was also a really good chance that I had tied the actual "secret" fly with my own bare hands.  BUT, I couldn't just volunteer all of that information right off the bat because then I turn into "THAT GUY!!!" But I digress...  I tried to get a description of the pattern, and he was saying stuff like "little hangy offy thingy in the back," and "some fluff coming off the front." Not helping.  Then he said "some guys call it the Frumpy Grumpy." Yahtzee!  He was fishing my fly, on my river even though he got the name backwards (no, I didn't correct him).  I told him that I knew River-X very well, and I that I just might have the fly he was speaking of (we had about 5 bazillion Frumpies).  He wasn't convinced until I led him to the bin.  He was utterly amazed/disappointed that he beheld his "secret" fly in a bin that was being sold to the masses!  To cap it off, I said "I know the guy who developed this pattern really well; in fact, I sleep in the same bed with him." He looked at me like "What the $#&&* did you just say??" It was great, and the rest of the shop enjoyed it as much as I did.  He laughed about it after I let him in on the joke, and left the shop with a fist full of Grumpy Frumpies.  That interaction made my day.

The funny thing about all this, is that we all have a little bit of "that-guy" in us.  

~Cheech

REVIEW: Synthetic Quill Body Wrap

$
0
0

Another way to get the segments

synthetic quill body wrap fly pattern
Soft Hackle tied with the Adams colored SQBW
I've always been a big fan of quill body patterns. Anything from stripped peacock to peccary -- I've used a lot of things out there. So I was understandably excited when I saw a new product from Hareline called "Synthetic Quill Body Wrap" (SQBW).


Per my normal sick material collecting tendencies, I ordered a couple of packages of each color. I tied up a few patterns and came to some conclusions about SQBW:


First off, it's very easy to tie with and get consistent segmentation. Not only that, it's much stronger than the natural materials out there, so it's nice to be able to give it a tug while you wrap it.

The "strips" are also equally consistent in color and size along the length so you can use one strip to tie a number of flies.

The strips are made of some type of paper-ish material and they are obviously printed on a printer. Granted these need to be color-fast in water, so that might explain the issue, but my one complaint is the quality of printing involved. You'll notice, especially on the soft hackle above, the color (as is the case with dot-matrix printers of old) is a result of a bunch of tiny dots printed close together to form, what appears to be, a solid color. These dots are fairly obvious when you look at an individual strip and especially on a smaller fly pattern. It's not a huge deal and I doubt the fish will care, but if you're looking for the solid and natural coloration from an animal quill, then the SQBW won't achieve that. Again, not a huge deal, but it's good to know.

Related to this, I also found that I like the body finish a lot more when I coat them with Clear Cure Goo Hyrdo. Of course, I do the same thing with any quill body pattern, so this isn't an issue for me.

All in all, I think the product is headed in the right direction and I'll definitely be using it to tie up some bugs here this winter.


synthetic quill body wrap fly pattern
Mayfly spinner tied with SQBW

Quill Body Baetis Recipe:
Hook: Allen D102BL #16
Thread: UTC Ultrathread 70 Denier, Olive
Tail: Lemon Woodduck
Body: Synthetic Quill Body Wrap (coated with Clear Cure Goo Hydro)
Thorax: Az. Synth Dubbing, Dark Olive
Wing Case: 1mm Rainy's Crosslink Foam
Wing: Spirit River UV2 CDC, Natural 


5 Essential Rules for Tying Flies

$
0
0

 Really?  Rules?

Pink and White?  Thanks to a tip from a buddy, I modified the colors of this Cheech Leech.


3 sections to the Cheech Leech?  Yes Please.
I remember being excited to attend the annual outdoors expo in 2001 because there were always demo fly tyers showing off their new goods and skills.  I was just getting started with fly tying, and I loved to watch other people tie flies so I could see how they did it.  I was walking up one of the aisles, and I heard someone proclaim "You MUST add exactly 15 wraps of .015 lead wire to the hook shank or this fly won't ride correctly." and "If you add any more than 4 turns of hackle, this fly won't work." and "This fly, if tied correctly, is so effective that it's illegal in Oregon." (I think some of you might know of the guy I'm quoting here).  The point here is that this guy had rules for everything, including tying and fishing...  Really?  No doubt his flies were effective, but so were my rebel-tied flies with 17.25 turns of .010 lead, and 6 turns of hackle.  It was during my fly tying infancy that I learned these critical rules:

Rule 1: There are no rules.
Rule 2: There are no rules.
Rule 3: There are no rules.
Rule 4: There are no rules.
Rule 5: Please refer to rules 1 through 4.

I mean, just look at the definition of the word (according to the fancy interweb). 

"A set of explicit or understood regulations or principles governing conduct within a particular activity."

YUCK.

So there you have it.  I don't like rules when it comes to fishing and tying.  If any of you have watched our videos, hopefully by now you have caught on that we don't really say exactly how you have to do something.  Instead, we give guidelines, and even if we say that something is really important, it's still just our opinion and there are probably 48 better ways to do it.  Guidelines are critical when you are trying to recreate an exact replica of something like a Humpy or a Royal Coachman, and in my opinion, there are two masters of giving this kind of instruction.  Charlie Craven, and Davie McPhail.  Those guys are gooooood.  Me?  Not so much.

I will also say this about guidelines; take them for what they are and don't be afraid to experiment.  I always love it when I get done teaching a class, and someone asks me "Hey uhhhh, Cheech..  You think I could tie that Grumpy Frumpy in red?" My answer is usually "Nope.  According to the Universal Fly Tying and Fly Fishing Codes and Regulations Handbook Unit 48 Section 246-45.7 , the Grumpy Frumpy can only be tied in yellow/red and peacock/lime.  Sorry." I don't really respond like this, but I'm definitely thinking it!

I'm an artist at heart, and I'm always thinking creatively about how I can use certain materials.  Here are a few pointers to help you break out of the world of Hare's Ears and Pheasant Tails (both great patterns by the way).

The Low Fat Minnow with marabou, dubbing, and flash.
  1. Become familiar with the properties of different materials.  Try to envision how these materials will marry with the other materials on the hook, and how it will behave in the water.  Does it sink/float? Is it rigid/soft? etc.  A good example of this is the Low Fat Minnow. This fly looks so-so out of water, but it's dead sexy when it's wet.  Being familiar with the properties of each material will help you more than anything else when creating a new pattern.
  2. Don't be afraid to experiment with different colors.  What do you think was going through Andy Carlson's mind when he first tied the Purple Haze?  Thanks to his willingness to break the rules and tie a purple Parachute Adams, we have a very very effective dry fly.  One of my buddies gave me a crazy color list for the Grumpy Frumpy one time that I would have never tried on my own.  Thanks to his insight, we now have the cat puke color that catches fish all over the place.  Thanks Kev. (And no, you should never combine chartreuse, pale yellow, and cinnamon: Unit 567 Section 878-73).
  3. Don't be afraid to substitute materials.  When I worked in the fly shop, I would get a kick out of the guys who would come in and ask for Hareline Dubbing #18792347 Olive/Rust/
    Prince Nymph with dubbing instead or peacock herl.
    Dun. "The pattern just won't work if I don't have this exact color." They would look at me like I was the devil as I tried to explain the concept of substituting a similar color for the one they were looking for.  My favorite fly hack is to use arctic fox instead of marabou for buggers.  Nothing new, but it adds a whole new element of durability to the pattern.  Other popular subs: Shaggy dubbing for Chenille on buggers. Palmer chenille instead of hackle.  Snowshoe rabbit for CDC.  CDC for poly yarn.  The list goes on and on.
  4. Test Test Test...  Once you settle on that whacked out color combo for your bugger or that new fangled streamer pattern, only tie up 3 or 4 of them before you go into full on production mode.  Test them to make sure they work before you tie up 78 of them and find out that not even bluegill will eat them.  I love to test my own flies, but the best
    The Bunny Emerger came after many trial and error sessions.
    way to find out if they work is to let other people fish them.  They will fish em' hard, and it's no skin off their backs if they snap it off on a tree, or to tell you that it sucks.  We tend to fish our own new stuff longer and harder to try to "make" them work.
Hope this rambling will lead to many new creations from the vise.  Just don't tell the tying police that i'm bashing their regulations handbook.

~Cheech


Scissors. In hand, or out of hand?

$
0
0

Attack of the killer scissors.


These look like harmless scissors.  They are really deadly weapons.


Several years ago I was tying flies at an expo and somebody mentioned that they thought it was interesting that I tied flies without holding my scissors in my hand the whole time.  It really struck me that I could save more time and tie faster if I just kept my scissors in my hand.  Also before I get too deep into this story, I feel like I need to explain some genetic Gigantor qualities challenges that I have before I tell you why I threw a perfectly fine pair of Dr. Slick scissors across my fly tying room.  I'm 6'5" and have hands that are tight in XXL gloves.  Yep.  I officially suffer from sausage fingers.
Dr. Slick Razor scissors are shaaaaaaaarp!
Anyway, I had just purchased a new pair of Dr. Slick scissors, and I was going to go home and get all efficient while tying flies.  I had an order of Grumpy Frumpies to tie, and the first thing I noticed with the scissors in hand was that I had to bend my wrist further than normal to get it into the hard-to-reach areas (I'll address that later).  Most of the fly went by just fine, but as I was attaching the rubber legs and coloring them with a sharpie, I realized that there were times when my beady little eyeballs perhaps got a little bit too close to the vise.  One last wrap of thread...  WHAP, I thought I had lost my eye.  I found out that Dr. Slick scissors make an excellent weapon if you were ever to need to gouge someone's eyes out during a home invasion.  I also found out, thankfully, that I was a bad aim.  I had effectively poked myself about an inch under my eye, and then I promptly wound up Nolan Ryan style and made a sizable dent in the opposing wall with those weapons of eye destruction.
I tried a few other times to tie with scissors in hand, but I realized that I'm much more efficient if I just drop them when I'm finished with them.  More importantly, I realized that there is no right or wrong way to do it, and that it's really determined on the comfort of the tyer.  From my experience, here is a list of pros and cons of tying with scissors in hand (and take it with a grain of salt because I write this from the standpoint of an anti-scissor-in-hand-ite).

PROS:

  1. It saves you time.  If saving .78 milliseconds in the process of tying a bug really gets you going...  By all means, grip those suckes.
  2. You look cool at the tying shows.  
  3. It trains your hands to do two things at once. Look mom! I'm holding a pair of razor sharp eye removers while I'm eating dinner! (Just put them down before using the restroom).
CONS:
  1. It's not ergonomic on the ol' wrists.  If you are holding the scissors deep in your palm (which you almost have to do if you want the use of the rest of your tangible digits) you have to bend your wrist much more to get the scissors into the "cut zone." Yeah, I'm probably just a wuss.
  2. You may just jab your eye out.  I'll buy my kids a Red Ryder, but NEVER a pair of Dr. Slicks.
  3. You don't really save all that much time.
All this being said, it's important to realize that this is just my opinion, and there are people who truly have mastered the technique of palming scissors while tying.  I'm just bitter because I can't make it work.

I also asked Curtis because he is a former scissor holder.  He says that he gained more dexterity by not holding the scissors in his hand, and can get a better hold on difficult-to-manipulate materials.  Also, he points out that some of the scissors that are designed to be held in hand aren't necessarily the best for cutting.  Wiss quick-clips and the "sixth finger" may be good in theory, but they lack in having an open gap and sharpness when put beside other normal scissors.  Finally, Curtis said that efficiency can be regained if he strategically plans all of his cuts with the scissors.  This eliminates the need to pick them up more than needed.

~ Cheech     


Fly Tying Hack: The Spool Minder

$
0
0

A better way to tame your spools

Here's another one of those "ah ha!" type tips on how to store and manage your spools of wire, tinsel, floss, v-rib or anything else that comes on a spool. And yes, it involves a trip to the Craft Store....

I'm pretty sure once you create and use a few of these little doo-dads, you won't go back to the free-wheeling spools like you might have done in the past.


The video explains it nicely below, but all you need are some 1/4" or 6 to 7mm craft beads, some 1/4" elastic and some super glue. I usually make a "template" piece of elastic and cut a bunch of them at once using this piece to measure against. Then you just glue and let them dry. Easy as can be...


The Lemon Lime Bugger

$
0
0

A Tribute to Dennis Brakke

For anyone that's been around the Rocky Mountain states for a while and fishes stillwaters, you've likely run into or heard about Dennis Brakke -- whether on the water, at his fly shop, The Fly Desk, or one of his books. Unfortunately, Dennis passed away from short but tough battle with cancer in 2009. He is missed.

For those of us who had the pleasure of knowing Dennis or who were able to spend time with him fishing or talking shop at the Fly Desk, he was a dedicated student of the sport. Whether it was specific materials (I spent a lot of time with him discussing hackle), techniques or patterns, he had things dialed in.

Dennis and another angler on Strawberry Reservoir, 2005


My first exposure to one of his patterns was the "Lemon Lime Bugger". I'd heard good things about a bugger tied in this specific color combination using a special chenille on the body. Dennis told me about several outings to a relatively unknown stillwater in Utah that consistently produced big Rainbows that would devour this bright pattern. I ended up tying up a bunch and headed off to fish. The fly did really well, definitely out-fishing my standard fare of Uncle Ken's Woolly bugs, and earned a spot in my bugger boxes.

Dennis Brakke's Lemon Lime Bugger


Cheech, too, had the pleasure of working with Dennis a lot. He recounts: "I remember the days of dreaming up flies...  Dennis always had the materials to make my flies work out, but more importantly, he always had the time to explain the properties and applications of those materials.  Many of my stillwater patterns are inspired by Dennis' hard work on the water.  He was a true ambassador to the sport, and definitely left a lasting impression on anglers in Utah.


So on a slowish day on the water this fall, I dug into my boxes looking for a pattern that the fish might be interested in. You see I tend to carry way more flies than I could ever need and I'm always tweaking and working on new patterns, so the flies in my boxes have a lot of competition for attention. As I opened and closed boxes and picked through rows and rows of flies, I caught a glimpse of a few trusty Lemon Limes peaking out at me, half buried by a bunch of overdressed leech patterns. One of my first thoughts was the sunrise outing (pictured above) on this same body of water over 8 years prior. Decision made, the Lemon Lime was soon tied and on its way to the water. On that first cast, as the fly slowly descended out of sight, this little Rainbow gobbled it up and reminded me that newer isn't always better and that fish can be like good friends: You don't always see them, but they're always there. 

Lemon Lime Bugger:
Hook: 2X Streamer Hook (TMC 5263 or the Allen S402 <-- Buy here)
Thread: UTC Ultrathread 140 Denier, Black (or lime green)
Tail: Chartreuse or Lime Marabou or Arctic Fox
Body: New Age Chenille, Lemon Lime. Grizzly Hackle dyed green
Bead: 3.2mm to 4mm Chartreuse Tungsten bead

3 Hackle Colors to Rule Them All

$
0
0

Hackle is expensive.  Purchase wisely.


The Fly Tying Tri-Fecta


Biot Adams with only grizzly hackle
13 years ago, I sat mumbling in Spanish at a call center wishing I could be out throwing banjo minnows at my beloved bass when a colleague of mine started unboxing a fly tying kit from his backpack.  "If we have to sit here tied to our phones all day, I might as well be productive," he said.  One thing led to another, and I ended up tying my first fly that day.  I remember it well.  It was a red, blue, and yellow wooly bugger.  That turned into almost an every day thing, and it was a great way to pass the time while we waited for our phone calls (I HATE call centers).  That is how I got introduced to the art of tying flies.
Grizzly Hackle
The thing I remember most about those days tying in the call center was the fact that we never had the right hackle for the job, and we would end up cutting the webby, schlappen-like hackle to get it to fit.  Now... these were some of the rattiest flies I can remember, but the fact was; we tied them, and they were cool to us.  After burning through all of my co-worker's materials, I told him that I would make a trip to the fly shop to replenish the goods, and I was specifically on a mission to find good dry fly hackle that would turn our ratty dry flies into masterpieces.  I was wrong.  I was wrong, not because of the quality of the flies that we would be able to produce, but because of the price of the hackle.  I remember thinking "$60 for a chicken pelt???!!!" There had to be a better way...  Well, there isn't.  I was also wrong because I was completely overwhelmed with the huge selection of colors that were available.  After a near panic attack,  I ended up buying a dun colored Metz #2 cape that did the trick for a little while.   If I knew what I know now, I would have gone about it a whole different way.

In this post, I don't want to talk about the price of hackle or the brands that you should look for, but the colors of hackle that a new (or experienced) tyer can focus their tying around.  In my opinion, there really isn't a need to have every color of hackle known to man, even though I'm a full fledged Hackle-O-Holic and I have more "chicken feathers" than I'll ever use in a lifetime.

3 colors to rule them all

Dun Hackle

  1. Grizzly.  Grizzly hackle is among the most fishy materials that you could ever think of binding to a hook.  It's mottled coloration can be used on almost any hatching mayfly imitation, and can be substituted for almost any other color of hackle on any pattern.  Yes, it will make the fly look a bit different, but the fish don't seem to mind.  I have grizzly hackle in capes, saddles, large, small, midge, etc., you get the point?  This should be the first color that a new tyer gets.  
  2. Dun. Dun, or some variation of it makes a great color to imitate most mayfly wings and legs.  My favorite color is Whiting's medium dun, and I tie everything from green drakes to PMDs with it.  It's also a very versatile color that easily blends with a variety of other colors.  I have good cream
    Brown Hackle
    colored hackle, but it sits on the bench because I typically sub it out for a light dun color. 
  3. Brown. Brown has a great dark contrast without being too dark (black), and my favorite shade to work with is a nice deep coachman brown.  I don't really tie with it for hatch matching bugs (maybe except for large stoneflies), but it's a go-to for attractors.  It's also a staple for tying the Parachute Adams, which just happens to be the most effective fly on the planet.  Part of the Parachute Adams' effectiveness comes from blending both brown and grizzly hackles, which I also highly recommend trying with other patterns.
I remember tying my first batch of Parachute Adams with grizzly hackle because I didn't have brown yet.  I was confident that they weren't going to work because I wasn't following the "rules," but guess what?  I must have found some really dumb trout because they worked.  Later that summer, I was tying drake patterns that called for grizzly barred olive hackle.  Guess what...  Grizzly worked again.
With these three colors of hackle, you should be able to cover a broad spectrum of patterns while saving a little bit of cash in your pocketbook.

~ Cheech


The Diving Sparrow

$
0
0

The Allen J100 BL - Jig Style


diving sparrow fly pattern jig hook
The Diving Sparrow

In the past few weeks, I've been messing around with a few different styles of small nymphs tied on the Allen J100BL. I like the hooks for their sharpness and, of course, the fact that the hook rides point-up (as I've verified in testing). The other little facet of this pattern is that it will drop (i.e. dive) pretty fast in even fast water. 


We took it out for a spin the other day and it did very well nymphing up a few nice little brown trout.
Brown trout that inhaled a Diving Sparrow
The fly is pretty fun to tie and has a few little unique features with the wing-case and the biot side-panels.

The Flying Penguin

Underbody: .025 Lead Free Wire
Thread: UTC Ultrathread 70 Denier, Hot Orange
Bead: 2.3 mm Tungsten
Tail: Brown Goose Biots
Body: Arizona Synthetic Dubbing, Dark Hare's Ear with Goose Biots extended
Ribbing: UTC Ultrawire, Small, Red
Thorax: Arizona Synthetic Dubbing, Golden Olive
Wing Case: Black Thin Skin with Clear Cure Goo Hydro
Legs: Brown Goose Biots

Fall Callibaetis

$
0
0

Going Deep Dish Again... 


callibaetis nymph fall brook trout patternOn a recent fall Brook trout outing on one of my favorite Brookie lakes, I was faced with a situation where the fish were in a bit of a funk when it came to the normal stillwater patterns. I could see the fish holding in 6 to 10 feet of water, occasionally nabbing a snack, but otherwise, not moving too much. We tried a few different patterns (scuds, leeches, damsels, etc) with relatively little success. On this specific lake, as with many bodies of water, the Callibaetis population is quite strong. I typically see stronger emergences in the late spring and summer, but the nymphs are available year-round and the bugs are there. The lesson in all this is don't discount a given insect in times where you're not seeing it normally hatch.


callibaetis nymph fall brook trout pattern
Deep Dish Callibaetis
Given this, I dug out a Deep Dish callibaetis and sent it to the depths to tangle with a trout. 5 casts later and 4 fish to net, I think I figured out what the fish were keying on. Thankfully, their focus lasted for a couple of hours, before turning to something meatier (Chimera as shown here), so it was nice to see this little pattern doing well once again.

Now that we've been fishing the Deep Dish for a few months now and having heard from a few tyers out there that have also experienced some good results, it's a staple to my stillwater box and has also served as a great prospecting fly both on rivers and lakes. Give it a try... and don't discount the great Callibaetis insects at any time of the year.


callibaetis nymph fall brook trout pattern
Brookie on a Deep Dish Callibaetis


callibaetis nymph fall brook trout pattern
Fall fishing and Callibaetis


Spirit River UV2 Giveaway!

$
0
0

Win $100 worth of UV2 materials!

We're excited to kick off the holiday and tying season with an awesome giveaway in conjunction with our friends at Spirit River. The winner will receive a cool $100 worth of UV2 materials from Spirit River. Here's the way this giveaway will work:


  • The giveaway will go from today through Wednesday December 4th. 
  • A random winner will be chosen from all entries submitted
  • You can submit an "entry" by any of the following methods:
  • The more entries you have, the more chances you have to win. There is a limit of 4 entries per day.
In the meantime, we have a great write-up from the Bill Black at Spirit River, regarding their great UV2 product line.


----------------------------------------------------------
It's always a challenge to decide what lure you should present to fish especially during off color water situations  A lure is anything that catches fish, be it a fly, jig, spinner, or even bait. One of the most important things to consider is making sure the fish sees your offering.  New developments in the Ultraviolet world have the potential to change the way you tie, fish, and certainly will change what you choose to fish with.  These new developments allow your jigs or flies to throw off a broad spectrum of color or wavelengths.  And sight and color are just as critical as is scent, silhouette and movement.
As a lifelong flyfisher and a small business owner,  I have had the opportunity to interface with a lot of anglers and guides.  In collaboration with these experts, we have discovered that UV enhanced products are worth researching. Likewise there have been a lot of reports from anglers around the world that substantiate a unique and  new double-dye method called UV2(R). One guide in the Seattle area told me last year at the Lakewood Fly Fishing show that the benefits of using UV2 flies and jigs are so strong that he always tells his customers about UV2.  In his words " I tell my customers in advance that if they want the best chance of hooking steelhead they should be using UV2 materials in their flies.  In fact, I have seen such a increase in our catch rate that I will even supply the flies and jigs if they do not have any.  These folks pay me good, hard-earned money and I want to give them the best chance of getting a beautiful fish or two.  I am soundly convinced that using UV2 helps me do that.”
The owner of another fly shop has experienced a surge in his sales of UV2 buck tails which is a key ingredient in Bob Clouser's famous Clouser minnows.  This is a relatively simple pattern to tie requiring Real-Eyes, strong thread, some flash, and UV2 buck tail.  You can find tying instructions his Clouser Minnows on You Tube or numerous other popular web sites.  These steamers imitate minnows and most larger species of fish gobble them up. Experienced anglers will agree that the advantage to a Clouser minnow is the versatility and wide range of species it catches. And it now a difficult pattern to tie.
Bob Clouser himself recently fished some of his freshly tied minnows and was elated at the performance of his flies tied with UV2(R).  At first he and his group fished regular flies with no luck.  He tied on his UV2(R) minnow and started hitting fish after fish.  He felt lucky that he had tied extra and was able to hand them out.  His entire group of anglers started catching fish.  He caught 7 species of fish including large and smallmouth bass, Muskie, rock bass, walleye and trout.  He commented that, "all I care about is whether the fish like it and there is little doubt about that. I had to give the rest of my flies to anglers before I left the lodge and I hear they are still using them.  UV2(tm)  flies can make all the difference.  I am sold 100% on its benefits."
You might think some anglers just get lucky and you are right.  But usually they are doing any number of things right.  UV2 strengthens the ratio for them.  The science behind what fish see in the Ultra Violet range is still being researched and what you read by the experts is many times contradictory.  Yet UV2 has strong merit in a couple different ways that are hard to refute.  In a nutshell we have combined two separate ultraviolet dye techniques that add UV Fluorescence (UVF) for heightened visibility, and UV reflectance (UVR) which is a lower spectrum of light humans do not see but is widely found in nature.  Obviously nothing is going to bite your lure, fly or jig if it is not seen.  So consider the UVF as a visibility attractant.  The UVR is a bit different in that it reflects a tremendous amount of different color wavelengths.  This prism of colors often contain the one or more spectrums that will trigger a strike.  
A good example that better illustrates the multi spectrum aspect is seen in UV2 dubbing  Start with a base color.  Then blend from 3 to 6 other fiber colors in small amounts.  These 'other colors' must have been dyed separately with both UVR and UVF.  Youend up with a spectrum blend from 7 to 13 colors in both UVF and UVR.  Each color has it's own energy or reflectance.  This is a more realistic coloration for insects or minnows.  No bug or minnow is one single color.  Just like a tree in your yard or a scale on a minnow.  There are multiple colors in everything in nature.  It can be an important factor on what fish see and eat. To impart even more energy or light wavelengths from your dubbed areas on your flies you can add a base layer of tinsel or a bright silver rib so any light that that enters the dubbing will be reflected back out in various color spectrums.  Always brush it out so individual fibers have the best opportunity to bounce light.  Again you're adding all these subtle yet realistic colorations to your offering with can be another ace in your hand.
No one is saying that the new UV2 materials, jigs or flies will always work.  What is does do is it gives the angler another key to attracting fish.   Many of these unusual materials can be found at your local fly shops, online, or better box stores throughout the country.

Bill Black has owned and operated Spirit River since 1990 and prior to that was one of the founders of Umpqua Feather Merchants.  He has 60+ tying videos on You tube.  His passion is Tying, Scrimshaw and photography

. He can be reached at bblack@spiritriverinc.com.


Gut-Bomb: Tan Edition

$
0
0

Tan is the new red

The other day, we got a comment on the original Gut-Bomb article asking an excellent question in tying the Gut-Bomb in a tan color, similar to the photos we posted of the natural bloodworms (from Phil Rowley's website). The naturals come in a variety of colors, depending on the amount of hemoglobin, ranging from red to tan, as shown below, but also showing up in greens, grays and browns.

New Tan variation of the Gut-Bomb
Bloodworms come in a variety of color shades
The challenge with this particular color combination is that tan, being a lighter color, becomes more difficult to get it to "pop" in contrast to the darker black vein. I ended up going through a few variations with different colors of thread, stretch flex and Sharpies. Most of the time, the fly ended up much darker than I'd like. I finally ended with a relatively decent color combination using some tan GSP. Because the thread now becomes the main fly color, I ended up using a black fine point marker to create the "gut" (whereas the original pattern, the "gut" is created/colored via the black thread and the body color comes from Sharpies). Also, for some reason, with this lighter color, I liked the way the fly looked without the ribbing.

Anyway, it's another color to try out. Here's the original video tutorial, so just swap out the thread, leave out the ribbing and Sharpie coloring, add some black vein markings and you're set.


Classic Wet Flies

$
0
0

The Ongoing Wet Fly Collection

The page is an ongoing collection of wet flies -- both classic and not-so-classic, but all tied in the same manner and style as the old-school patterns out there. 

mascot classic wet fly pattern ray bergman
The Mascot

dr burke classic wet fly pattern ray bergman
Dr. Burke

purple turtle classic wet fly pattern ray bergman
Purple Turtle

Ferguson classic wet fly pattern ray bergman
Ferguson

Greenwell's glory classic wet fly pattern ray bergman
Greenwell's Glory

hare's ear classic wet fly pattern ray bergman
Hare's Ear Wet Fly

Double Wide Cheech Leech

$
0
0

This fly is straight from the trailer park


Double Wide Cheech Leech


This summer was a great one in regards to testing new fangled ideas that turned into bona-fide fish killers.  The Mongrel Meat was the biggest success (that we published anyway...), but I was also toying with a big brother for the Cheech Leech.  The main difference is that it's longer and more bulky than the little brother.  The swimming motion was INSANE and it stuck many fish.  I tied it with all three hooks intact, but I typically cut out the middle hook (I'll leave that decision for the end-user).

Much more info to come on this bug...  including a video.

Oh yeah. Check out my sexy Dyna King vise too.

REVIEW: 6th Finger Scissors

$
0
0

An Ergonomic Scissor Choice


When I first saw the 6th Finger scissors, from www.singlebarbed.biz, a few years ago, I was a pretty dedicated "scissors-in-hand" tyer, so these scissors had an immediate appeal. It wasn't too long before I had a pair in my dirty little mitts and started to tie with them. I also ended up doing a short review on our Youtube channel that I've posted below for your viewing pleasure.

Now to the nitty gritty...

First off, in full disclosure, I am no longer a dedicated "scissors-in-hand" tyer. I won't go into a lot of detail as to why I switched, but a lot of it has to do with a recent article Cheech did on the virtues of tying with scissors in your hands. Nonetheless, I wanted to give this cool scissor design a fair review.

With that in mind, I believe these are likely the "best" solution if you wish to tie with scissors in your hand. I definitely don't advocate tying with super-sharp "regular" scissors in your hands because you cannot easily hide the blades as easily in your hands as you can with scissors like this or other similarly designed scissors. Plus, the 6th finger scissors give you more dexterity, I believe, than most other scissors that you might want to keep in your hand as you tie.

So, here's the breakdown of the pro's and con's...

PRO's:

  1. The scissors are truly designed to be kept in your hand as you tie and to "hide" the blades as completely as possible while not in use.
  2. The scissors are very lightweight and, as such, don't impact your hand dexterity as much as would a bigger pair of "regular" scissors.
  3. The loop on the scissors is big enough to fit more regular-human fingers, but not so loose as to become an impediment.
  4. If you're looking for good finishing work in tight spots, these blades have very fine points with some precision cutting capabilities.
  5. I believe that your cutting stroke is inherently going to be shorter and require less effort because the blades are relatively short when compared to the blade joint. This makes the "mouth" of the scissors smaller, which means less distance to travel to complete a cut. (this is also a CON...read on)

CON's:

  1. My biggest challenge with the 6th finger scissors is that, because of the smaller "mouth" on the blades (see #5 above), I could not very easily cut bigger chunks of materials without having to take multiple chops/cuts with them. This actually slowed down my tying quite considerably because I was then required to either take more cuts or to put them down and pick up a pair that could do that type of cutting -- which sorta defeats the purpose of using them. Granted, I could always try to plan better on my material cutting and try to do those types of cuts in advance with different scissors, but ultimately, this was a fairly big limitation.
  2. When compared to some other "regular" scissors, I ended up finding that the 6th Finger scissors blades were not quite as sharp as I'd like or need. Again, the scissors are plenty sharp for most things -- especially in close detail work with thread and small feathers, fibers etc. But where I felt things got a little challenging was in trying to cut materials like antron or other synthetics in larger amounts or in situations where I could not put tension on the material itself (realizing, of course, you can cut most any material well with a dull pair of scissors as long as you keep good tension on the material as you cut it).
  3. As I considered the two "CON's" mentioned above, I realized I ended up grabbing a different pair of scissors to perform some cuts even while I had these in my hand. That sorta defeated the purpose of the in-hand design and I realized the 6th Finger scissors aren't as versatile as I would have hoped.

Summary

So in all fairness, I think these scissors are worth a try -- especially if you're wanting to go in-hand on your scissor work. For me, personally, I ended up needing scissors that were a bit more versatile and knowing I typically use different scissors during my tying sessions anyway, I didn't feel the in-hand design was something that benefited me enough to use them on a more frequent basis. But the 6th finger scissors are a great design and a great way to get in and do some tight detailed scissor work.

Here's the original review from 4 years ago...


Wolff Vise Reviews

$
0
0

Durable workhorses of the bench


Apex vise and Versa-Clamp


I love gear.  There, I said it...  I love trying out new or existing stuff, and I'm usually pretty adaptable when it comes to rods reels, etc.  I'm a bit more particular when it comes to vises, so I was really excited to get the opportunity to tie for the last several weeks on Wolff Indiana's Atlas and Apex vises.  I was also able to review one of the best c-clamps (the Versa Clamp) that I have used (I'll go into detail later in this post).  These vises are the same vises that were made famous under the Anvil name, the only difference is that they now bear the Wolff name.

What really interested me in these vises, is that they are made in the USA, they looked to be very well made, and they had an excellent price point.  The Apex vise retails for about $99, and the Atlas vise retails for about $149, so they fall right into the same price range as some of the other popular vises in the market.

Both vises are designed around essentially the same jaw.  It is a smaller profile jaw that I immediately knew  I would like for tying the small stuff, but how would it handle the bigger stuff?  Remember, in my opinion, a good vise should be able to hold any hook without having to switch jaws, or adjust too much.  What I found in the jaw were two strategically placed notches that allow you to seat the larger stuff.  100% lockout on big hooks - check.  I did find that I had to find a happy medium with notches the Atlas, but the Apex was a bit easier to manipulate.  I'll explain later.
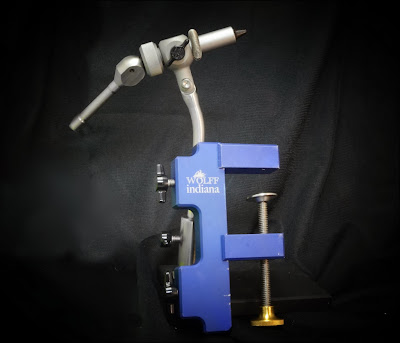
Apex Vise (Traditional style vise)
Wolff Apex Vise

Most of you know by know that I'm a die hard rotary guy.  I don't really go out of my way to tie on non-rotary stuff, but this little vise kept finding it's way into my starting lineup, in fact, on a recent trip to Michigan for work, it is the vise that I took with me due to it's small size and simple design.  If it can make it through the TSA and the brutal baggage carriers from Delta Airlines (my box of tungsten beads wasn't so lucky), you know that it's well made.

Pros:

  • Very well made.  Clean design with mostly machined metal parts.  
  • The jaw plain holds hooks.  In fact, I think this will be my new go-to vise when I'm wrapping up anything under a #20.  The fine points on this jaw give you maximum room to work with even #32 hooks (yes... I tied several 32's on it).
  • The notches really line up well with larger hooks, and I was able to achieve positive lockout on hooks as big as 4/0.
  • The clamping mechanism has a long lever making it very easy to clamp hooks in with an easy squeeze of your fist. (Much easier than on the Atlas).  I really liked this function because it helps with hand fatigue.
  • It comes with both a pedestal base and a c-clamp (not the versa clamp pictured, but still a good clamp).
  • This is one of the BEST options for a new tyer that is trying to stay under $100 on a vise.
Cons:
  • When tying on this vise, there is a very slight amount of play in the connection where the jaw meets the stem.  It didn't bother me at all when I tied on it, but it might bother you if you are a wierdo with OCD like cough... cough... cou-Curtis...
  • I had to do a very slight amount of tuning to the vise, and it got more smooth as I tyed on it more.  I added reel oil to the threaded adjustment on the back of the jaw.  It also seemed like the clamping motion got more smooth the more that I clamped it.  It was kind of rough at the beginning.
  • The pedestal base on this one is too small for tying bigger flies.  If I were going to be doing deer hair, or bigger bugs, I'd get a larger base, or put it in the c-clamp
  • The stem is a bit short for the c-clamp.  It still works, and I tie with the vise fairly low so it worked great for me, but if you like your vise at head height while tying, this stem is too short for that.
  • The material clip kept moving around on me.  If I were going to tie on this vise long term, I'd find a way to stick the clip in one place without having to worry about it slipping off the front of the vise.
In all, I think this vise is one of the best sub $100 vises on the market.  It's made in the USA, and as I said, I think I might just adopt this one for the fine and micro stuff.  This is a very solid vise.


Atlas Vise (True rotary style vise)

Wolff Atlas Vise
I was most excited to get this vise because I really prefer to tie on a true rotary vise.  I did my best to put this thing through it's paces and tied every type and size of fly imaginable, and the verdict is that it basically holds any hook you throw at it... almost.  I'll talk about the notches and the angle of the jaw in a bit.  Again, USA made, 99% machined metal parts - this one is built to last a lifetime as well.

Pros:

  • This thing is bulletproof.  It is designed to last the test of time as I mentioned with the Apex.
  • Holds a wide range of hooks, especially the small ones.
  • For $150 you can get a fully functional true rotary vise.  This one definitely hangs side by side with the Peak vise.
  • The jaw adjusts up and down, allowing you to achieve true rotary with any size of hook.  
  • The pedestal base is very wide and heavy.  This thing won't tip when you are cranking on that buck tail musky bug with GSP thread.
  • It also comes with a c-clamp 
  • I like the longer rotary stem that comes off the back of the vise.  This makes it easier to get a hold of and control even when you are just positioning the vise at an angle and not "tying" rotary style 
Cons:
  • The angle of the jaw, and the notches in the jaw, don't lend themselves to easily place large hooks in it.  The Apex was much easier, because the jaw can be adjusted to a less extreme angle, but because of this angle on the Atlas, the notches try to grab the hook where there it typically a pretty extreme bend of the hook.  The notches are straight, not curved.  This being said, I could get a hook to sit in the notch, it just took some practice to get used to it.  Not a deal breaker at all.
  • The tensioning device on the back of the vise would loosen every so often.  I know that I could have fixed it if it were the vise that I was going to be tying on all the time, but I chose not to.  No big deal because most vises require a bit of tuning at first.
  • It was a bit rigid at first with the clamping mechanism on the jaw, but like the Apex, it broke in very shortly with use and a bit o' lube.
  • The material clip is lacking on this vise.  It's too small, and the gaps in the spring are a bit too wide.  There are many after-market clips available, but I found that I had to craft my own (as I have done with several other vises).  This really isn't a big deal to me because many vises are sold without material clips at all.
All this being said, If I had to chose a vise between this one and the Peak (same price category), I'd blindfold myself and throw a dart at their pictures on the wall.  Whichever picture I hit would be the winner.  These vises are about the same when it comes to functionality.  Yes, that means that this is a really, really good vise for a bill and a half.

Versa Clamp (See top picture)

Oh how I wish I would have had this back in my days of tying with my c-clamp Renzetti Traveler.  If I would have had this bad boy, I would very likely still be tying on a c-clamp vise.  This is hands down the best clamp that I have used.  As you will see on the top picture, this clamp is designed to be used a variable widths that can be adjusted easily.  The main reason I changed to a pedestal base is that my c-clamp wouldn't fit on some surfaces.  This clamp would have taken care of that issue for me - no problem. It also has two bolts that lock down the shaft of the vise. 

Pros:
  • This is the best c-clamp in the world
Cons:
  • See above.  There are no cons


All things being said, Wolff makes high quality products that are made to last a lifetime.  If I were deserted on an island with only a Wolff vise... I'd be a happy man.

~ Cheech


Viewing all 629 articles
Browse latest View live