Quantcast
Channel: Fly Fish Food
Viewing all 629 articles
Browse latest View live

Bug-Eyed Boodle

$
0
0

Simplicity is it's game


Bug Eyed Boodle


I can credit my father-in-law for first putting a fly rod in my hands at the age of 22.  I had fallen in love with chasing the local bass and trout with gear, but fly-fishing was an enigma that eluded me until I sat in his back yard waving a custom built fiberglass 6 wt with a pflueger medalist attached to it.  I was just some kid that his daughter had dragged in through the door a few weeks earlier, but he perked up when I mentioned fishing.  Bill and I have had many an adventure since that day, see, he is the father figure in my life, and there is no better place to talk about life's triumphs and struggles than while laying down big attractors for willing brook and cutthroat trout.  I place an extremely high value on my time fishing with Bill.

The phone rang.  "We are going to Idaho next monday to fish." There was no question that I was game for that trip, so I started to do some research.  Snake River cutthroat were on the menu so I was immediately thinking that I needed a whole bunch of the flashy/foamy/gaudy stuff that only hungry cutts dare put in their mouths.  I also happened to be on a total streamer kick, so I wrapped up some Mongrel Meats, and Cheech Leeches.  Because of the time investment of tying up big articulated streamers, I decided to tie some bugs that took less time to tie, but that would be something different from your typical wooly bugger.  Out came something that looked OK, so I wrapped up about 6 or 7 and called it quits.

Streamer eating Cutthroat
On the stream; the gray rolling clouds and light drizzle may as well have been a neon sign that said "THROW STREAMERS....  THROW STREAMERS." I lashed a Cheech Leech to my trusty 5 wt, and Bill Started out with a Blingnobyl Ant as we fished the first couple of holes in the river.  The first hole the cheech swam through caught the attention of a very meaty fish, but he peeled off at the last second...  Too flashy.  On went the mongrel, and it was game on for the rest of the day.  Bill, or "Royal Coachman" as is his CB handle,  was intrigued by this new fangled streamerness and gave me that look like "hey...  gimme a streamer!"

Ol' Royal Coachman with a Cutt
Little did Bill know that he would be the field tester for my new streamer concoction.  I gave him one to try, and he ended up pulling fish out of just about everywhere.  It swam great, was durable, and the fish were going bonkers over it.  After about 5 fish, I finally told Bill that it had never been fished before and that he would have the honor of naming it.  Without hesitation, while releasing yet another slab of a fish, he matter-of-factly looked up and declared, "Bug Eyed Boodle." Almost like it wasn't even a question...  So the Bug Eyed Boodle was born that rainy morning in Idaho, and it has been a staple in my box ever since.

Recipe:
Hook: Allen E601 #2
Eyes: Allen Brass Barbell w/ Eyes 4.8 mm
Thread: UTC 140 to match color of fly
Body: Holographic Cactus Chenille to match color of fly
Collar: Spirit River UV2 Schalppen
Overwing/body: Olive arctic fox tail hair


Note:  This hook is MEAN... Meant to be an egg hook, I have been using it for inverted minnow type flies and have been very impressed.

Video:


The NEWB Corner: Choosing a Vise

$
0
0

Don't get caught with a case of "vise envy".


And it's "vise" not "vice", although your vise can become a vice.


Choosing a vise is like choosing a mate for life.  Some want the type that is all about the function, while others want it to be functional and sexy at the same time.  There are vises that fit both bills, but there are also vises that might do a little of each, but excel at neither.  I have tied on many vises, and I definitely have my criteria of what is good, but not all tyers have the same needs.  For christmas of 1999 I got my first vise.  A beautiful Thompson model A vise that really didn't know what it was in for.  I kind of feel guilty about how I abused it over the next several years.  For me at the time, it was the perfect vise because it held hooks, yep, exactly what it was designed to do.  Years later I came home to see the most beautiful thing I had seen in my life (I hope my wife doesn't read my blog).  A rotary vise.  My wife had purchased a Dan-Vise for valentines day and it, too, would get its fair share of abuse.  The next several years saw vises come and go, but I definitely came up with a list of things that I needed in a vise to make me tie happy. And above all, we recommend trying out a vise before you buy it, if at all possible. This is YOUR vise purchased with YOUR money, so brands aside, this list should put you into a few options.


#1- Hook Holding Ability

The dang thing better hold a hook.  Bottom line, if the hook slips at ALL while tying, it has failed in it's journey upon this ever-livin' earth.  I would rather tie with a $15 vise that holds hooks rock solid than an expensive vise that is slippery.


#2- Must Fit My Budget

There is a reason why not everyone spins bugs on a Renzetti Master vise.  It's a great vise, but it also costs around $600.  There are many low-cost and medium-cost vises that hold hooks just fine.  They might not have all of the bells and whistles of more expensive options, but if you are after hook holding, there is no need to spend $600.  Most fly shops will let you play with the vises so you can get a feel for what they do.  If you are 100% sure that fly tying is going to be a very important part of your life (as it should be) I would recommending dropping a bit more change on the sexy AND functional model.


#3- Must Be Versatile

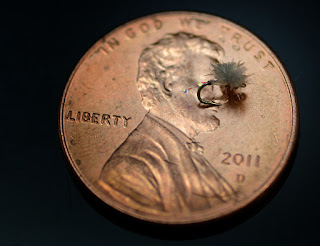
I should be able to use the vise for everything.  I tie bass jigs on 5/0 hooks, and I tie #32 midges in the winter.  I don't even want to have to buy a second set of jaws.  I realize that most vises out there are not going to be able to do this, so it's important to realize that a less expensive vise might limit your tying range a little bit.
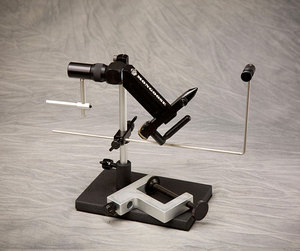
#4- Must Have Features

I really need a vise with a lot of bells and whistles.  I made the mistake of getting used to a variable tension rotary function, adjustable material clips, and a single jaw that can handle a #32 AND a 5/0.  I think if I had to go back to the Thompson, I'd either light it on fire, or throw it across the room.  Call me a snob...  There are a lot of accessories that you can add on the the vise after the fact, so I would recommend just starting with the basic vise and add on later.  Accessories I like: material clip, pedestal base, rotary handle, extendable stem for use with a c-clamp, hackle gauge.  Accessories I don't like: Light or magnifying glass that attaches to stem of vise, extended body tool, parachute (gallows) tool, or any extra crap that gets in the way.  The beginner will gather tastes as they gain experience, so take it slow.

There are three vises our there that, in my opinion, shine above the rest.  They can be had without breaking the bank too bad, and they will be able to handle most anything you throw at them.

#1 - Griffin Montana Mongoose MSRP - $200 - $225.  (The absolute cat's meow)


#2 - Renzetti Traveler MSRP $159. (Simplicity and function)


#3 - Peak rotary vise MSRP $150. (Best $150 vise, hands down)


I have also identified three excellent beginner vises that can be had for a bit less money.

#1 - Danica Danvise rotary vise MSRP - $100 (yes, it's a fully functional rotary vise)
#2 - Griffin Montana Pro MSRP - $80 (Same awesome jaw as it's big brother the Mongoose)
#3- Griffin Superior 1A vise MSRP $40-$60 (Bare bones vise that has a rock-solid jaw)


10 Organization Tips For Your Tying Area

$
0
0

Get your stuff together!

A few months ago, we did a blurb on fly tying stations here and wanted to follow up with a few suggestions on how to organize things once you have a workstation in place. If you read that previous post, one of the biggest takeaways is to plan big and grow into your space (if possible). This is especially important for a tyer just starting out because this will make their collection and organization sooooo much easier down the road. That means pay attention! So with that in mind, here are a few tidbits on getting your space organized...

  1. Keep materials stored and separated as early on as you can. There was a time in my tying career that I kept all my "feathers" in one bag or box. It won't be too long before you have to dig through a considerable pile of stuff to get what you're looking for. One suggestion is either bags or plastic bin or drawer type containers to group "like" materials together. For instance, I have drawers such as "Soft Hackle", "CDC and Ostrich", "Rubber Legs and Skin", "Marabou", "Hackles" etc, making it a lot easier to find what I'm looking for.
  2. Label stuff. Ok, I'm anal and a bit OCD -- that's a given. But having my stuff labeled in its various containers saves me a lot of time by knowing where things are and how to get at it. I bought a cheap nerdy hand-held labeling machine at the office store. Works great. I use it for containers, hook boxes, bead boxes and my underwear.
  3. Keep highly used materials close at hand. Things like threads, hooks, hackles, etc I try to keep within arms length. While I do have a whole closet-full of materials, I try to make sure the most commonly used stuff is right in my reach.
  4. Store and label hooks and beads in drift-safe containers. I suppose you can keep hooks in their manufacturers packages, but what's the fun in that? I like to use containers like the ones from Craft-Mates. The compartments are individually lockable and the hooks or beads won't "travel" to a new slot when you tip it upside-down.
     
    Also, it's a good idea to label those containers so you can go back and know which hook types to re-order or which bead sizes you used on that pattern you tied up a few weeks ago.
  5. Try to make sure everything has a home. I used to find myself (and sometimes still do) buried in piles and piles of materials that cover every horizontal surface in my tying area. But when I finally get around to putting things back in their respective spots, I can at least see my desk area because most materials, tools, hooks, beads and such have a place to call home. This can be a tpol caddy, a small bin, a shoebox, a shelf or whatever you want to use.

    Whether or not you decide to put them there, is another story, but a clean tying area will increase your tying efficiency and ensure that you're not re-ordering the same materials 10 times over because you can't find them.
  6. Find a good solution for storing your tools. Whether you stick them in a simple tool caddy or build your own, your tools are likely going to last longer and will be easier to access if they're not sitting on your desk free to roam and get lost or fall onto the floor and break (as I've done with a couple of pairs of good scissors). Because I'm a bobbin hoarder, I have a couple of spots for the bobbins to keep them easy to reach and still keep them threaded.
  7. Foam Storage. Because of the large variety of colors, thicknesses and types, foam can very easily get out of control. I've found that by putting the foam into containers sorted by thickness and type, I can more easily organize and keep track of it all. And since I buy a lot of foam at the craft stores, I also have a bigger drawer (not shown below) that will store the bigger foam sheets so I don't have to cut them to fit into my smaller containers if I don't need to.

  8. Know what to buy. Probably one of the most annoying things about not staying organized is that you have a much harder time keeping up with knowing what materials you need. As part of this, I have a running list using Evernote that I jot down a "need to buy" list. I'll update that list when I'm tying or organizing and realize I need a given material. Then when I'm online or in a fly shop and need to buy materials, I can quickly refer to my list. It also helps to make sure I'm not buying double or triple copies of the same thing (as I've been known to do on many occasion).
  9. Purge. What kind of blasphemy is that? Yes, as hard as it is to admit, if you've been tying for any length of time, you've likely collected a ton of materials -- some of which is useless, dated or just plain crap. I recently went through my marabou collection and found packets of feathers from 20 years ago! Compared to what they're putting out today, it was total junk. I'm sure I could have kept it and maybe used it for something, but the space it takes is worth more than the materials. Don't be afraid to go through and purge things from time to time. Or at the very least, donate it to a local tying club or something to benefit someone else.
  10. Keep it Clean! I know, I know, that's the hardest part of all and what kind of true fly tyer doesn't have an insanely cluttered work area?? But if you take the time every couple of weeks to put things back into their places and to maybe dust or vacuum, you'll find you can be much more effective tying and keeping track of things. For me, I find that when I have a more organized tying area, I'm actually more inclined to sit down and spend time at the vise. Sounds weird, but it's true.
In the end, I'm sure there are a lot of other organization tips, but this should get you going with some things to consider. If you have any other tips or suggestions, feel free to comment below....


Cheech's top 5 subsurface patterns of 2013

$
0
0

 Danger Lurks Beneath

Synthetic 20 Incher


For the past two or three years I have been on a nymphing/streamer kick, and I'd say that about 75% of my fishing is done beneath the surface.  In particular, this summer has been one of european style nymphing and throwing streamers, so I thought I'd share the flies that were on my line most of the time.

Masked Marauder / Synthetic 20 Incher:

Tan Masked Marauder

The Masked Marauder in both light and dark applications has been so very good to me ever since it's first dip in the water...  I added the Synthetic 20 Incher (pictured above) because it's pretty much the same fly without the fancy wing case.  I think one of the keys to the success of these patterns is the use of Arizona Synthetic dubbing that is used for both the thorax and abdomen.  These patterns can be tied in a wide variety of sizes and colors due to the synthetic materials used.  I mainly fished these flies in size 10.  Masked Marauder tutorial HERE.


Arizona Prince:

Tan Arizona Prince

The Arizona Prince is another pattern that is very versatile, and can be tied in a variety of sizes and colors.  I usually use the original prince color, or a tan variation to fish the streams that we have here in the west.  I have wanted to try out an all black version, but I never got around to trying it.  I  fish this fly in either a size 8 or a size 12.  Tutorial HERE.


Mongrel Meat:


Mongrel Meat
I know what you are thinking here...  "No Cheech Leech????" Well, because I spend so much time on the water trying to develop new patterns, the Cheech Leech didn't get as much playing time in the box this year because it's such a proven commodity.  Out came the big-eyed Mongrel Meat, and it was just as deadly.  I really like the way it swims in the water and how the bulky head pushes water.  I think it fishes better than the Cheech Leech in clear, spooky water because it doesn't have quite so much flash.  I fished it with both a sink tip, and with regular floating line depending on the type of water I was fishing.  Olive and Black were my top producers.  Tutorial HERE.


El Sculpito:
El Sculpito

I have wanted a good small-profile sculpin pattern for a while, and I think I finally have something that fits what I need it to do.  El Sculpito came into my mind last winter, so I had to patiently wait until spring to really give it a good workout.  What I really love about the Sculpito is that it has a knack for hugging the bottom and slithering through the rocks without hanging up.  The silicone fins give it a great fat-head profile, and also helps create a cool jigging action on the retrieve.  Tutorial HERE.


In all, I fished many different fly patterns this year, but these 5 have been the most consistent producers for me in 2013.

Best and Worst of Fly Fish Food for 2013

$
0
0

Drum roll, please...


In looking back over the year, we wanted to throw out some of our most memorable moments, fish and patterns -- both the good and the bad. We're also stoked to be a part of some exciting things for the coming year, so stay tuned for some announcements in the next few days!

In the meantime, here's the list....

Worst (not much was "bad" this year, but you gotta know the bitter to appreciate the sweet).

  1. Socks aren't necessarily made to be good toilet paper. Nature yelled hard when Cheech had to make a quick and urgent run to the rustic 1920's era outhouse on a remote lake to get rid of three days of gut-busting convenience store and camp food. As he emerged from the woods, a greatly relieved man, he lifted his pant leg and asked "Hmmm...where's my sock?". Lucky for him, there was a nearby campsite that had some extra man-sized wet wipes so he could finish the job.
  2. Wader Farts. The. End.
  3. Fly eating, rod-breaking trees. We broke a few rods this year, but Cheech, as usual, did it in the most spectacular fashion, yanking a two-dollar fly out of a tree, breaking his $600 rod in the process.
  4. Fishing for Musky in a river of chocolate flowing into Willie Wonka's chocolate factory.
  5. Hiking to a "secluded" lake full of enormous trout, only to be run off by a huge pack of venomous scouts.

Best

  1. The response and support from all you that read our stuff and watch our videos. We throw some crazy stuff out there and it's nice to see people digest and appreciate it. We have a lot more to come, so stay tuned!
  2. Streamer Fish. We fished a lot of new streamers this year and had a ball pulling out some nice fish from some really awesome and varied waters. Check out here, here and here
    Hungry Splake that chased down a big streamer
    A cutthroat stuffing his face with a Cheech Leech

    Honey Badger Don't Care.
  3. Some incredible Salmon Fly Fishing. We lucked into some of the better salmon fly action we've seen in years. Big dry flies and aggressive fish! Read more here.
    Peekaboo, Mr. Pteronarcys Californi

Mouthful, a Salmon Fly pattern inhaled by a brown trout


  • Year of the Bluegill. We had some fun throwing out patterns and hitting the local bluegill ponds as part of the "Year of the Bluegill" (see TFM for more details), which Cameron summarized nicely today here. In addition to the chunker below, there were some good fish this year and fly patterns were rolling off the vise for testing on a consistent basis. Read our bluegill content here...
    Bluegill taken on a white popper

    The Foam Dragon, Bluegill Fly pattern
  • High Country Trout. 2013 proved to be a great year of bush-whacking, hiking and exploring waters new and old in the waters of the back country. We spent many o' night under the stars and had some cold mornings, some tough hikes but most of all, some awesome fish. The fish weren't always big, but the scenery was usually insane and the beauty of these fish remind us of why we pursue these crazy fish. Either way, we're counting the days until the snow is melted and once again, we can head for the hills. See more content, here, here and here.
    Colorful Brook Trout taken on the Chimera pattern

    High Mountain Cutthroat who has a taste for Damsel adults

    Colorful cutthroat taken from a very small remote stream

    A beautiful splake taken on a cold mountain lake

    Dry fly action with cutts on a high elevation lake

    Thanks again for being part of Fly Fish Food in 2013. This next year will have a lot more in store...


  • Introducing Virtual Vise Sessions!

    $
    0
    0

    Fly Tying in the Cloud

    We're excited to introduce our new "Virtual Vise" series of online streaming fly tying classes, events, seminars and tying jam sessions through our Youtube channel! This will be a great way to see, learn and interact with us and your fellow fly tying nuts from all over the world. We'll feature tying seminars, guest tyers, beginner to advanced public and private tying classes and even general fly tying jam sessions for people of all skill levels. 


    We're kicking this all off with our first live event called "Tying and Fishing Midges" to go along with our January themed "Month of Midges". This is scheduled for Weds January 15th at 6pm MST/ 8pm EST and will last approximately 90 minutes.

    >>Click here to join the session on Weds evening.<<

    We'll be doing a few live pattern tying demos, including a tie-along for those that have a webcam and want to participate with us live and in person (well...as in-person as you can get with a webcam). With this interactive mode, you can follow along, ask questions and we can see what you're tying at the same time.

    Because we're limited to 8 tyers in the video conference room, it's a first-come and first-served basis on that. You will need a Google+ account and will need to have joined our site from the "Join This Site" link to the right. We highly recommend you have a high quality webcam with macro or close up capabilities in order to get the most out of the tie-along. Email us if you wish to be one of the 8 tyers in the interactive video conference. 

    If you don't wish to join the interactive video conference or we run out of room in the conference room, no worries as you can enjoy the live streaming event on YouTube without joining up or even having a Google+ account. It will be 100% open to the public for viewing the live stream here.

    If you have any questions, comment below!


    January is Midge Month

    $
    0
    0

    ..and Chironomids, buzzers and the like.


    Usually sometime in December or January, the cabin fever sets in and the things that come off my vise after hours of sitting in the man-cave can make me think twice about my sanity. My daughters' barbie doll hair is all but depleted and my dog is as bald as a coot. But this time of year is also a great time, in between tying sessions, to get out and hit the water for some great midge hatches. Not only the smaller river style bugs, but as the ice begins to recede from the lakes, their bigger bodied cousins show up in the form of Chironomids.

    So it's time to get tying some delicious Diptera.

    adult midge fly pattern
    Quill Body Midge Fly
    The first pattern out of the gate is a relatively simple peacock quill body midge adult. Similar to the natural pictured above, this is going to be a pattern you tie on when you're confident the fish are hitting the surface. With midges, it gets a little tricky because they'll end up taking pupa for a good majority of any hatch but yet they'll still "rise". Just be aware of the riseforms and realize that you'll likely fish a few pupa patterns before you'll tie the adults on. In terms of the progression of a midge hatch, we'll discuss other pupa and emerger patterns later on but this would be the final stage where the adults are skimming across the water's surface and the fish are actively rising for them. I find that leaving a shuck in the mix is a good idea as the hatch evolves from pupa-focused to adult-focused. The 2nd variation shown is a higher floating adult that can be nice for throwing into the choppier seams where you may not think a trout is focusing his attention on such small bugs. You'll be surprised.

    adult midge fly pattern
    Midge Adult Pattern
    Recipe

    Hook: Allen D101BL #18
    Thread: UTC Ultrathread 70 Denier Black
    Tail: Light Dun Antron
    Body: Green Dyed Stripped Peacock Quill
    Wings: Light Dun Medallion Sheeting
    Legs: Light Dun Antron


    Orange Asher: Midge of Mystery

    $
    0
    0

    But it just works

    Orange Asher Midge Pattern
    The Orange Asher with Holo-Tinsel and CCG

    For me, the Green River in Utah holds many o' tale of stumbling onto cool, new and yes, even mysterious fly patterns. Which reminds me of a couple more patterns I need to tell you about later...but I digress. The Orange Asher is one of these odd flies with an interesting history behind it.

    Our tale starts off many years ago as a friend of mine was hiking back to the boat ramp below the dam on the "A" section of the Green. At a distance, as he approached a big back eddy, he noticed the guy fishing there had a fish on the line. As he got closer, the fellow was into yet another fish. And another. My buddy, not having had a super stellar day, was obviously curious and stopped to watch this fisherman land several more fish. Before too long, the mystery fisherman packed up and got ready to leave but voluntarily and graciously offered the fly to my friend as he left. He explained it was a fly pattern he knew little about, but it had done well for him. Attached now to a new tippet and line, the fly continued its success for the last hour or so of the day.

    Upon his return, my buddy called and told me the story of the mystery fly and described the pattern to me. This was in the early days of the internet and not much was found on the pattern. However, after asking around and checking different sources, I was able to identify the pattern as an Orange Asher. As far as I understand, it was originated by a gentleman named Jack Howarth of Colorado Springs, Colorado and was primarily used for high mountain lakes to imitate adult midges.

    Arctic grayling orange asher midge pattern
    A high mountain Arctic Grayling takes the Orange Asher
    So with enough information to tie the fly, I hit the vise and whipped up a few samples. Easy enough to tie and, as it turns out, very effective to boot. Long story short, I've used this pattern now on rivers, lakes and everywhere in between and can honestly say I'm not quite sure why it works so well overall. I've had times where, fishing for very finicky midging fish that won't touch a #26 spot-on natural imitation, fish have come from several feet away and nailed the Asher. Go figure.

    In fact, the two photos shown here with the Grayling were the result of an initially frustrating day on a high mountain lake with fish rising all over the place. I had tried a few calliabaetis (which were hatcing) and some midge emergers, but it wasn't until I slapped on Ol' Reliable that the fishing turned for the better.

    >>> And if you don't tie your own, we sell them on the store here. <<<

    Arctic grayling orange asher midge pattern
    Large Arctic Grayling taken on an Orange Asher


    Hook: Allen D102 BL #16 << BUY HERE (preferred) or TMC 101 #14 - #22

    Thread: UTC 70 denier burnt orange
    Body: UTC holographic tinsel orange (also green has been a killer)
    Hackle: Grizzly

    NOTE: This is an old school video and uses pearl tinsel instead of the holo-tinsel we use today.


    Bunny Midge

    $
    0
    0

    Small, proportionate, AND visible.


    A dozen #30 bunny midges on a dime
    Several years back all of my free days in the winter consisted of arriving at the river about 8:00 am, rigging up the 3 weight and walking slowly down to the stretch of the river where the fish liked to eat dry flies.  I HATED nymphing, and I would rather go and sit at the side of the river waiting to see a nose, fin, or tail come up for a snack.  I quickly realized that my offerings needed some tweaking if I was going to be able to take advantage of these risers.  I had been tying a lot with snowshoe hare's foot (because I had no money, and good hackle costs money...) and I began to tie with some small hooks.  I started with a #24 and got the fly to be proportionate without a lot of added bulk where the wing was tied in.  I wanted a shiny trailing shuck and a very faint rib.  I started with a wire rib, but adding any more metal on an already minuscule hook was going to compromise the buoyancy of the bug.  I settled on tying thread of a slightly different color.  Off to the river to fish, and the bugs performed very well, except for the fact that the fish seemed to be taking size 64 emergers that day.  I would drift a #24 right down Santa Claus lane with no takers.  I had to go smaller.  The fly shop was on the way home, and they thought I was nuts for asking for #30 and #32 hooks, but hey, THEY were the ones who had them on the shelves.  The next weekend, the smaller flies performed amazingly, and I have been fishing small flies ever since.  I tie this fly from #18 to #32 in black, brown, olive, gray, etc.  The key is the wing and the shuck; you can do whatever tickles your fancy in the middle.


    Recipe:
    Hook: TMC 2488 #18-28 or TMC 518 #28-32
    Thread: Veevus 16/0 or Uni 8/0 color to match natural bugs
    Tail: Midge flash - root beer or opal
    Rib:  Uni 8/0 thread - dun or iron gray
    Wing: Snowshoe hare's foot - dun

    This one is tied on a #32 TMC 518 hook.


    AND... the HD video tutorial.

    5 ways to enhance midge pupae

    $
    0
    0

    becasue zebra midges are boring.

    Purple biot pupa with flash wing

    We all know that trout are gluttons for food that is plentiful and have high caloric value.  Because of this, most of us have line upon line of midge pupae in our boxes as a "last resort." I know that on any given day of the year the trout will take a zebra midge, but with a few tweaks here and there, your midge pupae can turn into bona-fide fish catching machines.  I think there is a lot of value in being able to present a fly that is a bit different from the monotonous designs in the fly shops.

    Here are 5 things that you can do to enhance your midge pupae:
    Single pheasant tail strand

    1- Experiment with different body materials.

    • Substitute the common thread and wire body with something like a biot, spanflex, stripped quills, floss, tinsel, etc.  My favorite body material is a turkey biot with a small wire wrapped over the top of it (in between the segments).  Another thing that I have done is create a body of tinsel, lightly coat with super glue, and then wrap a single pheasant tail fiber through it (see picture)
    2- Add flash.  
    • Yes I know that midge pupae don't have wings, but as they move around a lot and trap air against their bodies to help them emerge.  By tying a sparse overwing of krystal flash, midge flash, or other sparkly things, it just adds a bit of a flash element to the fly.  Flash can also be added to the thorax of your midges by dubbing ice dub, or other similar flashy dubbings.  Senyo lazer dub is actually a great dubbing for tiny flies because it is so fine.
    3- Vary the weight.
    Oversized bead with wingcase to keep it in place
    • I always like to tie my midge pupae in three varieties of weight proportion: tungsten bead, brass bead, and no bead.  The reason for this is that the fish aren't always going to be feeding on the bottom, and if you need to hang a midge pupa off of a tiny dry fly, the tungsten probably isn't an option.  It's nice to have something that won't sink quite as much for those film feeders too.  Conversely, I have tied some pupae with beads that might be a bit too big for the hook.  I have to come up with creative ways to get the bead to fit on the hook without eating up the hook gap.  That usually means that I'm lashing the bead to the top of the hook shank with some monofilament.
    4- Vary your hook styles.
      2488 hook with wire and bright floss
    • Most midge pupae are tied on curved shank hooks, but they can be tied with a wide variety of hooks.  For the value oriented fly tyer, they can be tied on the same hooks you are tying your dry flies on such as the TMC 100.  When midge pupae are in the water, they don't always take a curved shape, so a straight shank still imitates the natural quite well. There is a very wide variety of hooks out there, and the key to different hooks is to make your flies slightly different from the rest. 

    5- Experiment with colors. 
    My #1 color.  Olive.

    • Green or olive are by far my favorite color combos to fish, but there is such a wide array of colors that are fantastic when fished as pupae.  My eyes were opened one summer when I went from catching very few fish on one of my tried and try black patterns to catching fish after fish on a blue pupae with chartreuse wire.  Some staples in my box are black, olive, brown, blue, purple, cream, and chartreuse.  Remember that there are no rules when tying, and you should absolutely try fishing with crazy colors so the fish can decide if they are effective or not.
    ~ Cheech

    Stream Access Threatened!

    $
    0
    0

    Act now!!


    Whether you live in Utah or not, legislation here may very well trickle down and set precedence in other states.

    UTAH STREAM ACCESS: NOW IS THE TIME!

    SUPPORT HB37 | Protecting Public Water & Property Rights!

     In the state of Utah, it is against the law for the public to recreate (fish,
    wade, etc.) in public waters that are adjacent to private property. This law
    severely limits the freedom for not only the residents of Utah, but also to
    any persons who come to Utah to enjoy our precious streams and
    waterbeds. It's the public’s right to lawfully access and use its public waters
    in place for any lawful activity, including recreation, allowing the public to
    reasonably touch privately-owned beds of public waters in ways incident and
    necessary to such use. This right is defined in Utah's constitution, and has
    been upheld by the Utah Supreme Court several times.

    Approximately 50 percent of the legislature will only know 1% of the public water law. And that is hardly enough time to ensure strong support for HB37 —but it can be done and here’s how.

    You can help right now!
    RESIDENTS:
    Contact your local Representatives: http://le.utah.gov/GIS/findDistrict.jsp

    NON-RESIDENTS:
    Contact the office of Governor Gary Herbert, his chief legal counsel, and his
    senior environmental advisor. Tell them to SUPPORT HB37!
    + Utah Governor's: Gary Herbert -you must now go to this link. http://
    governor.utah.gov/goca/form_governor.html
    + Legal Counsel: Jacey Skinner -jskinner@utah.gov - 801 538-1645
    + Sr. Environmental Adviser: Alan Matheson - amatheson@utah.gov -
    801-538-1574

    info@utahstreamaccess.org |www.utahstreamaccess.org
    Become a member, It's free!

    Top 5 Midge Myths

    $
    0
    0

    Get your midge-information here


    Large Rainbow caught on a small midge pattern
    1. Smaller Flies = Smaller Fish. I'm always surprised when people tell me they don't fish midges because they don't like to settle for smallish fish. Granted a big beefy streamer will likely drum up bigger fish more consistently, but I've had some of my biggest trout on the fly come on midge patterns. I've hit the 24/24 club on a couple of instances (24 inch fish on a #24 fly) and the 22/22 or even 20/20 is more common than you might think. Barring the existence of bigger meals, the fish will often spend the time eating the smaller nutritive morsels in the form of midges. Not always, mind you, but at least be open to the idea that there might be a big fish under that riseform among the no-see-um's.

    2. Rise = Dries. When you see fish rising, you need to throw on a dry fly midge adult because they're eating on the surface. I think most fly fisher people know this isn't necessarily true, but still it's a good one to mention. As many midgers understand, you need to pay attention to the rises to determine whether the fish is actually taking something "on" the surface as opposed to something "in" or just below it. As the hatch gets going, you can almost count on the fact that the fish are hitting midge pupa emerging from their shucks trying to break through to the surface. Fish will snack on these helpless targets all day long if they could and they can't help but break the surface of the water as they take the bugs. Look for "finning" or "tailing" as opposed to the standard bubble rise of a surface take to know whether they're up top or just below it.

    3. When you're fishing flies so small, the pattern itself doesn't matter as much. Oh if this were only true! While I've found that the smaller you go, the simpler your flies can be, I've definitely concluded you still need to pay attention to size, color and profile. I've fished through enough huge midge hatches with finicky fish (think Silver Creek in Idaho or Rocky Ford in Washington) that I can tell you those things definitely make a difference. With midges especially, since there is a big variety of colors -- even on the same body of water, you need to always pay attention to size, color and profile in order to maximize your results. Go ahead and fish the same style Griffith's Gnat, er Peacock King, across all situations and see how that goes.

    4. There's no need to fish flies smaller than #22. Believe it or not, I've heard this on several occasions and have to bite my tongue because it usually comes from one of "those" guys that doesn't pay attention to the rules. Both Cheech and I have run into situations on many occasions that required us to dial down the size to something as ridiculously small as a #32. Now, that doesn't mean we throw on a #32 as a matter of practice, in fact I'd prefer to avoid fishing crap that small, but sometimes you gotta miniaturize. Just pay attention to the naturals and look to see what the fish are doing. And sometimes remember that when things are looking that small, throw on a cluster or something flashy like an Orange Asher and see what happens!

    5. I can't tie on a fly that small, let alone see it on the water, so I can't fish midges. This is yet another objection to midging I hear from time to time when teaching tying classes or seminars -- especially when talking about dry flies. True, the smaller flies are virtually impossible to see on the water. But you don't need to see them. Learn to either guesstimate the location of your fly and look for a rise in that area. If you have a hard time doing that, get some small pieces of stick-on foam indicator or some Loon Biostrike to put up your tippet a small distance. As for tying on the small flies, you can always pre-rig with with a threader and have them ready for you to use on-stream. Either that, or invest in some inexpensive magnifier glasses. Or bionic eyes with x-ray vision.

    Bottom line, don't give up on midges just because of a few pieces of common misinformation out there. Midge fishing is some of the most addictive and rewarding style of fishing, in my opinion. And if you want some additional pointers, tune into our midge fishing seminar. See details here.

    Why Go Small?

    $
    0
    0

    There's a reason you tie on the small stuff


    Taking a page from some of the midge myths we posted about last week, we headed out to find rising fish the other day. My fancy bug net (read: net wand) in hand, I danced around the stream plucking midge pupa from the surface film to get an idea of the size of bugs we'd be dealing with. Luckily the hatch was just starting and we ended up getting into some typical midging fish. Now when I say "typical", I mean somewhat fussy and laser-focused on the specific bugs on the water. Not every midge hatch is this way as some hatches include multiple species of varying sizes and colors -- fish may not be as picky. But this time the fish were really dialed in on the bugs that were hatching. Our midge clusters did nothing and even some of our better midge emergers had some challenges. Cheech, of course, goes directly to the ol' Bunny midge in a #30 and proceeds to clean the entire run. As a matter of scientific curiosity, I ended up throwing patterns of similar size (parachutes, adult midges and a couple of emergers) and didn't have near the success. I'd turn around and the Bunny midge had scored again. And again.

    Anyway, see more about this great fly here. But that's not the main point here. The point is these fish were keying in on a very specific size bug in a very specific color. Check out the comparison between the natural (also caught with my fancy net wand) and the bunny midge on the dime here. The pattern below is a #30 and compares nicely to the size and color of the natural.

    midge emerger pattern
    Bunny midge and midge adult hangin' on a dime
    Midge Adult
    Midge shucks and other body parts
    After taking a quick throat sample from one of the fish to double-check size and color of the naturals, we can see a lot of shucks and adults. This tells us that the fish were likely taking emergers just in the film as they were shucking. Or maybe they just ate the shucks kinda like the tasty skin from a Costco rotisserie chicken.

    Either way, it wasn't until we were throwing flies that fit the class of bug the fish were focusing on that we saw solid takes. In fact, while fishing one section, I could see the fish come up, inspect and then ignore my midge cluster on the first few casts. Lesson here: Don't be afraid to tie on a "no-see-um" size fly if the fish are dialed in on the small stuff. On this day, when the midge clusters and other larger bugs wouldn't move a fish, we had to size way down to find our way into some tight lines. And don't be afraid to get down to the water level to seine samples or even (carefully of course) take a throat sample or two if you're not sure -- especially when there's a hatch that involves multiple species. Because when you see fishing rising and they're tight-lipped on your patterns, it's always good to look at the size of the naturals to shed some light on things.


    The Foamerger: Midge Emerger Extraordinaire

    $
    0
    0

    My go-to midge pattern for fussy fish


    Size #26 Foamerger
    This is literally one of the easiest patterns you'll EVER tie.

    The pattern, however, was designed out of pure frustration. I was fishing a phenomenal midge hatch on the Green River in Utah one day and after a couple of hours of fishing my traditional midge patterns (griffith's gnats, true midge dries etc), the score was: Picky Trout -- 1000; cold dumb midge fisherman -- 1. I landed only one fish in three hours. As I packed up and picked the pieces of my ego up from the rocks, a dude comes walking along the trail, sees the rising fish, takes one cast and nails a fish. Must've been luck. Next cast: fish on. I suck.


    As I walk by, he actually strikes up a conversation and I came to find out he was fishing a fly his son had given him and he wasn't sure of the name. It was a variation of a palomino midge and it was designed to sit in the surface film.


    With new hope of redemption for my next midge encounter, I got busy trying to understand what it was about that style of pattern that made such a difference. I came to understand, as a lot of people already know, midges have a tendency to hang vertically in the surface film as they struggle to emerge from their pupal stage to an adult. With this in mind, I sat down at the vise to figure out a pattern that fit the bill. The palomino was ok, but when I tried to get it to float vertically, it didn't look much like the pictures of real insects I was looking at. After a bit of trial and error using different materials and patterns, I found one that floated vertically and resembled the bugs. I tied up a few more and set out for the Green the following week.

    The fish gods were smiling on me that day as my new little midge invention did the trick. I fished the same hole and came up with much different results as I lost track of the number of fish I hooked that day. My friend fishing across the way, ended up with 1 fish as he refused to change from his good ol' Griffith's gnat. Anyhoo...the fly was dubbed the "Foamerger" and earned a permanent spot in my midge boxes from then on.

    As it also turns out, this pattern has far outpaced any of my tried-and-true Baetis patterns during the early stages of the Baetis hatch in the Spring. I can't remember why, exactly, I tied it on one day in early Spring as the Baetis turned on, but it turned a so-so day fishing into a great day of dry fly fishing for nice Brown Trout. So I made a point to keep it in the mix even when the Baetis hatch grew stronger and the midges less important. Time after time, this little stupid looking fly kicked the snot out of my Baetis patterns. I'm guessing it's the way it hangs in the surface film or maybe just the overall general impresssion of an emerging bug, but either way, it's been good to me.

    Hook: TMC 2488 #18 - #32
    Thread: UTC 70 Denier Black
    Shuck: EZ Magic Dub, Black << BUY HERE>>
    Thorax: Gray or Black dubbing to match natural
    Head: Gray or Black open cell (or Evazote) foam


    Build a Better Brassie

    $
    0
    0

    Turn simple into ultra simple


    I know.  How can you make the brassie even more simple than it is?  Trust me - it is possible.

    The brassie is a great fly because it just plain produces fish.  Similar to a Zebra midge, it is designed for maximum simplicity, and effectiveness.  With the wide array of wire products out now from UTC and other companies, there are many different color combinations that can be achieved.  

     This video is designed to help you tie cleaner, faster brassies.  The key is to eliminate thread under the body of the fly.  Check out the video for demonstration.

    ~ Cheech

    Recipe:

    Hook: Mustad C49S #18
    Thread: Black UTC 70 black
    Wire: UTC wire black and silver size sm
    Head: Whatever you want...  I used AZ synthetic dub


    Virtual Vise Sessions : Streamers

    $
    0
    0

    Time to get the meat ready for spring

    Tie the Mongrel Meat Live with us

    We'd like to thank all of you for making our first Virtual Vise session a huge success.  We are excited to announce that we will be doing the second installment of our Virtual Vise Sessions: Streamer-Palooza This will be similar to our midge session, and we will do a short presentation on streamers before we tie.   

    This is scheduled for Thursday February 6th at 6pm MST/ 8pm EST and will last approximately 90 minutes.

    Blazin Mini Cheech Leech


    If you  wish to participate a little more actively, we'll be doing a few live pattern tying demos, including a tie-along for those that have a webcam and want to participate with us live and in person (well...as in-person as you can get with a webcam). With this interactive mode, you can follow along, ask questions and we can see what you're tying at the same time.

    Because we're limited to 8 tyers in the video conference room, it's a first-come and first-served basis on that. First, you will need a Google+ account and add me (Curtis Fry) to your circles:  https://plus.google.com/+CurtisFry/ Then at the time of the event, go to my Google+ page, https://plus.google.com/+CurtisFry/posts/p/pub, and you will see the Google Hangout started. Click to join that event.

    We highly recommend you have a high quality webcam with macro or close up capabilities in order to get the most out of the tie-along. Email us if you wish to be one of the 8 tyers in the interactive video conference. 

    If you don't wish to join the interactive video conference or we run out of room in the conference room, no worries as you can enjoy the live streaming event on YouTube without joining up or even having a Google+ account. It will be 100% open to the public for viewing at this link: https://www.youtube.com/watch?v=vJ6JZ1Z2KWI

    What streamers do you all want to see?  We'll take some suggestions before we post the pattern and material list.


    Transitional Midge Emerger

    $
    0
    0

    Fripple Style

    fripple midge emerger midge adult
    Fripple Midge Emerger
    One thing about a lot of different hatches -- midges included -- is that there tends to be a fairly distinct transition period as the fish start to focus on different phases of the hatch. Whether it's a larva-to-pupa or a pupa-to-adult or just plain adult phase, it's important to remember that the hatch will progress and that what a fish was focusing on 10 minutes ago, might not be what they're focusing on right now. It's during those transitional phases where it's a good idea to have a "cross-phase" pattern.

    Cutthroat Trout who liked to eat midges
    The Fripple pattern, as I've written about before, is a great pattern for mayflies because it can cross the emerger/adult/cripple phases and be a lot of things to a lot of fish. Think of it as more of a cross-dressing jack-of-all-trades. The Fripple Midge Emerger has that same idea in mind. I've found it to fish equally well during the beginning of a midge emergence all the way through to the adult phase. Also, I like this specific pattern because I've seen some of the bigger (#18 - #12) chironomids hatch in a more green/olive color than just plain black.


    Fripple Midge Emerger:

    Hook: Daiichi 1160 #18 - #22
    Thread: Veevus 16/0, Black
    Body: Veniard's Stripped Peacock Quill, Green. Coated with Clear Cure Goo Hydro
    Wings: Dun Medallion Sheeting
    Thorax: Evazote Foam, Black


    Tie a Killer Hare's Ear

    $
    0
    0

    Subtle changes to make your pattern stand out.


    Kicked-up Hare's Ear Pattern


    As I was preparing this article, I realized that I literally changed all of the materials that are used for the classic Hare's Ear.  Guard hairs for the tail, adios.  Dubbing from the hare's mask, gone...  etc.  It's been a few years since I have been tying flies with Arizona Synthetic and Mega Synthetic dubbing (not to be confused with Arizona Simi Seal), and they have become a major staple on my desk.  It has that perfect blend of bugginess and shine that I really like when I'm tying subsurface flies.  Aside from the dubbing, I'm also using Whiting Coq de Leon hen fibers for the tail and legs, and thin skin for the wing-case.  I like to have a lot of these in my box because they are a quick tie, and are very effective.  I usually have them in sizes 10 to 16 in a variety of colors.  

    Hook:  Allen Flyfishing W501 #12
    Bead: Allen Flyfishing 3.2mm copper tungsten
    Thread: Montana Fly premium thread 8/0 brown
    Tail and legs: Whiting Coq de Leon hen saddle fibers (speckled copper olive) 
    Abdomen: Arizona Mega Synthetic dubbing (hare's ear)
    Thorax: Arizona Mega Synthetic dubbing (dark hare's ear)
    Rib: UTC wire sm size (amber)
    Flashback: UTC mirage tinsel 
    Wingcase: Montana Fly skinny skin (mottled brown) coated with Clear Cure Goo Hydro

    Hope you enjoy this one

    ~ Cheech

    Here's the video tutorial.


    The Yong Special

    $
    0
    0

    A Legendary Midge Pattern


    In certain circles, it is rumored that anciently there was a fly pattern that possessed such magical fish-catching mojo that no fish could resist its siren-esque call. A fly with material so secretive that it was said there existed only one source of it hidden high in the Andes of Patagonia on the testicles of a golden Guanaco. A fly pattern so powerful that any angler who should possess it was assured of 100 fish days and to whom women instinctively flock like the salmon of Capistrano.

    100 fish days?! Nonsense, you say? Well, kidding aside, the Yong Special was a very highly hyped, highly effective and subsequently highly controversial pattern originated by Andy Kim, a popular guide on the San Juan River in New Mexico.

    I know there's been a lot said, both good and bad, about Andy and his patterns but my experience comes first-hand from a few times I ran into him on the water. The first time I came across the famous "Yong", I was fishing the Green River in Utah about 20 years ago. As we meandered down the riverside trail back to our vehicle, I see this very animated guy landing a fish yelling "Another one on the Yong Special!!" (or something along those lines). We stood and watched as this fellow pulled fish after fish out of a very highly pressured stretch of water. His cohort, dressed in a long camouflage overcoat of some sort and who we later found out was aptly nick-named "Camo Man Jerry", would help him land the fish. We couldn't help but want to see this "Yong Special". Lucky for us, the next fish landed pushed upstream a ways and the Camo guy was nice enough to show us the pattern as he landed the fish.

    It took a few days to track down some people who knew what the pattern was and we ended up trying to duplicate it with mixed success. We ran into Andy and his buddy a couple more times over the years there on the Green and eventually learned the "secret" of the pattern (although to this day you'll find some people that claim the "secret" still isn't published). Either way, the general consensus is that the thread is a sewing thread from Coats and Clark called "Summer Brown". I've tied enough of these over the years to say that it's pretty dang close, if not the same material and anyway, I don't think the fish will tell.

    Long story short, this is a great little midge pattern, super-easy to tie and you'll enjoy the women of Capistrano to boot. Just be careful as you harvest from the Guanaco.

    Yong Special

    Hook: Daiichi 1110 #18 - #26 (I use a #22 in this video and the original pattern calls for a 1100, but I like the straight eye)
    Thread: Coats and Clark Summer Brown, UNI 8/0 Black
    Coated with Clear Cure Goo Hydro


    El Sculpito Dos - Updated!

    $
    0
    0

    A small streamer with a bad attitude

    The new and improved El Sculpito

    ***UPDATE***
    Shortly after writing this article, I started on tweaking the Sculpito into something that could be done with more readily available products.  The major change is the head which is now made of Mega Simi Seal. (Which we just ran out of... but will be back soon).  Check out the new video that we did on this little fish slayer.

    Buy El Sculpito HERE


    Version of El Sculpito
    It seems that articulated flies are all the rage right now, but there is definitively still a place in our hearts (and in fish lips)  for the one hook variety of streamers.  El Sculpito, like many of the patterns that I tie, is more of a concept than an exact recipe, and many of the materials can be added/subtracted to your liking.  When I started this concept, I wanted to make a pattern that wasn't too complex, and that would slither over rocks without hanging up.  I knew the tail was going to be rabbit, but the rest of the fly was kind of up in the air.  I used Arizona Mega Simi Seal (AZMSS) for the body (and eventually for the head too), because it has a wide variety of colors and isn't overburdened with flash.  By using AZMSS in the fly it eliminates the need to add flash of any kind and makes the bug even faster to tie.  Pectoral fins on sculpins are what really make or break them because the head and fins should have a wide, flat profile.  I had been tying some bass jigs and had a bunch of skirt material (sili legs) laying on the table, so on they went.  They looked really cool on the vise, but I didn't realize what they would do for the action of the fly in the water until I actually fished it (see below).  Then came the head...  Deer hair?  Nope, I want to keep it simple.  Wool?  Nope, even more simple.  I grabbed some Congo Hair and started cutting it up to make a super dubbing.  The dubbing consists of multiple colors of congo hair cut about 2 inches long and blended all up with combs and dog brushes (coffee grinders don't take to well to this stuff).  I attached the dubbing using a dubbing loop, and it actually brushed out really well and held its shape even in the water.  I have since moved to AZMSS dubbing for the head due to a wider array of colors available.  For the eyes, I have been using lead barbell eyes with CCG eyes super glued  to them, but if I want to simplify the pattern I add  Spirit River I-Balz eyes or Allen Fly Fishing barbell eyes.

    This Splake found it hard to resist


    Field tests have been completed, and not only did the fish munch it up, it swims great and slithers over rocks just as I suspected it would.  One of the coolest features was that the sili legs are somewhat buoyant, and make the back half of the fly kick up after it is stripped kind of like a jigging motion.  Many more variations to come.

    ~ Cheech


    Recipe:

    Hook: Gamakatsu B10 S or Allen Fly Fishing B200 (almost any streamer hook will work, but I get better hook-ups with these two.)
    Thread: Uni 6/0.  Bigger thread is important so I can cinch the dubbing loop between the eyes.
    Tail: Rabbit strip.  Normal size for smaller patterns, and magnum for larger patterns.
    Body: Arizona Mega Simi Seal, or Simi Seal dubbing.
    Pectoral fins: Skirt material from www.fishingskirts.com (seriously, you should check this site out.)
    Eyes: Lead eyes w/ CCG eyes glued on, Spirit River I-Balz, or Allen Fly Fishing barbell eyes w/eye.
    Head: Same as body, OR crazy Congo Hair  mix that is mentioned above.


    Shown in a smaller size with simi seal dubbing. (this is the one in the fish lip above.)

    Original pattern with I-Balz and Congo Hair

    Original pattern with I-Balz and Congo Hair

    and the video...


    Viewing all 629 articles
    Browse latest View live